Pages

Receive More Updates

Date: - Time:
SMS: Send FOLLOW BALLOWAP To 40404 For Free - EMAIL: azeezbello8@gmail.com

Sunday, 6 July 2014

How To Change YouTube Channel URL : 2014 Update

Earlier today, I shared a tutorial on how to create multiple YouTube channels on one Google account. If you create a channel by following the steps in that tutorial, you'll have a default unique channel URL that looks something like this:


   http://www.youtube.com/channel/UCqYsQpcOL_oddDxIpAa9YZg


You can see that it is quite complicated and hard to remember. If you'd like a simpler URL, you can add a custom URL to your Channel. To add a custom URL, follow me through the steps below:
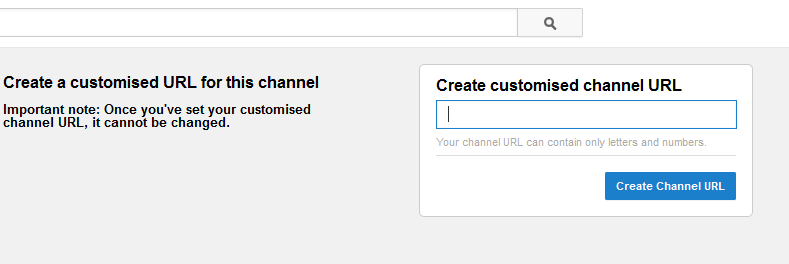


change youtube username url


  •  Make sure you're signed into YouTube, and go to your advanced account settings here.

  •  Under Channel Settings, click Create customised URL.

  •  You'll then be able to choose the URL you want. Note that you can't choose a URL that someone's already chosen. Once you've chosen your custom URL, it will appear like this:


http://www.youtube.com/user/CUSTOMURL


Once your channel has a custom URL, it can't be changed. Choose carefully!


NOTE:


If you had or have a traditional YouTube username on your channel, then you unfortunately can't add a custom URL or change your URL. Your channel already has a URL associated with your old username, like the following:


   http://www.youtube.com/user/USERNAME

I hope this helps.


Kindly follow OgbongeBlog Videos at : https://www.youtube.com/user/ogbongeblogvideos


How To Have Multiple YouTube Channels On One Account

Before now, promoting all my sites on YouTube was very stressful. Imagine having to create a separate Google account for every YouTube channel for my sites; which also means I have to sign in and sign out of my Google accounts for me to switch channels.


Now that YouTube integrates with Google+, you no longer have to go through such stress. You can now create up to 50 YouTube channels under one Google account and you can now use YouTube Channel switcher to switch from one channel to another without signing out of your Google account.


For you to make multiple YouTube channels on one account, all you just need to do is to ensure you have created Google+ page for all the channels you want to manage with a single Google account; and of course you must use the single Google account to create all the Google+ pages.


Once you've created the Google+ pages, sign in to www.youtube.com with the Google account you want to use to manage all the channels.


Thereafter, go to https://www.youtube.com/channel_switcher


Right there, click on the Google+ page you want to use as YouTube Channel (Under "other Options")


Yiutube create channel


Clicking on it should bring up a popup window similar to the screenshot below:


Click "OK"


You will see another pop up similar to the one below:


Click "OK"


Wait for some seconds.


Once successful, you might see a prompt to select the channel you want to use. Select as desired.


That's all.


The URL of the new channel will be long. I will show you how to shorten it to something very simple in my next post.


NOTE:


==> You can always switch from one channel to another without signing out, using the YouTube Channel Switcher.


==> If you want to add admins to the channels, add them as managers to the Google+ page used for creating the channel.


==> If you want to change the name and icon of the YouTube channels, you have to change them from the Google+ pages. This is because, once you’ve connected your YouTube channel with a Google+ page or profile: the name on your connected Google+ page or profile becomes your YouTube channel name everywhere (on videos, comments, your channel title, etc) and your Google+ page or profile photo becomes your YouTube channel icon. Google+ supports changing your name up to three times in two years. Please keep this in mind if you decide to edit your name. 


You can create a Google+ page here.


Recommended: How To Add And Remove Managers From Google+ Page.


Cheers!

Root Any Karbonn Android Mobile Easy Steps | Karbonn Mobile Rooting Guide.


Disclaimer:

       "If you are rooting your phone using this guide then you are responsible for anything you do to your device.Success with this   application void's warranty of your device."

Precaution Before Proceeding:

1. Charge your phone upto  20%
2. Backup data.

Framaroot - One Click Root :
   
        Framaroot is the root for “rooting beginners” and those who want to keep as close to stock as possible. Framaroot is the easiest tool to root your device for beginners.

Installation :
  1. Download Framaroot from Below Given link  : 

  2.   Install it with a file explorer or directly from your internet browser, if android  warn you about security  risk, say ' OK ' and check Unknown sources to allow  install   of applications  outside of Play Store.

After Installation :
   
  1. Open Framaroot, for root select Install SuperSU and Click on  first option
    for unroot select Unroot and Click on first option.

  2. Message Popup :
    "Success :)  ... Superuser and su binary installed. You have to reboot your device"
  
  3. Reboot your device and you are done !! You have Successfully rooted your karboon android device.


FAQ :

What can I do when the result is Half-success ?
You see this message when the /system partition on your device is a read-only filesystem (eg: SquashFS). To handle this case Framaroot try to use a trick by adding "ro.kernel.qemu=1" in file /data/local.prop. To test if this trick work you have to reboot your device and connect to it with adb shell. Once connected type the "id" command to see if you are root.
If you are not root, your last chance is to select "Execute script" action and put your own shell script commands in /sdcard/custom (use at your own risk, all commands are executed with root privileges).


Special Thanks : XDA-Developers, Manish Gusain.

Friday, 4 July 2014

How To Set Up CPM Bidding in Google Adwords

Yesterday, I decided to experiment with the CPM bidding instead of the CPC so as to test which one will work better for the promotion of my bulk SMS site on Google display partner sites using Google Adwords.


Types of adwords campaigns


I opted for the "Search Network with Display Select" option when setting up the campaign. When I got to the point where I will have to select my bidding strategy, I didn't see any option to make the campaign focus on impressions (CPM bidding). This baffled me.


I decided to check the Adwords forum for tips on how to set up CPM bidding and fortunately, I stumbled on a thread which explains how to create a campaign that focuses on impressions using Google Adwords.


According to the thread, you can only setup CPM bidding when you have chosen the "Display Network Only" option when setting up your campaign. Selecting this option, automatically enables the CPM bidding option via the campaign settings tab, thereby allowing you to choose whether to focus on clicks (CPC) or impressions (CPM).


Adwords CPM bidding


With CPM bidding, you bid for your ad based on how often it appears on the Google Display Network. You set the max amount you want to pay for 1000 impressions, whether your ads are clicked or not.


This bidding type is recommended to businesses that just want to get their name in front of more people, i.e businesses that care more about ad views than about clicks and visits to their websites.

Thursday, 3 July 2014

Campaigns Feature In Blogger Lets You Advertise Your Blog With Adwords

A new feature "Campaigns", which can help your blog get more visibility has been added to the Blogger dashboard. A friend tagged me in a screenshot of the new feature yesterday on Facebook and I signed in to my Blogger account immediately to confirm it.


Unfortunately, as at the time of publishing this, I'm finding it difficult to use the Blogger "campaigns" because I keep seeing "This email address already has access to an AdWords account and cannot be reused." everytime I try using the new feature with my blog's email address.


If you click on the "Campaigns" tab in your Blogger dashboard, you will be taken to a page on "Google Adwords" site where you can create your account and your first ad campaign in just a few steps.


You will be able to create an ad that tells people about your blog, after which you will choose the search terms that will make your ad show in the Google search results.


If the words people type in Google match your keywords, your ad can appear above or next to the search results and people will see your blog on Google.


You get more readers when they click your ad and go to your blog.


Is it Free?


NO. You only pay when they click on your ad.


How Can I Pay for Blogger Campaigns?


If you are a Nigerian, you can pay for the ads using your Access Bank Visa card, UBA Africard and GTB Naira Mastercard.


Add the card to your Adwords account and use it to load any amount you want to spend into the Adwords account. When people click on your ad, the charges will be deducted from the balance in your Adwords account.


Once you exhaust your balance, the ad will stop running and Google will alert you to add more funds to your account if you want your ad to keep running.


Whether you're looking to bring in new readers or keep them coming back for more, you can give it a try, may be starting with $10.


What's your take on this?

Wednesday, 2 July 2014

2014 Promo: Get .US domain for $0.98 at Namecheap

This July, Namecheap.com will be offering one year .US registrations with private email for $0.98.


.US is “America’s Address.” It is the official country code top-level domain (ccTLD) for the United States within the global domain name system (DNS).


All U.S. residents, government entities, public service organizations, and businesses can establish an American identity on the Internet with the America’s address. (e.g. mycompany.us).


Why get a .US domain?


It’s a great way to assert your American identity, establish your US business presence, and so much more.


If you are a business owner, you can use .US domain name to promote your business as American company to inspire consumer confidence and to encourage consumers to “buy American.”


.US is also widely recognized by search engines as being aligned with American websites, so ranking on search engines is just a bit easier.


To get your .us domain name while the offer lasts, head over to www.namecheap.com now!


Sign up and grab the offer asap.


NB: Registrants of .US domains must be United States citizens, residents, or organizations, or a foreign entity with a presence in the United States. You can find more information about usTLD Nexus Requirements here.

Tuesday, 1 July 2014

How To Set Custom Redirects in Blogger

Over time, most blogs may go through many changes, like posts being added or deleted. In some occasions, you don't want people to get 404 messages when they surf to posts or pages that don't exist on your blog and instead, make all requests to a specific link to be redirected to another page. One of the best way to avoid broken links and keep your traffic flowing in the right direction is setting custom redirects via the Blogger Custom Redirects tool.

In this post, we will see how to set custom redirects for Blogger posts and redirect an old URL to a new URL. But before redirecting any URL, you must know that there are two types of redirects:

A 302 redirect means that the page has moved temporarily. This redirect doesn't pass the URL value to the new location and instead, it will take the visitors to an appropriate location so that you aren't showing them a 404 page not found, or an error page. You can use a 302 redirect for coming soon pages or maintenance pages.

A 301 redirect means that a page has moved permanently to a new location. Use the 301 redirect when you deleted or changed the URL of your post. In most instances, the 301 redirects are always recommended for SEO because they will pass link juice (ranking power) to the redirected page and visitors will also benefit from this. However, 301s aren't suitable when you change your custom-domain, because it only supports redirection within the same blog, not to an external URL.

Now that we've established which is which, let's see how to set custom redirects for Blogger posts.

How to redirect old URL to new URL in Blogger


Step 1. Login to you Blogger account with email and password.

Step 2. Click on your blog > go to Settings \ Search Preferences and click "Edit" next to "Custom Redirects."

search preferences, custom redirects, 301, 302 redirect

Step 3. Enter the old URL in the "From" field, and the new URL in the "To" field including the forward slash "/" (see the screenshot below)

custom redirects, redirect old url to new url

Note: Do not enter the full URL in these fields. Just omit the address of your blog and type only the rest of the link. Again, this works only if you wish to redirect within your blogger blog and not to any external links.

Step 4. Click the "Save" link (1) and the "Save changes" button (2), and you're done!

blogger custom redirects
blogger custom redirect

If you want to redirect more pages, just click the "New redirect" button.

PLACE YOUR ADS HERE