Pages

Receive More Updates

Date: - Time:
SMS: Send FOLLOW BALLOWAP To 40404 For Free - EMAIL: azeezbello8@gmail.com

Thursday, 2 July 2015

Transfer Wordpress From One Host to Another Using Softaculous

Yesterday, I stumbled on a guide on Softaculous website which explains how to restore a backup on a new server.

I tried the trick and it worked for me in moving a WordPress blog of a client from a webhosting provider to my reseller hosting account (different webhost). I didn't use any WordPress backup & restore plugin, no Filezilla and I didn't change any database settings. In fact, I didn't use phpMyAdmin at all.


This was possible because the cPanel username for the blog is the same on both servers.

While creating the account for the site on my reseller hosting account, I ensured I used the same cPanel username on the old server for the site, to avoid issues since I'm aware that the database name will have the cPanel username as the prefix and the path to the domain will also depend on the cPanel username.

This is the same reason why Softaculous states clearly in the guide that the backup will work fine only if the domain name and the path to the domain is the same as installation on old server.

Below are the steps taken:

==> Change the nameservers of the domain name to the nameservers of the new server
==> Back up my installation (directory and database) on the old server using softaculous
==> Download the backup to my PC
==> Create "Softaculous backup" folder on the new server
==> Upload the backup to the "Softaculous backup" folder created on the new server
==> Restore the back up


That's all.

After changing the nameservers, I intentionally waited for 24hours before restoring the backup so as to monitor the propagation of the new nameservers. So, once I discovered that the site is offline due to change in nameservers, I restored the backup with Softaculous and the site ws back online instantly!

So, follow the steps in the guide if you can ensure that the cPanel username on the new and old servers will be the same.

If you don't understand the "Step 5" in the guide, you can read "how to create softaculous backups folder in cPanel"

Have fun!

Monday, 29 June 2015

How To Disable WP.me Shortlinks On WordPress

Shortlinks are a quick way to get short and simple links to your posts and pages. These are perfect for use on Twitter, Facebook, and over SMS where every character counts.


If you have the Jetpack plugin installed on your WordPress blog and the “WP.me Shortlinks” module is enabled, WP.me shortlinks will be generated for each one of your posts, pages, and attachment pages by default.

Hence, whenever you edit an existing post or page and click on “Get Shortlink” button, you will get a shortlink that includes the wp.me domain, whose functionality is similar to other URL shortening services.


jetpack url shortening feature


If you prefer a shortlink that contains your domain name and not the WP.me url, then you have to deactivate the “WP.me Shortlinks” module via JetPack settings.

Once deactivated, you will be reverted back to use the default WordPress URL shortening feature. What the default WordPress URL shortener does is simply replace your full permalink with the post or page ID.

Note that either way though, using the default WordPress URL shortener or the Jetpack powered WP.me option, you do not get the benefits of tracking or custom branding that some URL shortening services offer.

Kudos to +Desmond Nwosu  for the tip.

Sunday, 14 June 2015

How To Restore JetPack Custom CSS After Deactivating The Plugin

I checked one of my WordPress sites few minutes ago only to discover that the styling have been messed up. The header, footer, ads etc were all scattered.  I thought about what might have caused it and within few seconds I realized it was because I have deactivated the JetPack plugin.


I used the JetPack Custom CSS Editor to customize the appearance of the site without the need to create a child theme or worry about theme updates overwriting my customizations. So, deactivating the plugin simply removed the customizations.


Immediately, I tried reactivating the plugin but couldn't get it to work. It failed to connect to wordpress.com after reactivation. Hence, I couldn't access the Custom CSS Editor. I searched google to see if I can access it via CPanel but read somewhere that I can't except I browse through my database.


Instead of going through that stress, I tried putting JetPack into development mode using the Unplug JetPack plugin and guess what, it worked! All Customizations were restored!


While in the development mode, I was able to access the JetPack "Edit CSS" via "Appearance". I copied the custom css, added it directly to my theme file and also saved it to my dropbox as backup.


JetPack Unable To Connect To WordPress.com? UnPlug It!

I deactivated the JetPack plugin on one of my WordPress sites only to find it difficult to use after reactivating it. It keeps throwing error everytime I click on the "Connect to WordPress'' button i.e the jetpack plugin cannot connect to wordpress.com.


jetpack wordpress


I deactivated all plugins and reactivated ONLY the jetpack plugin. Yet the problem was not resolved. While I await feedback from my host and also from JetPack support, I decided to unplug it and it worked.  Thereafter, I was able to access the JetPack custom css without connecting JetPack to wordpress.com.


So, How do I Unplug JetPack Plugin for WordPress?


Simply install the UnPlug JetPack plugin created by WordPress developer Tanner Moushey.


The Unplug Jetpack plugin essentially puts Jetpack into development mode. With the plugin activated, you won’t be required to connect to WordPress.com unless you need to use Site stats, Publicize, Related Posts, etc.


It allows you to use jetPack features that do not require a connection to WordPress.com servers. So, if you don’t see the module you’re looking for among those listed on the JetPack page in your dashboard, that means that it likely requires a WordPress.com connection in order to use it.


So, try it if JetPack can't connect to WordPress.

Saturday, 6 June 2015

Post Views Counter WordPress Plugin Displays Stats on Post Pages and Admin Backend

In this post, I am sharing with you, a WordPress plugin that can display how many times a post, page or custom post type had been viewed in a simple, fast and reliable way. The plugin can display the stats on your WordPress Blog and also in the admin dashboard.


You can download the Post Views Counter WordPress Plugin here.


It simply allows you to hide the post views counter from selected type of visitors eg logged in users or by user roles. You can select where you would like to display the post views counter eg below/after posts or manually using a shortcode.

If you are using any of the caching plugins, it allows you to select the "Javascript" option for greater flexibility. You can select the type of visitors to be excluded from post views count eg robots and you can even enter the IP addresses to be excluded from post views count.

It's really a better alternative to the WP-PostViews plugin and even supports one-click data import from WP-PostViews plugin.

Give it a try and share your experience.

Kindly let me know if you there are WordPress post views counter you can recommend.

Pls, share this with friends!

Thursday, 4 June 2015

How To Add Default Featured Image To WordPress Posts and Categories

If you publish a post without settings a featured image, an empty box will be displayed next to the post if your WordPress theme supports featured image and has no fallback option.


If you won't want the empty box to be displayed, then you need to set a default fallback image when no featured image is found. This can also be very useful when you forget to set a featured image for your post.


In this article, I will show you how to add a default featured image in WordPress using a plugin.


First thing you need to do is install and activate the Default Featured Image plugin.


Once installed and activated, the plugin adds an option under Settings » Media to choose a default image.


Upload your default image and save settings. This image could be any image, for example an image of your site logo on a plain background.


That’s all.


Now, when your theme looks for a featured image and does not find one, it will display the default image.


If you would like to set a fallback Featured Image based on post category, using this same plugin, read the conditional featured images tutorial.


I hope this helps.

Tuesday, 2 June 2015

How To Enable Contact Form 7 Acceptance Checkbox Error Message

If you're using Contact form 7 plugin on your WordPress-powered site and have integrated the acceptance " form tag but no error message displays whenever a user fails to check the box, this tutorial is for you.


By default, due to JavaScript magic, users won’t be able to press the submit button without first checking the box to accept your terms. Clicking the "Send" button won't work and no error message will be displayed. This is simply because an acceptance checkbox is a different mechanism than general input validation, and it runs after all validation succeeds.

This behaviour of the acceptance checkbox might confuse some form submitters. Hence, it's highly recommended that you set it up in a way that will let the users know why the message won't fly.

So, How Do I Make It Work Like Other Validation?

==> Sign in to your WordPress dashboard
==> Go to "Contacts"
==> Click "edit" next to the contact form you want to modify
==> Add this line below, to the Additional Settings section:


acceptance_as_validation: on


==> Click "Save".

That's all.

Try using your form without checking the acceptance box. It should display something similar to the screenshot below:


I hope this helps.

Recommended: How I Use Free Contact Form 7 Plugin For WordPress Blogs

Saturday, 16 May 2015

Spot.IM Social Network Integration Widget for Blogger and WordPress Blogs

Spot.IM is the creator of the first “everywhere” social network, empowering website owners and publishers to turn their websites into a social network driven by their own content where members can chat, share links, photos etc.


Within 5 minutes, you can host on your blog, a vivid, live community with almost zero effort just by integrating the spot.im widget.


Once you successfully create your spot and integrate your blog with Spot.im, the widget will appear at the corner of your site, via which your blog readers can easily join, start talking about your site content and get to know each other in live conversation. Two users can also have private conversation by making use of the "directSpot" feature.


Once you’ve created a Spot you are automatically assigned as the Spot’s host. As the host of the community, you can delete a user’s message or kick a user out of your spot. Spot.IM also provides the option of blocking all external links (links not leading to pages on your site) on your Spot.


Users can  also report a message or another user, after 4 reports the message will be automatically deleted or the user will be automatically kicked.


Spot.im app for Android and iOS allows spot hosts to converse with their users on the go. So, if you really want to keep up with happenings in your spot, ensure you download and make use of the spot.im mobile app.


How To Integrate Spot.im With WordPress and Blogger Blog


To get started, you need to go to www.spot.im, click on the Get Spot.IM now button  and sign in to Spot.IM via your preferred social network to create a user profile.


Thereafter, choose your Spot’s name and design it according to the branding of your website. With a logo and color to match, a category that best describes your Spot and so on.


Once completed, you will be presented with a code you can embed on your site.


For blogspot users, copy and paste the code in HTML/Javascript gadget and you're good to go.


For WordPress users, install the spot.im WordPress plugin. You will have to enter your spot id in the settings of the installed plugin. You will get the id by clicking on the "For Wordpress users" button on your spot management dashboard.


Once it's live on your site, you can edit and moderate your spot via your spot management dashboard. You can also make use of the Spot.im app for Android and iOS  to converse with their users on the go.


You can see sample spot live at : www.mobilitaria.com


What's your take on this?

Saturday, 9 May 2015

Want to Add Free Notification Bar at The Top Of Your Website For eMail Opt-Ins? Try ManyContacts

ManyContacts is a simple and efficient drop-down website notification bar that sits at the top of your website, making it easy for your site visitors to take action on your website. If you want to generate more leads or grow your email list, ManyContacts is what you need. It is a product of online marketing experts from Woorank.


By making use of ManyContacts bar, you can offer a giveaway - such as an ebook, coupon code, a test, a course - without creating extra landing pages as it allows you to add a link to a file or offer in your "Thank You" message.


manycontacts website notification bar


People that have used your ManyContacts bar will be added to a list in your Contacts Manager for later reference. Leads generated are data enriched, qualified and displayed conveniently in the Contacts Manager. When you gain a new contact an email notification will also be sent to you to facilitate a prompt follow-up.


The form closes for everyone that previously filled the form and it can be closed manually by everyone.


Adding ManyContacts bar to your site is easy. First, create an account and start customizing your bar. When you are happy with your bar, you will get a piece of notification bar html code that you will need to paste in your web page’s source code just before the </body> tag.


It works on any CMS as long as you have access to your source code. There are also ManyContacts bar plugins for Wordpress and Joomla.


I've added it to one of my sites and integrated it with madmimi. So, if anyone fills the form on my site, such contact will be automatically added to an email list on my madmimi account. It also integrates with mailchimp.


It is FREE and you can create as many as you want and paste the code on each page that you want to see the bar appear.


Get it at : www.manycontacts.com


Do you know other tools for adding a notification bar for email opt-ins and promos ??

Wednesday, 6 May 2015

500 Internal Server Error in WordPress : Fixed

I experienced the "500 Internal Server Error" earlier today on one of my sites powered by WordPress. In fact all addon-domains were also affected.


Instead of checking through the server logs for what might have caused the error, I contacted my host for support. The rep requested for my cPanel login details and within few minutes, he was able to detect and fix the problem.


He told me that the .htaccess file was misconfigured, which surprised me because I've not tampered with the file for a very long time. I assumed it might have been caused by the recent automatic upgrade of my WordPress installation.

So, if you're experiencing similar error especially after updating your WordPress, you might consider checking the .htaccess file config or request your host fix it for you.

Tuesday, 28 April 2015

Download Uncle Hummer - Responsive WordPress Building Theme

Uncle Hummer - Responsive WordPress Building Theme is one of the Envato Free files for the month (April 2015). This means you can download it for free until the end of the month after which you will have to pay $43 to buy it at Themeforest.


It is modern and clean type WordPress Theme with great typography. This Theme contains latest features to give your site a trendy look. It is easy to customize and enables you to create lots of positions for short-codes and plugins.


free responsive wordpress theme


Uncle-Hummer has been made fully responsive. Uncle-Hummer is utilize for business, portfolio, product, Ship builders, Contraction, Building corporate and website.


Features included in Uncle-Hummer Responsive WordPress Theme


• 100% Validate Code by W3 validator.

• Included Visual Composer page builder

• Included Slider Revolution Responsive WordPress Plugin

• Included WPML Multiple language setup

• Multiple slide-shows included.

• Latest HTML 5, CSS3 Techniques.

• Unlimited Google fonts

• Font Awesome icon integration.

• 3 Home version Blog version

• 4 Blog version

• SEO friendly coded

• 20+ short-codes

• Drag and drop Layout builder

• Video Background

• Fully Responsive.

• User friendly Theme backend.

• Detailed Documentation.

• And surely much more…..............


You can download Uncle Hummer - Responsive WordPress theme here.


Demo and Documentation also available via the link.


If you stumble on this after it's no linger available as free download, you can get it via the downloads section of my Facebook group.


Please, SHARE with friends.

Saturday, 18 April 2015

Codes for Google+, Twitter and Facebook Follow Buttons

Adding the Google+, Twitter and Facebook follow buttons to your Blogger or WordPress blog will make it easy for your blog visitors to easily follow you on those social networks without having to leave your blog.


The Facebook Follow button lets people subscribe to your public updates on Facebook. It is not for Facebook pages.


Below is what the buttons will look like on your blog:


If you want to add the buttons to your blog, copy the code below in HTML/Javacript gadget (if Blogger) or a text widget (if WordPress).


<div class="fb-follow"
data-href="https://www.facebook.com/jideogunsanya1"
data-colorscheme="light" data-layout="button_count"
data-show-faces="false"></div> <p>

                                       
<a href="https://twitter.com/jide_ogunsanya"
class="twitter-follow-button" data-show-screen-name="false">Follow
@jide_ogunsanya</a></p> <p>

<div
class='g-follow' data-annotation='bubble' data-height='24'
data-href='//plus.google.com/100475476355251995300'
data-rel='author'/>

 </div></p>


Replace the Facebook username, Twitter handle and Google+ URL with yours.


NB
: If you've not added the Facebook SDK and Twitter script on your blog, the buttons might not display.


I hope this works for you. 

Wednesday, 8 April 2015

Download DW One Page Retro Responsive WordPress Theme Free

Creative Market is allowing members to download for FREE, the DW One Page Retro - Responsive WordPress Theme. You will only be able to download it for FREE this week, after which you will have to pay $49 to buy it at the website.


DW Page Retro keeps your contents only in one page using sliders, infinite scrolling, popups and combination with other content presentation methods. Fully responsive and easy installation. Perfect for creating websites for agencies, SMEs etc


You can download it at Creative market website here.


Alternatively, if you want me to send it to your email or you're reading this when the theme is no longer available for free, you can get it by subscribing to my WordPress Freebies List.


Once you subscribe, you will receive via email, the direct download link of where I uploaded the file online. In the same email. you will also get the link to the online guide which will teach you how to use the theme to set up a site. 


You can subscribe to the list here.


I will set up a site using the theme and I will share the tips etc with those that subscribe to the list and also the members of my personal Facebook group.


Have fun and Kindly share with Friends!

Monday, 6 April 2015

How I Add Facebook Comment Form To WordPress Blog Without Plugin

Placing Facebook comment form on WordPress blogs is possible without having to install any plugin. I added the Facebook comment form under the blog posts at mobilitaria.com without using any plugin. You too can. Just follow me through the steps below.


For you to add the Facebook comment form to your blog, you will need the Facebook Application ID of the blog. If you know the ID, copy it somewhere and if you don't know it you can check the Facebook apps page.


You can read: How To Get Facebook Application ID to generate one for your blog.


Next is to sign in to your WordPress dashboard and go to "Appearance" > "Editor"


==> Find Header (header.php) on the sidebar and click on it.


==> Carefully find the <body tag below the closing <head tag

==> Paste the code below, directly below the <body tag


<div id="fb-root"></div>

<script>(function(d, s, id) {

var js, fjs = d.getElementsByTagName(s)[0];

if (d.getElementById(id)) return;

js = d.createElement(s); js.id = id;

js.src = "//connect.facebook.net/en_US/sdk.js#xfbml=1&appId=1569785879914041&version=v2.3";

fjs.parentNode.insertBefore(js, fjs);

}(document, 'script', 'facebook-jssdk'));</script>


==> Carefully replace the highlighted appID with the ID of your blog

==> Click "Update File" button


==> Find Comments (comments.php) on the sidebar and click on it.


==> Paste the code below at the top as seen in the screenshot below the code:


<br>

<div style="text-align: center;">

<div class="fb-comments" data-href="<?php the_permalink() ?>" data-num-posts="8" ></div>

</div>

<br/>


==> Click "Update File" button.


View one of your blog posts and you should see the Facebook comment form displayed.


I hope it works for you.


NB: Mobilitaria uses Jarida theme as at the time of publishing this post. Although, I have restyled it to my taste, you can get the Jarida theme here


Recommended: How To Add Facebook Comment Form To Blogger.


Tuesday, 24 March 2015

How To Hide Comments in WordPress Dashboard From Non-Admin Users

If you have multiple authors on your WordPress site and you don't want Authors, Editors, and Contributors to view ANY comment information(s) at all via the WordPress dashboard, you can get this done by using the Adminimize plugin for WordPress. I've successfully implemented this on one of my WordPress blogs.


Although you can do a lot with the plugin as explained in a post at WpBeginner, but in this post, I am sharing with you, how to hide comments in WordPress dashboard from non-admin users. The comments menu will be hidden as well as comments info displayed on the "At a Glance" section of the dashboard.

First thing you need to do is install and activate the Adminimize plugin. Upon activation, visit Setting » Adminimize to configure the plugin settings as explained below:


adminimize plugin for wordpress


1. Click on "Menu Options". Disable "Comments 1" for Authors, Editors, and Contributors. Click "Update Options". This will hide the "Comments" menu item on the dashboard.

2. Scroll up to the main options and click on "Dashboard Options". Disable "At a Glance" and "Activity" for Authors, Editors, and Contributors. Click "Update Options". These will hide the comments info on the dashboard.


wordpress plugin settings


That's all.

You can instantly confirm the changes if you've installed User Switching plugin. The plugin simply lets you switch between user accounts in WordPress.

I hope this helps.

Tuesday, 17 March 2015

Awesome Sidebar Feedburner Email Subscription Form For Blogger and Wordpress Blogs

While googling for awesome opt-in-forms yesterday, I stumbled on an attractive Feedburner Email Subscription Form. I copied its code from the blog post, made some changes to the code and embedded it on the sidebar of my blog. I'm loving it and I decided to share it with you.


feedburner email subscription form


You can place the Feedburner Email Subscription Form on the sidebar of your Blogger and Wordpress blogs. All you need to do is to edit the code below, copy and paste it in HTML/Javascript gadget of a Blogger blog or Text widget of a Wordpress blog.


<link href="http://fonts.googleapis.com/css?family=Open+Sans:300italic,400italic,600italic,400,300,600,700" rel="stylesheet" type="text/css"></link>

<div id="Subscription">

<div class="heading">

Sign Up in Seconds</div>

Sign up with your email address to receive latest updates straight in your inbox.

<div class="emailsub">

<form action="http://feedburner.google.com/fb/a/mailverify" method="post" onsubmit="window.open('http://feedburner.google.com/fb/a/mailverify? uri=secretinfos-ogbongeblog', 'popupwindow', 'scrollbars=yes,width=550,height=520');return true" target="popupwindow">

<input name="email" placeholder="Your Email" type="text" /><input name="uri" type="hidden" value="SecretInfos-Ogbongeblog" /><input name="loc" type="hidden" value="en_US" /><input class="button" type="submit" value="Sign Up Now!" />

</form>

</div>

</div>

<style type="text/css">

#Subscription { width: 300px; height: 200px; border: 1px solid #51C0F9; border-radius: 5px 5px 0px 0px; }

#Subscription .heading { padding: 10px 20px; line-height: 20px; font-size: 20px; font-weight: 600; font-family: open sans; color: rgb(38, 38, 38); text-align: center; text-shadow: 0px 1px rgba(255, 255, 255, 0.75); background: none repeat scroll 0% 0% rgb(81, 192, 249); }

#Subscription p { font-family: open sans; font-size: 13px; color: rgb(12, 12, 12); line-height: 25px; padding: 5px 15px 0 15px; margin: 0; }

#Subscription .emailsub { padding: 0px 20px 10px 20px; }

#Subscription .emailsub input { color: rgb(170, 170, 170); padding: 10px; margin-top: 10px; font-size: 15px; font-family: open sans; width: 92%; border: 1px solid #ccc; border-bottom: 2px solid #ccc; border-radius: 5px; transition:border 0.15s linear 0s, box-shadow 0.15s linear 0s, color 0.15s linear 0s; }

#Subscription .emailsub input:focus { border-color:#F4836A; outline: none; box-shadow: 0 0 2px 1px #F4836A; }

#Subscription .emailsub .button { background: #F4836A; color: white!important; border:none; outline: none; border-bottom: 3px solid #B3614E; transition:background .4s linear; width: 90%; margin-right: 5%; margin-left: 5%; font-weight: 600; cursor:pointer; }

#Subscription .emailsub .button:hover{background: #DD7761;}

#credit {margin: -5px 0 0px 15px!important;text-shadow:none; opacity:.6;}

</style>


You can customize as desired if you have basic knowledge of html and css.


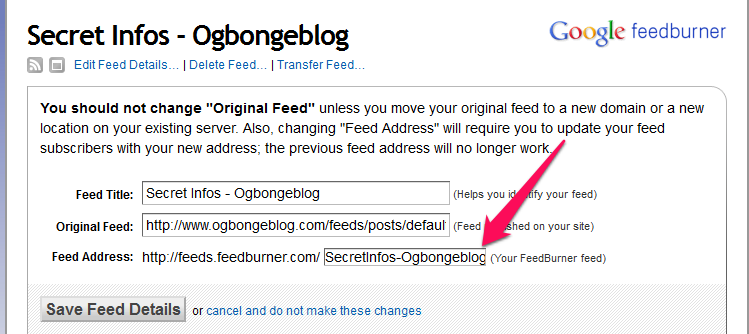
Ensure you carefully REPLACE the "secretinfos-ogbongeblog" in the code with your blog feedburner ID. You can get it via feedburner.com. Click on your feed, then click on "edit feed details". It will be displayed as seen in the screenshot below:


Do you like the email subscription form?

Wednesday, 4 February 2015

How To Add Adsense Into Wordpress Blog Posts

Adding adsense to wordpress post is possible with most of the free ad management plugins for WordPress out there. I've tried the official Adsense plugin for Wordpress as well as the Quick Adsense plugin but my favorite for now is the "Insert Post Ads" plugin by the guys at wpbeginner.com.


I ditched QuickAdsense plugin recently when I discovered that I couldn't save changes to my ad codes and placement. The plugin was misbehaving and there wasn't any update to fix the bug. The Adsense plugin on the other hand, as at the time of publishing this post doesn't give me the freedom to set the size of ads I want in my my Wordpress post.


With the "Insert Post Ads" plugin, all I need to do is to install it, paste my code and select if the ad unit should appear after the first or second paragraph. I can also set it to display the Adsense ad unit at the top or end of Wordpress blog post. You can also easily align your ad to appear in the center, left or right using css. Using the plugin to insert adsense into wordpress also makes it very easy for me to track performance of each ad unit in my Adsense dashboard.


adsense pugin for wordpress


So, if you are looking for how to paste adsense code in wordpress, you can try the plugin.


How To Use "Insert Post Ads" Plugin for WordPress


==> Simply install and activate the plugin : Insert Post Ads.

==> Upon activation, the plugin will add a new menu item called Post Adverts.

==> Go to : www.google.com/adsense to get your ad code.


==> Click on Post Adverts » Add New. On the next screen, simply add the name of your ad for identification purposes, paste the ad code itself, and select the paragraph you want to display the ad code after. you can also select "Before content" or "After content"


==> Once done simply click publish.

==> Go to Post Adverts » Settings to select which post types you want to show your ads on such as posts, pages, and custom post types. Very Important!


==> View your posts and your ads should now be appearing in inside your WordPress blog posts.


NB: If you want the ad to appear in the middle, add <center> at the top of your ad code and add  </center> at the end of the ad code.


How To Add Adsense to WordPress Sidebar


==> Go to 'Appearance" > "Widgets"

==> Drag a text gadget to the sidebar column

==> Copy and paste your adsense add code in text gadget.

==> Save.


How To Add Adsense To Wordpress Header


==> Install official Adsense plugin.

==> Connect I to your Adsense account and use it to place your ad anywhere the pointer displays in your header area.


I hope this helps.


Which plugin do you use for adding adsense to wordpress post ?


Recommended: How to add adsense inside Blogger posts

Friday, 26 December 2014

Manage Your Jetpack Sites from a Single Dashboard on WordPress.com

With the release of Jetpack 3.3 this earlier this month, the automattic team has announced the launch of new dashboard from which you can manage all your WordPress sites — both your WordPress.com and your Jetpack-connected sites, regardless of where they’re hosted.


With the new centralized Site Management feature, you can update plugins, set plugins to automatically update, and activate or deactivate plugins on a per-site basis or in bulk. You can also make a new post to any of your blogs from a single page without having to login and post from each site individually. Also, this new interface was designed and built to provide a great user experience whether you’re on your computer, tablet, or mobile device.


To enable these new features make sure you are running Jetpack 3.3 or above. If you’ve used Jetpack before, there will be an opt-in banner on your WordPress dashboard.


Once you opted into the site management features, ensure the JSON API feature is activated via Jetpack settings and the Allow remote actions setting is checked.


If you’re new to using Jetpack plugin for WordPress, you will automatically be opted-in when you activate and connect Jetpack to your WordPress.com account.


After you might have enabled site management for your Jetpack site, you can update and manage your plugins, see your site’s stats, and even post to your Jetpack site all from one page.


Visit your My Sites page at: https://wordpress.com/sites (while logged into your WordPress.com user account) to see all of your WordPress.com and Jetpack connected sites.


You can read more on how to manage your Jetpack sites and plugins from WordPress.com here.


Are you using the WordPress site management feature? If Yes, kindly share your experience.

Sunday, 9 November 2014

Instagram Widget For Wordpress With A Follow Button

If you own a WordPress blog and would love to display your Instagram photos directly on your posts,pages and sidebar, then you need to install the free Simply Instagram Plugin by Rolly G. Bueno Jr.


The plugin allows users to embed photos from their Instagram accounts into their Wordpress site using a widget or into content area, using a shortcode. Users can also display their Instagram profile pricture, a follow button that links to their Instagram account, number of photos uploaded, number of followers, thumbnails of followers etc


You can see it embedded in a page at : www.jideweb.com/instagram and below is a screenshot of the widget on the sidebar


How To Use Simply Instagram Plugin for WordPress


To get started, you need to download Simply Instagram For WordPress.


To Install, login to WordPress and click on ‘Plugins’, then ‘Add New’ and search for Simply Instagram.


Once installed and activated, the plugin will show you a notification, asking you to authorize it to access to your Instagram account. Click on the authorize link.


Thereafter, you will see a login button next to Instagram logo. Click on login button, and it will take you to Instagram website where you can provide your username and password to give Simply Instagram access to your account.


After the authorization you will be redirected back to Simply Instagram settings page in your WordPress site. Right there, you can generate different shortcodes, which you can copy and paste in a Post or Page, for you to display your instagram photos in a post or Page.


If you want to display your Instagram pictures in your sidebar or you want to display an Instagram widget that will display your number of followers, your Instagram profile photor, a follow button, then you will have to make use of the Simply Instagram widgets.


The plugin comes with four built-in widgets which you can drag and drop to your WordPress sidebar or widget areas. They are:


    ==> Recent Media Widget

    ==> User Info Widget

    ==> Latest Feed Widget

    ==> Currently Popular widget


Each widget comes with configuration options of its own.


The "User Info" widget is what you need to display Instagram follow button, your profile photo, thumbnails of followers etc on your blog sidebar.


That's all.


I hope it works for you.


NB: You can revoke Instagram access at anytime by logging into your Instagram account then clicking on the ‘Manage Apps’ tab.


If you are in need of Instagram Widget for Blogspot blogs or you need a widget that can show Instagram photos of any Instagram user or hashtag on your blog, you can check out IntagMe widget.


You can also check out ElegantThemes list of plugins for sharing your instagram feed with WordPress.

Saturday, 8 November 2014

How I Use Free Contact Form 7 Plugin For WordPress Blogs

Having a contact form on your site is a great way to offer your readers the ability to get in touch with you, without giving out your personal email address. If you own a WordPress blog, and you are not satisfied with the wordpress comment form, you can try Contact Form 7 plugin for WordPress.


Contact Form 7 is a free, simple and flexible contact form creator by Takayuki Miyoshi. It can manage multiple contact forms, plus you can customize the form and the mail contents flexibly with simple markup. The form supports Ajax-powered submitting, CAPTCHA, Akismet spam filtering and so on.


I use the plugin to create different kind of forms on my WordPress-powered sites and I've decided to share with you, how to set up a basic contact us page, using the free form creator plugin for WordPress.


Below, is a form created with the plugin, with the "acceptance" option and the message displayed after successful submission of the form.


mobilitaria_contactForm


It's available as free download at the WordPress Plugin Directory but the official website is ContactForm7.com. There is an official docs section for detailed documentation.


After you install and activate the plugin, you will find a dedicated menu item called "Contact" in the admin dashboard of your WordPress site. Clicking it, will take you to the Contact Form 7 main screen where you can create new forms, or edit the one that is there.


Right there, you will see your first contact form. It comes pre-made for you; usually called “Contact form 1". You will also see the shortcode (labelled "3"in the screenshot above) which you’ll need to install the form on a post or a page.


By clicking on the title of the form, or clicking on the “edit” link that appears when you mouse over it, you can modify the form.


Editing and Creating Your first Contact form


The first form that is built there for you is a great example when you’re starting out with contact form 7.  After clicking on "edit", you will be taken to the page where you can edit your comment form. You can duplicate it to make a copy of your current form. This is a great way to test different stuffs without modifying the default form. You can click on the name to rename it.


On the "edit" page, you will see some tags already entered to give you a general idea of what the form can look like, but you can add in and take out anything that you’d like. To the right of the text body is a dropdown menu titled “Generate Tag”, which contains all the tags to choose from.


For you to create a basic form similar to the one I shared earlier, we only need to generate an "acceptance" tag and add it to the default tags so that the "edit" page will look like the screenshot below:


To add the "acceptance" tag, click on the "generate tag" button and select "acceptance".


Copy the code eg [acceptance acceptance-5] and paste to the left, before the code for the "Send" button as seen in the screenshot above.


Click "Save".


Next, is to create your Mail Template


You can modify this template anyhow you want but for starters, just follow me through the basics below:


==> In the "To:" field,  Enter your email address in the . Do not enter a gmail or yahoo here unless you have set up an smtp server for your WordPress site.


Use the email, you have created with your domain name. If you don't have, create one via CPanel.


==> In the "Additional headers:" field, you can add "cc: example@gmail.com". This will let you receive a copy of each message at example@gmail.com. You can use any email addres for that.


Leave other fields as they are and click "Save".


Scroll down to the 'Message" section.


Click inside the "# Sender's message was sent successfully" field. Edit it as seen in the screenshot below:


The message is what will be displayed after successful submission of the form and it will include whatever the sender entered in the "name" field.


Click "Save".


Scroll down and paste this line below, to the Additional Settings section:


acceptance_as_validation: on


 This will ensure an error message is displayed if a user fails to check the acceptance checkbox.


Scroll up, copy and paste the shortcode of the form somewhere, maybe in a notepad.


Go to the "Contact Us" page that you have created. If you have not created it, go to "Pages" > "New". Give it a title eg "Contact Us".


Paste the shortcode of the form and click "Preview".


If you are OK with it, you can click "Publish".


Thereafter, you can try the form to see if it will work and see if you will receive the message in your email.


Below is a screenshot of a contact page with the shortcode embedded in it:


If you want to make changes to your form, go to "Contacts" and edit the form accordingly.


Note: You can also add the contact form shortcode into a post or in a text widget.


You can check out how to track clicks on the form in Analytics, how to use Akismet with it and also the ContactForm7 FAQs.


You can use the plugin to create forms more advanced than this.


Have fun!

PLACE YOUR ADS HERE