Pages

Receive More Updates

Date: - Time:
SMS: Send FOLLOW BALLOWAP To 40404 For Free - EMAIL: azeezbello8@gmail.com

Friday, 20 February 2015

How To Create a Blog on Blogger For Testing Templates and Codes

I recommend you create a blog on Blogger for testing templates and codes before making changes to your live blogspot blog. By doing this, you won't mess up with your blog by uploading a corrupt template. I always use test blogs when testing templates, scripts and other hacks before implementing the changes on my blog.


Since text blogs are used only for experimental reasons, I set them up in a way different from the way I set up my main blogs. First of all, I ensure that they are not listed in public listing of blogger, not visible to search engines; not appear in my Google+ or blogger profile page. Atimes, I also set them up in a way that no one else can view it except me.


Luckily, Blogger allows us to set up any number of blogs for FREE and also makes it easy to create a Blog on Blogger with the settings highlighted above.


How To Get Started


==> Go to www.blogger.com and sign in with your Google account details.


create blog


==> Choose a name for your test blog e.g My Test Blog 1

==> Next you will need to choose your blog address (something.blogspot.com). Try to use an address which is unlikely to be used by other Bloggers

==> Choose one of the default templates and create your blog.


The next screen invites you to make your first post. This is actually quite important as having a few posts in your test blog will be of great benefit in seeing how your experiments will work when you try them out.


I recommend you change a few settings as explained below, before adding posts to your test blog.


1. Go to Settings tab.

2. Go to Basic sub-tab.

3. Add description for the test blog eg a test blog for testing templates and scripts.

4. Via "Privacy", Set 'No' for Add your blog to our listings? option and also Set 'No' for Let search engines find your blog? option as seen in the screenshot below:


Blogspot privacy


After configuring these settings, neither your test blog will be indexed by search engines, nor it will be displayed in public search listings of blogger blogs.


How To Restrict Readers From Viewing the Test Blog


1. Go to Settings tab.

2. Go to Basic sub-tab.

2. Scroll down to Permissions.

3. In Blog Readers section, select the "Private - Only blog authors" option.


Blogger Permissions


After configuring this option, no one can view your blog except you.


Disconnecting Test Blog From Google+ Profile


If you've linked your Google+ profile with your Blogger account, you can follow the steps below to disconnect your test blog from auto-sharing the posts on your test blog on Google+ :


==> Go to Google+ tab of your test blog

==> Scroll down and click on "Disable Google+ Link"


If you're still using Blogger Profile instead of Google+ profile, go to your dashboard, click "edit profile", select blogs to display and uncheck your test blog from the listing.


So, How Do I Add Posts To My Test Blog?


For posts in your first test blog, you can copy some individual posts (eg 10 posts) from your main blog making sure each post has at least an image in it. Also ensure you add at least one label to each post. The images and labels will be useful when testing templates with featured images and label widgets.


When creating more test blogs, you can simply import posts from your first test blog to the new test blogs.


You can also easily generate a paragraph or two of dummy text using the Lorem Ipsum generator but ensure you add images and labels to the posts.


Now you can use your test blog for whatever experiments you choose! You can upload your existing template to test new modifications, try out your scripts or codes, or even try a new Blogger template you've downloaded somewhere!


When you have finished using your test blog, you can easily delete it by going to Settings > Other and choosing the "Delete blog" option. Once you do this, the blog will be deleted forever. Also the blog url will be released and available for others to use instead.


Do you use test blogs ? If not, how do you manage the modifications done on your Blogger blog?

Saturday, 17 January 2015

You Can Now Purchase Domain Name Right From Blogger Settings

Last year, I announced the launch of Google Domains;  a new domain registration service which will enable businesses to search, find, purchase and transfer the best domain for their business - whether it’s .com, .biz, .org, or any of the wide range of new domains that are being released to the Web.


Fast forward 2015, Google has announced the integration of Blogger directly with Google Domains, allowing Blogger/Blogspot users to purchase a custom domain for their blogs right from Blogger with just a few clicks, thereby making it so easy to connect their blogs to custom domains.


buy domain blogger settings


So, if you want to change from .blosgpot to .com, you can grab a custom domain for your blog via Google Domains via the Publishing section of your blog's Settings tab.


According to the source, if you purchase a new domain from Google Domains, it’s also easy to create a new blog for that domain right there.


google domain blog


What's your take on this?


NB: I can help you change to .com here if you can't do it yourself.

Wednesday, 31 December 2014

Custom Permalink Feature in Blogger. How Do I Use it?

When you write a blog post, Blogger automatically generates a permalink (a URL that links to a blog post) from the title of the post. if you prefer to customize the link, you can do so with the custom permalink feature in Blogger. It was one of the suite of SEO features integrated into Blogger in 2012 to enable users effectively customize their search preferences.


I use it alot every-time I compose my posts. It makes it possible for me to generate URLs that provide readers with more information about my posts when scanning search engines results. Atimes, when you fail to use it, Blogger might end up auto-generating a URL that might not really make sense for your blog post.


How To Use Blogger Custom Permalink


To create your own URL for a specific post, go to the Compose page and enter a title for your blog post.


Click on "Links" in the Post Settings box.


Allow Blogger to auto-calculate the permalink. Once completed, click on the 'Custom Permalink" option.


You should see the editable permalink generated by Blogger


Edit it as desired. You can also delete all and retype whatever you want there.


Click DONE.


That's all.


NOTE


==> Separate each word with -

==> Avoid words like "of", "the", "is", "from" etc

==> The shorter, the better.

==> Each blog post must have a unique permalink.

==> You can't edit permalink of an existing post. It's only for new posts. 


I hope this helps.

Wednesday, 5 November 2014

Blogger Comment Form Not Showing On Mobile View? Try This Solution

I've been receiving mails lately from co-bloggers, complaining that their readers are finding it difficult to comment on their blog posts simply because the Blogger comment form won't display on mobile even after clicking the "post a comment" link.


This is mostly experienced on blogs that have switched to Blogger custom mobile template. Although, I don't really know what causes the problem but there is a solution, which I've decided to share with you in this post.


To fix the problem, you only have to add the css below to your Blogger blog's html. If you view your blog posts after saving the changes to your html, you should see the comment form displayed directly below each post even if the post has zero comment.


.mobile .blogger-iframe-colorize {

display: block !important;

}


.blogger-iframe-colorize {

display: block !important;

}


How Do I Add the CSS Code To My Blog?


==> Sign in to www.blogger.com and click on your blog in the dashboard

==> Back up your template. Very Important!

==> Click "Template" > "Edit HTML"

==> Click inside the HTML

==> Use CTRL F to find ]]></b:skin>

==> Paste the CSS code directly above it as seen in the screenshot below


blogger_comment_form_html_code


==> Click "Save Template"


That's all.


Try it and let me know if it works for you or not.


Cheers!

Saturday, 1 November 2014

How To Upload A New Template To Blogger

Although Blogger allows users to easily make changes to the design of their blogs by making use of the Template Designer, there might be occasions you may prefer to download and install a Blogger template sent to you by someone or the one downloaded from sites that offer custom Blogger templates eg btemplates.com.


Just as with WordPress themes and Joomla templates, you need to be careful about using free Blogger templates found on the web because they might include malware or spam links to other sites which might harm your blog SEO. If the source is trusted, no cause for alarm.


For you to install a template successfully, it must be in the .xml format that is compatible with Blogger. Most sites where you can download free Blogger templates package the .xml file and some other files in a zip file. Hence, you will have to unzip the file before you can upload the .xml file to your Blogger blog. If you upload the .zip file directly to Blogger, you will likely get a blogger template upload error.


How To Install New Blogger Template


Now, let's assume you have the .xml file of the template you want to upload. Just follow me through the steps below, to install it to your Blogger blog:


==> Sign in to www.blogger.com and click on your blog in the dashboard

==> Back up your blogger template.  Very Important!

==> Click on "Template"


==> Click the Backup/Restore button located at the upper right corner of the screen

==> A popUp similar to the screenshot below will appear


install blogspot template


==> Click "Browse". Select the .xml file of the template you want to install

==> Click "Upload".


Preview your blog and if everything is fine, hit the 'Save Template' button.


If upload is successful, you should notice the changes once you view your blog in your browser.


That's all.


Don't Know How To Unzip The Zip File You Downloaded?


In Windows and Linux, you can right-click the Zip file and select “Extract All…” Extract All will allow you to set a path for the extracted folder to go.


Select the location for the extracted folder. You will see the .xml file of the template in the folder.


I hope this helps.

BackUp Blogger Template and Restore It In Easy Steps

Saving a backup of your Blogger template to your PC before making changes to it, is highly recommended. This is simply because if you are not satisfied with changes you apply to your template and feel like reverting it back to its previous condition, all you need to do is to restore the back up.


Your Blogger template back up will also be handy in situations whereby you want to revert your blog back to an old design after uploading a new template.


Blogger makes it very easy to back up templates of Blogspot blogs. Just follow me through the steps below:


==> Sign in to www.blogger.com and click on your blog in the dashboard.

==> Click on "Template"


==> Click the Backup/Restore button located at the upper right corner of the screen


==> A popUp similar to the screenshot below will appear.


back up blogspot template


==> Click on "Download Template"

==> Choose where you want to save the file on your computer and then click the “Save” button.


You can rename it to include the date you created the backup and you can upload it to the cloud eg to dropbox, Google drive etc so you can always access it from anywhere whenever you need it.


How To Restore Your Old Blogger Template


If after making changes to your Blogger template, you decide to revert back to its previous condition, all you have to do is to restore the most recent back up you saved to your PC.


To restore, follow the same steps above but when the pop up appears, click on the "browse" button to select the Blogger back up file on your PC, then click "Upload".


That's all.


NOTE: This will only back up the look of your blog and not the posts and comments. You can read how to back up blogger posts.


Happy Blogging!

Thursday, 23 October 2014

Anonymous Comments On Blogspot Blogs Requires You To Enter Confirmation Text? Here Is How To Avoid It

Since yesterday, I've been receiving emails about how anonymous commenters are now finding it hard to drop comments on Blogspot blogs, hence making some bloggers to lose comments on their blog posts. Below are some :


Jide oooooo!

Goodmorning...:(, peeps are complaining that it's hard to comment on the blog cos it's showing them a pop up box asking them to confirm if they are robots or not.

Please how do i get it off :(


Hello Jide, some readers are complaining when they want to drop comments as anonymous, it tells them to prove they are not robots. I've gone to comment settings and it's been on No for word verification. I refreshed it and the people still say it's still showing the same thing. But one said when she is logged on to Gmail on her phone, she can comment with anonymous, but as soon as she signs off, she has to do the word verification.


Well, if you're also experiencing same, don't bother yourself googling how to make the word verification go away. This is because it seems to be a new way Blogger is fighting comment spam.


Looking closely at The word-verification option page at Blogger Help, you will notice where Blogger states that even if you don't have word verification turned on, anonymous commenters might be asked to enter some text before they can leave comments on your blog.


So, it's obvious that it's a new way Blogger is protecting Blogspot blogs from abuse.


If you own a Blogspot blog, you can edit the "Comment Form Message" via "Settings" > "Posts and Comments" to inform your readers to sign in if they want to comment anonymously without having to enter the verification code.


If you are not satisfied with this new feature at all, you can move to wordpress where you can tweak your blog commenting system as desire. :)


How Can I Avoid Solving Capthca Before I Comment Anonymously On Blogger Blogs?


If you always love commenting anonymously on Blogspot blogs and you don't want to be entering th verification text everytime you want to post a comment, follow the steps below:


==> Type your comment and select "Google account'

==> Click "Publish".


You will be redirected to a page where you can sign in


==> Sign in with your Google account credentials


The blog post page will reload.


==> Select "Anonymous" from the "comment as" drop-down box.


==> Re-Enter your comment and Click "Publish".


Thereafter, you can post anonymously on any Blogger blog without having to enter the verification code, in as much as you remained signed in to your Google account.


That's all.


What's your take on this?


Monday, 20 October 2014

How To Add Read More To Feedburner Blog Posts Feed

Feeds are a way for blogs to distribute their content well beyond just visitors using browsers. Feeds permit subscription to regular updates, delivered automatically via a web portal, news reader, or in some cases good old email. If you have a website, blog, audio/video content, or even photos, you can offer a feed of your content as an option.


If you are using a popular blogging platform or publishing tool like TypePad, Wordpress, or Blogger, you likely publish a feed automatically. You can manage your blog feeds, using the free services been provided by Feedburner. FeedBurner's services allow publishers who already have a feed to improve their understanding of and relationship with their audience.


By default, subscribers to your blog's feed will likely be able to read the full content of your blog posts without visiting your blog. Well, if not satisfied with this, you can offer a short summary of your hyperlink-free content and direct your subscribers to your Web site for the rest of the story.


If you've burned your post feed with FeedBurner, there is a 'summary' setting which, if enabled, may affect the display of your feed for the Until Jump Break option. To activate it, sign in to feedburner, go to the "Optimize" tab, click "Summary Burner" and activate the service.


How Do I Add Read More To The Feed of My Blogger Blog?


If you are using Blogspot/Blogger as your blogging platform or publishing tool, even without burning your feed with Feedburner, you can change your feed settings via the Blogger dashboard.


To change your the feed settings of your Blogger blog,


==> Sign in to www.blogger.com

==> Go to "Settings" > "Other".


Blogger_feed_settings


Here, you can select how much of your content you want to syndicate.


"Full" will put the entire content of each post in your site feed, while "Short" only includes an excerpt from the beginning of each post. Select "Until Jump Break" to show all post content before your jump break. The "None" option turns your site feed off entirely. For more advanced options, you can select "Custom."


feed_content_with_read_more


Hence, to add read more, select the "Until Jump Break" option. This will make your posts to be displayed as seen in the screenshot above, with a read more link, which when clicked, will take your subscribers to your blog.


Yiu can confirm the change via your browser (Mozilla Firefox recommended) at : http://www.ogbongeblog.blogspot.com/feeds/posts/default?alt=rss (Replace ogbongeblog.blogspot.com with the URL of your blogspot blog).


Wednesday, 17 September 2014

How I Make Adsense Appear In Middle Of Blogger Posts (New and Old) Without Using Post Template Feature

In my previous post, I explained how to easily place Adsense ads in middle of Blogger posts using the Blogger "Post Template" feature. Although the trick is very easy to implement and automatically displays ad in desktop and mobile view, the trick doesn't display the ads in old posts.


If you want the ad to display in the middle of all posts (old and new), you will have to hack your blog's html and add some codes to it. I stumbled on the trick here, implemented it and works fine on my blog. I even use the trick to make Adsense ads appear in the middle of posts on Blogger mobile view.


This script in the trick actually looks for number of <br/>  (line break) tags inside your post and display ad unit.


adsense in middle


How To Get Started


==> Generate your Adsense ad code from www.google.com/adsense

==> Parse the Adsense ad code at www.freehtmlparser.blogspot.com (paste and click "Encode")

==> Login to your Blogger dashboard and back up your template ( Very Important! )

==> Go to "Template" > "Edit HTML"


==> Use CTRL F to search your HTML for the JQuery script below:


<script src='https://ajax.googleapis.com/ajax/libs/jquery/1.9.1/jquery.min.js' type='text/javascript'/>


If it exists, move on to the next step. If not, copy the script above and paste directly above </body> in your blog's html


==> Use CTRL F to find </body> again and directly above it, paste the code highlighted below:


<b:if cond='data:blog.pageType == &quot;item&quot;'>

<script>

 $AdCode = $("#AdCode").html();

 $("#PostBody br:lt(1)").replaceWith($AdCode);

 $("#AdCode").remove();

</script>

</b:if>


==> Save the Template


==> Go back to "Template" > Edit HTML. Use CTRL F to find <data:post.body/> . Replace it with the code below:


<div id="PostBody">

 <data:post.body/>

</div>


<div id="AdCode">

<div style='margin:5px 0;text-align:center;clear:both;'>

 <!-- Paste PARSED Ad Unit Code Here -->

</div>

</div>


==> Save the template


NB: Your template might have 2 or more <data:post.body/> codes. You have to identify correct one by using "try and error" trick. The 2nd or 3rd instance works in most templates though.


==> Go to "New Post" > "Options". Ensure you select "Press Enter for line breaks".


That's all.


To make it appear on mobile view, find <b:includable id='mobile-post' var='post'> in your HTML and replace the <data:post.body/> under the line as explained above.


I hope it works for you.


If it doesn't work for you, you can simply revert the changes by uploading the back up you created before implementing the trick.


Tuesday, 16 September 2014

How To Put Affiliate or Adsense Advert In Middle of Blogger Blog Post

There are series of tutorials online on how to place Adsense below Blogger post title and at the end of Blogger post but you will hardly see tutorials that will explain how to easily place adsense or affiliate advert in the middle of a Blogger post. This is simply because it's not something you can easily achieve by copying and pasting your ad code in your blog's html.


Although, there exists an advanced hack you can implement to insert an ad in the middle of a Blogger post but I'm sharing with you in this post, a trick that simply involves the use of Blogger's "Post Template" feature.


Post template helps save you time by pre-formatting the post editor. You can use it to format your posts in a certain way. Hence, you can also use it to automatically display your adverts in the middle of your posts.


How To Get Started


==> Get your Adsense code or advert code ready

==> Log in to your Blogger dashboard and go to Settings > Posts and comments, then click Add next to Post Template.

==> Paste your ad code in the box and save. (No need to parse the code).


Blogger post template


That's all.


When next you need to compose a post, click on the "HTML" tab of the post editor to see your ad code.


Type your post content above and below the ad code, so that the advert will be in the middle.


When you are through with typing the content, you can click on the "Compose" tab to easily add links etc to your post.


When you are done, publish your post, view and you should see the ad in the middle of the post.


NB: The ad will not display in old posts but automatically displays on the Blogger mobile view.


Try it and let me know if it works for you.


Cheers!


Recommended: How I Make Adsense Ads Appear Automatically In Middle of New and Old Blogger Posts Without Using Post Template Feature.

Thursday, 3 July 2014

Campaigns Feature In Blogger Lets You Advertise Your Blog With Adwords

A new feature "Campaigns", which can help your blog get more visibility has been added to the Blogger dashboard. A friend tagged me in a screenshot of the new feature yesterday on Facebook and I signed in to my Blogger account immediately to confirm it.


Unfortunately, as at the time of publishing this, I'm finding it difficult to use the Blogger "campaigns" because I keep seeing "This email address already has access to an AdWords account and cannot be reused." everytime I try using the new feature with my blog's email address.


If you click on the "Campaigns" tab in your Blogger dashboard, you will be taken to a page on "Google Adwords" site where you can create your account and your first ad campaign in just a few steps.


You will be able to create an ad that tells people about your blog, after which you will choose the search terms that will make your ad show in the Google search results.


If the words people type in Google match your keywords, your ad can appear above or next to the search results and people will see your blog on Google.


You get more readers when they click your ad and go to your blog.


Is it Free?


NO. You only pay when they click on your ad.


How Can I Pay for Blogger Campaigns?


If you are a Nigerian, you can pay for the ads using your Access Bank Visa card, UBA Africard and GTB Naira Mastercard.


Add the card to your Adwords account and use it to load any amount you want to spend into the Adwords account. When people click on your ad, the charges will be deducted from the balance in your Adwords account.


Once you exhaust your balance, the ad will stop running and Google will alert you to add more funds to your account if you want your ad to keep running.


Whether you're looking to bring in new readers or keep them coming back for more, you can give it a try, may be starting with $10.


What's your take on this?

Thursday, 26 June 2014

Make Background Image Of Your Blog Clickable With This CSS Tweak


UPDATE 


+Kanyi Okeke alerted me via comments that once you implement it on a Blogger blog, it automatically links anything on the page to the link in the code above.I will find a solution to this and update this post asap.


Earlier today, +Temi Baby  asked me how to make the background image of her blog clickable and probably link to an external website, while also ensuring that the link opens in a new tab/window. Initially, I thought such won't be possible on a Blogger blog but after making some research, I realized it's possible and can be achieved with css.


You can see a demo at www.wizkid-download.blogspot.com. Clicking on the background image on desktop and mobile view of the blog takes you to blogger.com + it opens in a new window/tab without taking you away from the blog page.


So, let me assume you've already added a background image to your blog.


==> Log in to www.blogger.com, go to your blog dashboard, click "Templates" > "Edit HTML"


==> Click inside the HTML editor, press CTRL F on your keyboard to find < body


==> Directly under < body, paste the code below:


<a href="http://www.nairaforsms.com" id="blogbackground-link" target="_blank"> </a>


==> Replace www.nairaforsms.com with the link you want the background to open when clicked.


==> Click "Save Template".


==> Click inside the HTML editor again and use CTRL F to find ]]></b:skin>


==> Paste the css code below, directly above ]]></b:skin>


#blogbackground-link {

    position: absolute;

    top: 0;

    left: 0;

    width: 100%;

    z-index: 1;

    height: 4000px;

}


==> Click "Save Template".


View your blog, click on the background image and it should open your link in a new tab/window.


That's all.


Don't know how to add background image to your blog?


Paste the css code below, directly above ]]></b:skin>


body {

    background-image: url('https://blogger.googleusercontent.com/img/b/R29vZ2xl/AVvXsEgZzrYFRT3Q5EN5iiH6dYI1r-QXKRmJgS5Nz0e3V9k1xHVj3aSECswVeD4BiLMIeDdej_UaobYdmXPkNaf0GjDI-NQpDyjncS3uR9CnJ25YSe9In5VLZf27n-PO4zn2k2ii0CYCUpyBPjY4/s1600/Nairaforsms-300x250AD_optim.jpg');   

    background-position: top center;

    z-index: 1;

    background-attachment: scroll;

    background-repeat: repeat-y;

    background-color: grey;

}


Carefully replace the highlighted link; https://blogger.googleusercontent.com/img/b/R29vZ2xl/AVvXsEgZzrYFRT3Q5EN5iiH6dYI1r-QXKRmJgS5Nz0e3V9k1xHVj3aSECswVeD4BiLMIeDdej_UaobYdmXPkNaf0GjDI-NQpDyjncS3uR9CnJ25YSe9In5VLZf27n-PO4zn2k2ii0CYCUpyBPjY4/s1600/Nairaforsms-300x250AD_optim.jpg with the link to your background image.


That's all.


NB: If you are a WordPress user,  copy and paste the code below, directly below the <body tag.


<a href='http://www.nairaforsms.com' id='blogbackground-link' target='_blank'> </a>


Thereafter, you can paste the css code in your custom css file.


==> Replace nairaforsms.com with the link you want to use


I hope it works for you. Let me know via comments, if there are challenges.

Monday, 2 June 2014

How To Create and Add Responsive Adsense Ad Unit to Blogger Blogs

Responsive web design is the trend these days as more and more people are browsing the internet through their smartphones and tablets. If your Blogger blog is responsive, you can consider adding responsive ad units to the blog to maximize your Adsense earnings.


Adsense responsive ad code automatically serves different ad sizes based on the space available and also has support for ad size changes after a screen orientation change  (e.g., when a tablet or phone goes from portrait to landscape).


By using a responsive ad unit, you can control the size of the ads on
your page, in line with how you control the layout of the rest of your
page across devices. 


If your blog design is responsive, all you need to do is to generate responsive ad code and add it to your blog's html.


How To Generate Code for Responsive Adsense Ad Unit  


==> Log in to www.google.com/adsense

==> Click the My ads tab and click +New ad unit

==> Provide a unique name that will help you find this ad unit later

==> Select “Responsive ad unit (BETA)” from the Ad size drop-down


responsive adsense ad unit


==> Click Save and get code.

==> In the “Ad code” box that appears, select the recommended "Smart Sizing" mode from the Mode drop-down.

==> Place the ad code on your site.


How To Place Adsense Code On Blogger Blog


==> Log in to www.blogger.com

==> Go to "Layout"

==> Click on "Add a gadget"

==> Select "HTML/Javascript" from the options

==> Paste the ad code in it and Save.


That's all.


Once you’ve placed your ad code,I recommend that you test your ads on different devices and screens to make sure that the responsive behavior is working correctly. You can also use the free online Responsive Web Design Testing Tools for the test.

Friday, 18 April 2014

How To Back Up Blogger Blog Posts and Comments

Backing up your Blogger blog even if it is once in a week is highly recommended if you really care about your blog. Although Blogger blogs are not easily hacked but Blogger can disable or delete your Blog without warning you. Mind you, Blogger automated classification system can disable your blog without you doing anything wrong. I experienced this recently.


If such happens and you have a back up file of your blog, you can easily create a new blog and restore the content of your old blog. Besides, if you decide to move to Wordpress, the .xml back up file is all you need to restore your blog posts and comments to the Wordpress blog.


Backing up your Blogger blog is very easy. You can get it done easily using the "export" feature of Blogger. The Blogger tool lets you save a copy of your blog on your hard drive. The export tool will not back up your Blogger template though, just your posts (including drafts) and comments.


STEPS


    ==> Sign in to www.blogger.com

    ==> Click on the Small arrow beside the "view blog" button

    ==> Click on "Settings" > "Other"


    ==> Click on the 'Export blog" link under Blog tools.


download Blogger export file


    ==> Click on 'Download blog"

    ==> Save the .xml file to your PC


That's all.


You can rename it to include the date your backup and you can upload it to the cloud eg to dropbox, Google drive etc so you can always access it from anywhere whenever you need it.


The total number of posts and comments will determine the size of the export file.


Remember, your data is very important. So, DO NOT download your back up on public computers.


You can use Google TakeOut to back up all the blogs in your Blogger dashboard and if you want to back up the design/look of your Blogger blog, read how to back up Blogger template.


When last did you back up your blog?

Sunday, 6 April 2014

How To Recover and Reset Blogger Password and Email

If you're having troubles accessing your blog via the Blogger sign in page just because you've forgotten your Blogger password or because you've forgotten the email account you used for registration, Blogger offers an account recovery tool which you can use to resolve the issue on your own.


You can access the Blogger's account recovery tool at  http://www.blogger.com/forgot.g


Password recovery tool
Blogger Account Recovery Tool


How To Recover Blogger Username or Email


To recover your Blogger Username or Email, enter your blog's URL in the space provided and click on the "Lookup" button. Blogger will send an email message with login instructions for the blog to the Gmail accounts associated with the blog.


So, if you check all your GMail accounts, you will see the email message in the inbox of the account associated with the blog. You can then use the Google account email to sign in to Blogger.com and access your Blog.


How To Reset Blogger Password


Lookup your blog's URL as explained above. In the email message you will receive, Blogger will include a link you can click to reset your Blogger password if you've forgotten it.


Alternatively, you can reset it via Google password assistance page or by entering your email address in the email field of the Blogger account recovery tool.


Forgot Your blog URL?


Just go to www.blogger.com and sign in with your GMail account. You should see your blog on the Blogger dashboard.  Click on the "view blog" button. Once your blog loads in your browser, you can then copy the blog's URL from the browser address bar.


That's all.


I hope this helps.

How To Fix Broken Blogger Feeds

After Blogger restored my blog few days back, I noticed that the links of the Related Posts, Recent Posts widgets were all broken. Clicking on them leads to a 404 page. Twitterfeed and other applications using the Blog's feed were all affected.


While trying to find out what's wrong, I discovered that the blogspot feed url wasn't redirecting to the custom domain feed url i.e http://www.ogbongeblog.blogspot.com/feeds/posts/default?alt=rss wasn't redirecting automatically to http://www.ogbongeblog.com/feeds/posts/default?alt=rss.


broken Blogger feed


Instead of it redirecting automatically, it will display an error message that the blog is not hosted on Blogger blah blah blah as seen in the screenshot above. Also, Feed Validator coudn't validate the feed as seen in the screenshot below:


feed validator error


I reported the issue at Blogger forum and while waiting for feedback from Blogger top contributors, I decided to try something?


What's that?


I removed the custom domain from the blog to revert it back to www.ogbongeblog.blogspot.com. Without wasting much time, I reconnected it back to the custom domain. I refreshed my blog and was so happy when I noticed that all broken links have been fixed.


That's it.

Monday, 17 March 2014

Add Adsense Below Post Title of Mobile Blogger Templates

I've customized the mobile view of OgbongeBlog in such a way that I now have an Adsense 320x50 mobile banner been displayed under post titles as well as an Adsense 250x250 ad unit been displayed at the end of each post on the mobile view.


Besides that, I created an extra section above the header region and right there, I can also add an Adsense mobile banner or a non-adsense 320x50 banner. In this tutorial, I'm sharing with you how to add Adsense ad inside blog posts of Blogger mobile templates, directly below post titles.


Just follow me through the steps.


==> Log in to www.google.com/adsense to generate the Adsense code for the ad unit you want to add to the mobile view. eg 320x50 mobile banner.


Now, we need to parse the ad code.


==> Go to http://www.freehtmlparser.blogspot.com/

==> Copy and paste your ad code inside the box and click the "Encode" button

==> Copy and paste the code somewhere eg in a notepad


==> Ensure you have enabled CUSTOM Blogger mobile template.


If not sure, login to your Blogger dashboard, go to "Template". Under "Mobile", select "Yes. Show mobile template on mobile devices" and choose "Custom" from the "choose mobile template" dropdown box and save your settings.


==> Now, we need to find the code for the Blogger Mobile Template Post title so we can place the Adsense code directly below it.


==> So, back up your template and go to "Template" > "Edit HTML"


==> Click inside the HTML and use CTRL F to find the code below:


<b:includable id='mobile-post' var='post'>


==> Once you find the code, scroll down gently till you see the code below:


<div class='post-body entry-content'
expr:id='&quot;post-body-&quot; + data:post.id'
itemprop='articleBody'>


==> Paste your parsed Adsense code directly below the code above.


Save your template.


View one of your blog posts on mobile view using default browser of your mobile device (NOT Opera Mini) and you should see the ad below the post title on POST pages (Not on the homepage).


NBYou can place any ad code there be it AdDynamo, Infolink, media.net ad etc


You can access the mobile view of your Blogger post on PC by adding ?m=1 at the end of the post URL.


Try it and let me know if it works for you.


PLEASE, Share this with your friends.


Questions? Contributions? Kindly relay them via comments.


Recommended: How to Add Adsense Below Post Titles on Blogger Desktop View

Thursday, 13 March 2014

Facebook Comment Form Not Working? Try This Solution for Blogspot Blogs

If you've been finding it difficult to integrate the Facebook comment box with your Blogger blog, sit back and relax as I guide you on how to add Facebook comments plugin to Blogspot blogs using HTML5.


For you to add the Facebook social plugin to your blog, you will need the Facebook Application ID of the blog. If you know the ID, copy it somewhere and if you don't know it you can check the Facebook apps page.


You can read: How To Get Facebook Application ID to generate one for your blog.


Next is to log in to your Blogger dashboard, back up your template and go to "Template" > "Edit HTML"


==> Click inside the HTML and use CTRL F to find : <body


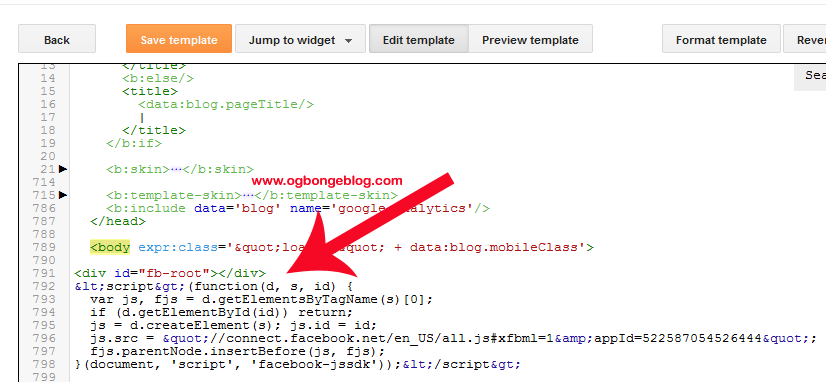
==> Directly below it, paste <div id='fb-root'/> OR <div id="fb-root"></div>


==> Open a new tab on your browser and go to www.freehtmlparser.blogspot.com

==> Copy and paste the code below inside the box on the page


<script>(function(d, s, id) {

  var js, fjs = d.getElementsByTagName(s)[0];

  if (d.getElementById(id)) return;

  js = d.createElement(s); js.id = id;

  js.src = "//connect.facebook.net/en_US/all.js#xfbml=1&appId=522587054526444";

  fjs.parentNode.insertBefore(js, fjs);

}(document, 'script', 'facebook-jssdk'));</script>


==> Carefully replace the highlighted appID with the ID of your blog

==> Click "Encode"


==> Go back to the browser tab where you have your blog HTML


==> Copy and Paste the encoded script directly below the  <div id='fb-root'/>


==> Now, your html should look similar to the screenshot below:


==> Click "Save Template"


==> Click inside the HTML and use CTRL F to find :


<div class='post-footer-line post-footer-line-3'>


 OR


<div class='post-footer-line post-footer-line-3'/>


 OR


<data:post.body/>


==> Directly below it, paste this code : 


<b:if cond='data:blog.pageType == &quot;item&quot;'>

<p align='center'>

<img alt='' class='icon-action' src='https://blogger.googleusercontent.com/img/b/R29vZ2xl/AVvXsEi_i6bwzBUZd9Uko4OfIk0eV0Ha_mVxz0ilZamN1zUwGZk8zGzmQPKDQdp_eN7V84Fy_JWK3bzTV91J7y4YESw5gL7iz8ESDXRbHrLVuPxrSPfbphKoUtZtJM3Nfc0ZpvOFSilCo_0IGMLT/s1600/cmds.png'/> </p>

<div style='text-align: center;'>

<div class="fb-comments" expr:href='data:post.url' data-width="100%" data-numposts="10" data-colorscheme="light"></div></div>

</b:if>


==> Click "Save Template"


That's all.


Check out the desktop view (not Mobile View) of any post on your blog and you should see the comment form below the post.


Please, let me know if it works for you.


Also use the comment form to let me know if you face some challenges.


Please, SHARE this with friends.


Cheers!


Subscribe to this blog if you don't want to miss my tutorials on how to add Facebook comment form to Blogger mobile templates and how to receive notifications On Facebook when anyone comments on your blog, using the Facebook comment form. 

Tuesday, 11 March 2014

Embed Soundcloud Free Music Player On Blogger In Easy Steps

If you are a music blogger, you can easily add Soundcloud widget to your blog to enable your blog readers play and listen to latest music on your blog. This Soundcloud music player widget for websites is an alternative to the Hulkshare music player for websites I shared sometimes ago.


SoundCloud is an online audio distribution platform that enables sound creators to upload, record, promote and share their originally-created sounds. If you are a music lover, the site makes it easy to share uploaded songs with your friends on Facebook, Twitter and via your blog.


In this post, I'm sharing with you, how to add the Soundcloud embeddable music player to Blogger/Blogspot blogs using the Soundcloud widget embed code.


Below is the "Drunk in Love remix" by Beyonce ft Kanye West and JayZ ;  to show you a sample of what an embedded mp3 from Soundcloud will look like on your Blogger blog.


How To Add Soundcloud Widget To Blogger


Let's get started.


==> Go to www.soundcloud.com


==>  Search Soundcloud playlists, tracks etc for the song you want to embed


==> Once you see the music track in the search results, click on the "Share" link under the track


==> A new window like the one below will pop up.


Soundcloud widget


==> Click on "Embed".  You will now see the Souncloud code to embed in your blog post.


soundcloud embed code


==> Copy and paste it somewhere eg in a Notepad.


==> Log in to www.blogger.com dashboard and create a New Post.


==> Give the post a title, write the content and paste the code inside the post editor.


==> Click the "Options" icon at the right hand side of the Post Editor.  Select "Interpret typed HTML" and click Done.


==> Click on the "Preview" button


==> If it works fine and can see the Soundcloud music player, click "Publish".


That's all.


Let me know if it works for you.


Kindly SHARE this with friends.


Questions? Contributions? Kindly relay them via comments.


How To Make Adsense Show After Posts On Blogger Mobile View

Earlier, I shared a tutorial on how to add Adsense ad below post titles on Blogger mobile templates. In this tutorial, I am sharing with you, how to add Adsense ads after each blog post on the mobile view of your Blogspot blog.


Readers of your blog posts are more likely to click on ads after reading
your post. Hence, I recommend you add an ad unit right after each post.


Ads added below each post on the desktop view of your Blogger blog won't
show by default on the mobile view. You have to enable "custom" mobile
template and add the ad code to the HTML of the Blogger mobile template.


Below is a 300x250 Adsense ad showing after my blog post on the mobile view of  OgbongeBlog:


Adsense under blog post


Let's get started 


==> Log in to www.google.com/adsense to generate the Adsense code for the ad unit you want to add to the mobile view. eg 300x250 Medium Rectangle ad size.

Now, we need to parse the ad code.

==> Go to http://www.freehtmlparser.blogspot.com/
==> Copy and paste your ad code inside the box and click the "Encode" button
==> Copy and paste the code somewhere eg in a notepad

==> Ensure you have enabled CUSTOM Blogger mobile template. If not sure, login to your Blogger dashboard, go to "Template". Under "Mobile", select "Yes. Show mobile template on mobile devices" and choose "Custom" from the "choose mobile template" dropdown box and save your settings.

==> Now, we need to find the code for the Blogger Mobile Template Post title so we can place the Adsense code directly below it.

==> So, back up your template and go to "Template" > "Edit HTML"

==> Click inside the HTML and use CTRL F to find the code below:


<b:if cond='data:top.showMobileShare'>


==> Directly above it, paste the parsed Adsense code.


Save your template.


View one of your blog
posts on mobile view using default browser of your mobile device (NOT
Opera Mini) and you should see the ad after each blog post on POST pages
(Not on the homepage).


NBYou can place any ad code there be it AdDynamo, Infolink, media.net ad etc If you also want to add share buttons to your Blogger mobile template, you can also paste the codes of the buttons there.


You can access the mobile view of your Blogger post on PC by adding ?m=1 at the end of the post URL.


Try it and let me know if it works for you.


PLEASE, Share this with your friends.


Questions? Contributions? Kindly relay them via comments.


Recommended: How to Add Adsense Below Post Titles on Blogger Desktop View

PLACE YOUR ADS HERE