Pages

Receive More Updates

Date: - Time:
SMS: Send FOLLOW BALLOWAP To 40404 For Free - EMAIL: azeezbello8@gmail.com

Tuesday, 1 July 2014

How To Set Custom Redirects in Blogger

Over time, most blogs may go through many changes, like posts being added or deleted. In some occasions, you don't want people to get 404 messages when they surf to posts or pages that don't exist on your blog and instead, make all requests to a specific link to be redirected to another page. One of the best way to avoid broken links and keep your traffic flowing in the right direction is setting custom redirects via the Blogger Custom Redirects tool.

In this post, we will see how to set custom redirects for Blogger posts and redirect an old URL to a new URL. But before redirecting any URL, you must know that there are two types of redirects:

A 302 redirect means that the page has moved temporarily. This redirect doesn't pass the URL value to the new location and instead, it will take the visitors to an appropriate location so that you aren't showing them a 404 page not found, or an error page. You can use a 302 redirect for coming soon pages or maintenance pages.

A 301 redirect means that a page has moved permanently to a new location. Use the 301 redirect when you deleted or changed the URL of your post. In most instances, the 301 redirects are always recommended for SEO because they will pass link juice (ranking power) to the redirected page and visitors will also benefit from this. However, 301s aren't suitable when you change your custom-domain, because it only supports redirection within the same blog, not to an external URL.

Now that we've established which is which, let's see how to set custom redirects for Blogger posts.

How to redirect old URL to new URL in Blogger


Step 1. Login to you Blogger account with email and password.

Step 2. Click on your blog > go to Settings \ Search Preferences and click "Edit" next to "Custom Redirects."

search preferences, custom redirects, 301, 302 redirect

Step 3. Enter the old URL in the "From" field, and the new URL in the "To" field including the forward slash "/" (see the screenshot below)

custom redirects, redirect old url to new url

Note: Do not enter the full URL in these fields. Just omit the address of your blog and type only the rest of the link. Again, this works only if you wish to redirect within your blogger blog and not to any external links.

Step 4. Click the "Save" link (1) and the "Save changes" button (2), and you're done!

blogger custom redirects
blogger custom redirect

If you want to redirect more pages, just click the "New redirect" button.

Sunday, 18 May 2014

How to add Static Pages to a Blogger Blog (UPDATED)

A few months ago, Blogger has completely redesigned the section of the Pages, which now, looks very similar to that of the Blogger Posts. Now we will be able to manage the pages with more flexibility. For example, we can publish, delete or change many of them to draft at the same time - which has just the same function as the old Don't show option.

Among the options that we can find by hovering over a page and which we can see in the screenshot below are:

Edit: To access the editing panel and to edit its contents.
View: Open a new tab with the actual page.
Share: Share it on Google+ (which was not possible before)
Delete: remove a page.
add static pages on blogger

static pages, blogger

In order to create a page, we need to open the pages editor from the button that says New Page. Almost every option tells us its function.

How to add a Web Address in the Pages widget


Many Blogger users wanted to know how can we add other web addresses, so that they display in the list of the Pages widget, since this option no longer appears in the "Pages" tab?

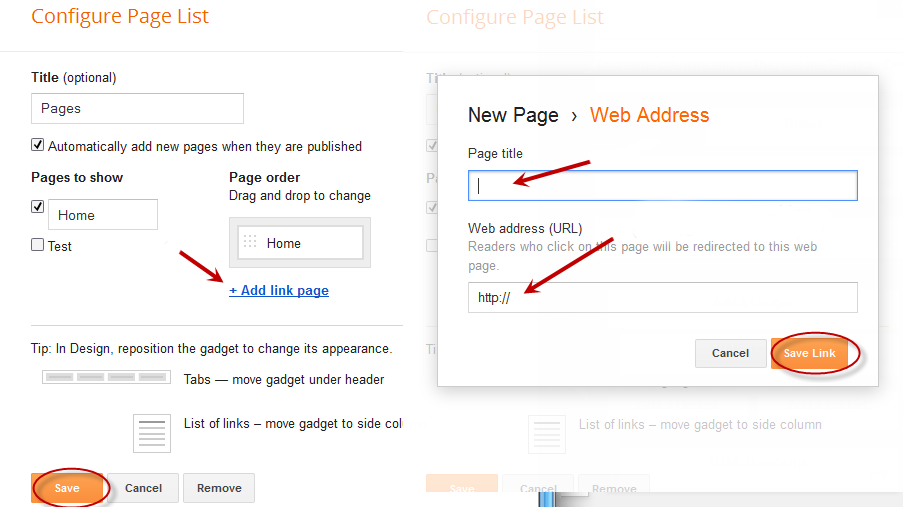
Well, now we will have to open the settings of the Pages widget by going to Layout, then click on the Edit link in the widget / gadget for Pages (if you don't have the Pages gadget, just click on the Add a gadget link and select "Pages" from the pop-up window). And from there, we will find the option that says: Add link page and we will have to type the Web Address in the second field every time we want to add a new page from a specific address or URL (see the screenshot below).


add web address, blogger tutorial


Another cool feature that has been built is that now it will be possible to add a search description, and in that field to add the text that we want to appear in search results. Until now, this option has been available only for blog posts.

search description for pages

This option will appear once you enable the Enable search description? option by choosing Yes. This will show up on "Meta Tags" by accessing the preferences for the search engines: Settings > Search preferences > Meta Tags > Enable search description?

Friday, 24 May 2013

New Blogger Widget: Contact form - Change Style & Install in a Static Page

Just a few days ago, Blogger introduced a new widget. It is about a contact form that you can add to your blog easily. It is very basic, because - at least for now, does not permit incorporating files or send anything other than plain text.

The contact form for Blogger has the following features:
  • Field for the user name
  • Field for email
  • Field for the message (textarea)
  • Submit Button
Screenshot
contact form, blogger gadgets, static page
 The design is simple and the text colors inherit the section where you add it. At the moment, this widget has no configuration options and is not available for dynamic views.

How to Add Contact Form to Blogger

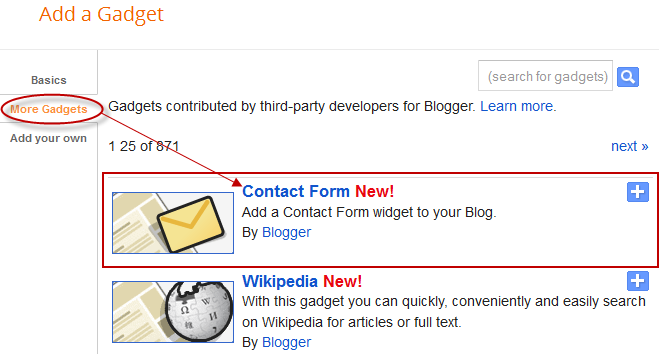
To add it to your blog, just select the Layout tab, then click on Add a gadget in the section you want to show, for example, in the sidebar. Then, select the More gadgets tab and add the Contact Form gadget.


blogger gadgets, blogger widgets, contact form

Styling Contact Form


As the background is transparent, the form will integrate well, aesthetically speaking, but nevertheless it is easy to modify using Style Sheets (CSS) to the appropriate selectors. Here's an example:

/* Contact Form Container */
.contact-form-widget {
width: 500px;
max-width: 100%;
margin: 0 auto;
padding: 10px;
background: #F8F8F8;
color: #000;
border: 1px solid #C1C1C1;
box-shadow: 0 1px 4px rgba(0, 0, 0, 0.25);
border-radius: 10px;
}

/* Fields and submit button */
.contact-form-name, .contact-form-email, .contact-form-email-message {
width: 100%;
max-width: 100%;
margin-bottom: 10px;
}

/* Submit button style */
.contact-form-button-submit {
border-color: #C1C1C1;
background: #E3E3E3;
color: #585858;
width: 20%;
max-width: 20%;
margin-bottom: 10px;
}

/* Submit button on mouseover */
.contact-form-button-submit:hover{
background: #4C8EF9;
color: #ffffff;
border: 1px solid #FAFAFA;
}

This is how it will look like after applying the style:
contact form, blogger gadgets, contact form for blogger

To add this style, go to Template > Edit HTML, click on the sideways arrow next to <b:skin>...</b:skin> and paste the code just above ]]></b:skin> (press CTRL + F to find it):


How To Add Contact Form In A Static Page


First step is to add the Contact Form gadget (Layout) and second, to edit the template (Template > Edit HTML) to remove most of the gadget. You have to search for the id "ContactForm", expand the widget by clicking on the black arrow on the left (same with the includable) and then delete the part that I have colored in red (see below):

Part to be removed:

  <b:widget id='ContactForm1' locked='false' title='Contact Form' type='ContactForm'>
    <b:includable id='main'>
  <b:if cond='data:title != &quot;&quot;'>
    <h2 class='title'><data:title/></h2>
  </b:if>
  <div class='contact-form-widget'>
    <div class='form'>
      <form name='contact-form'>
        <p/>
        <data:contactFormNameMsg/>
        <br/>
        <input class='contact-form-name' expr:id='data:widget.instanceId + &quot;_contact-form-name&quot;' name='name' size='30' type='text' value=''/>
        <p/>
        <data:contactFormEmailMsg/> <span style='font-weight: bolder;'>*</span>
        <br/>
        <input class='contact-form-email' expr:id='data:widget.instanceId + &quot;_contact-form-email&quot;' name='email' size='30' type='text' value=''/>
        <p/>
        <data:contactFormMessageMsg/> <span style='font-weight: bolder;'>*</span>
        <br/>
        <textarea class='contact-form-email-message' cols='25' expr:id='data:widget.instanceId + &quot;_contact-form-email-message&quot;' name='email-message' rows='5'/>
        <p/>
        <input class='contact-form-button contact-form-button-submit' expr:id='data:widget.instanceId + &quot;_contact-form-submit&quot;' expr:value='data:contactFormSendMsg' type='button'/>
        <p/>
        <div style='text-align: center; max-width: 222px; width: 100%'>
          <p class='contact-form-error-message' expr:id='data:widget.instanceId + &quot;_contact-form-error-message&quot;'/>
          <p class='contact-form-success-message' expr:id='data:widget.instanceId + &quot;_contact-form-success-message&quot;'/>
        </div>
      </form>
    </div>
  </div>
  <b:include name='quickedit'/>

</b:includable>
  </b:widget>

After you have saved the template, go to Pages and paste the following code into a new blank page with the title you want:

 <div class='widget ContactForm' id='ContactForm1'>
  <div class='contact-form-widget'>
    <div class='form'>
      <form name='contact-form'>
        <p>Name</p>
        <input class='contact-form-name' id='ContactForm1_contact-form-name' name='name' size='30' type='text' value=''/>
        <p>E-mail *</p>
        <input class='contact-form-email' id='ContactForm1_contact-form-email' name='email' size='30' type='text' value=''/>
        <p>Message *</p>
        <textarea class='contact-form-email-message' cols='25' id='ContactForm1_contact-form-email-message' name='email-message' rows='5'></textarea>
        <input class='contact-form-button contact-form-button-submit' id='ContactForm1_contact-form-submit' type='button' value='Submit'/>
        <p class='contact-form-error-message' id='ContactForm1_contact-form-error-message'></p>
        <p class='contact-form-success-message' id='ContactForm1_contact-form-success-message'></p>
      </form>
    </div>
  </div>
</div>

Messages will be sent to the same email that you have registered in Blogger.

Here's a demo page where you can test it (it is an account that I don't use, so don't expect reply).
That's it! If you have any questions or comments please post below.

PLACE YOUR ADS HERE