Pages

Receive More Updates

Date: - Time:
SMS: Send FOLLOW BALLOWAP To 40404 For Free - EMAIL: azeezbello8@gmail.com

Sunday, 28 June 2015

SaveFrom.net Helper Lets You Download Files from YouTube, Facebook, Vimeo, VK.com etc Just In One Click

SaveFrom.net Helper is a browser extension, which if installed on your Windows PC, will enable you download files from YouTube, Facebook, Vimeo, VK.com and more than 40 other just in one click.


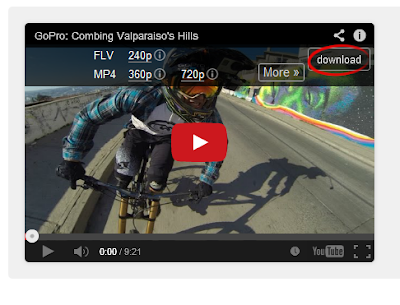
With it, you can download videos directly from embedded YouTube players. All you just need to do, is to hover a cursor on it and a "Download" button appears. Thereafter, you can save the video in the desired quality.


You can also use it to download videos from Facebook.com with a click from user pages, news feeds, or even comments. Move the mouse pointer over the link - a green arrow will appear. Click the arrow and choose the preferred video quality.


For Vimeo.com and Dailymotion.com, the extension forces a "Download" button to appear on the page, where you're watching a video file.

You can download SaveFrom.net Helper extension here.

Thursday, 11 June 2015

Backup Firefox Browsing History and Restore On Another Computer Without Software

Earlier, I explained how to use MozBackup to backup and restore Firefox extensions and more. Yesterday, I tried using it to backup and restore my Firefox browsing history on another computer but it just didn't work for me.  I tried another trick, without using the software and I was able to get it done.


So, in this post, I'm sharing with you, how to backup Firefox browsing history and how to restore it on another computer without using any software. Just follow me through the steps below:


  1. Click the Start button on the taskbar of your Windows PC, type "Run"
    into the search bar and  press the "Enter" key on your keyboard. 

  2.  Copy and paste the following into the Run prompt and press Enter: %APPDATA%\Mozilla\Firefox\Profiles\

  3. A folder will appear. This is your Firefox profile folder that contains
    all of your bookmarks, browsing history, settings and other information.
    Copy the folder to a transfer media (e.g. a Flash drive) 

  4. Copy the folder from the Flash drive to the desktop (or any location) of the other computer (Computer 2)

  5. Ensure Firefox browser is closed on computer2 and repeat steps 1 and 2 on the computer

  6. Once deleted, drag the content in the folder saved earlier to your flash drive from computer1 to the empty folder on Computer 2

  7. Launch the Firefox browser on computer 2 and you should see option to restore previous session. If not, go to "history" > "restore previous session".


Your Firefox browsing history will be restored as well as your bookmarks, extensions etc.

I hope it works for you.

NB: If you keep getting "file in use" while deleting the content of the profile folder, go to Windows "Task Manager" and end the Firefox process.

Wednesday, 10 June 2015

MozBackup Lets You Backup and Restore Firefox Extensions, Bookmarks and More

MozBackup is a simple utility for creating backups of Mozilla Firefox, Mozilla Thunderbird, Mozilla Sunbird, Flock, SeaMonkey, Mozilla Suite, Spicebird, Songbird and Netscape profiles. It allows you to backup and restore bookmarks, mail, contacts, history, extensions, passwords, cache etc.


I used it to back up my Firefox extensions earlier today and I was able to use it to also restore the extensions on another computer.  So, if you're switching PCs and would love to transfer your Firefox extensions etc to another computer, then you have to try this portable MozBackup tool.


How To Use MozBackup


The first thing you have to do is to download MozBackup and install it on your PC. The MozBackup software is freeware (even for commercial use) and works on Windows 98/ME/NT/2000/XP/2003/Vista/7.

Now lets assume you want to use it to back up your Firefox extensions.

==> Close your Firefox. You might as well have to end its process via Windows "Task Manager"
==> Launch the MozBackup utility installed on your PC


mozbackup utility


==> Click "Next"
==> Choose the operation you want to perform i.e Backup


==> Click "Next"
==> Select the location where you will save the back up file(s)
==> Click "Next"
==> Select the details you want to back up


==> Click "Next and complete the process

If you want to restore on another computer, install the MozBackup tool on the new computer. Launch it and follow the steps above but remember, you have to select the "Restore" operation. Thereafter, if you launch your Firefox browser, it will load with the restored extensions.

NB: If it keeps telling you to close Firefox, even after you might have closed it, that simply means you have to end the Firefox process via the Windows "Task Manager".

I hope this helps.

How I BackUp FireFox Bookmarks and Transfer To Another Computer

Mozilla Firefox allows you to store Web pages you visit often as bookmarks. Firefox automatically creates backups of your bookmarks and saves the last ten backups for safekeeping. Nevertheless, you can generate your own bookmark backup file manually and do anything you like with it.


Earlier today, I was able to save Firefox bookmarks on my laptop and restore the bookmarks on my new laptop. So, this makes it very easy for me to access the bookmarks on my old PC on the new PC. So, in this post, I've decided to share with you, how I was able to do that.


How To Get Started


==> Launch the Firefox browser on your PC

==> Click the Bookmarks icon


firefox bookmarks icon


==> Scroll down and click "Show All Bookmarks" to open the Library window


==> In the Library window, click the "Import and Backup" button

==> Click "Export Bookmarks to HTML..."


export firefox bookmarks to html


==> Choose a location to save the file, which is named "bookmarks" by default. The desktop is usually a good spot, but any place that is easy to remember will work.


==> Save the file and close the Library window.


How To Transfer Firefox Bookmarks To Another Computer


You can use a bookmark backup file from one computer and restore it on another computer.


So, place the bookmark backup file created earlier on your transfer media (e.g. a Flash drive) and copy it to the desktop (or any location) of the other computer.


Next is to go to Bookmarks > Show All Bookmarks  and click the "Import and Backup" button


Then, click "Import Bookmarks to HTML...."


After importing the backup file you created earlier, your bookmarks from that file will be restored. Close the Library window.


That's all.


NB:


Restoring bookmarks from a backup will overwrite your current set of bookmarks with the ones in the backup file.


If you use the "BackUp" option, it will create a JSON file which might not be detectable by the other PC. So, use the "Export bookmarks to html..." option as recommended in this post.


Recommended: How To Delete All Firefox Bookmarks at Once

How To Delete All Firefox Bookmarks at Once

If for some reasons, you want to delete all your Firefox bookmarks at once, to start afresh, follow me through the steps below:


==> Launch Mozilla Firefox on your computer

==> Click the Bookmarks icon


firefox bookmarks icon


==> Scroll down and click "Show All Bookmarks" to open the Library window


==> Click "All Bookmarks" in the left navigation menu pane


==> Click "Bookmarks Menu" to view your bookmarks in the right pane


firefox bookmarks removal


==> Hold the "Ctrl" key and click each bookmark you want to remove to select multiple bookmarks.


==> Press "Delete" to remove the bookmarks and then close the Library window.


Alternatively, you can start Firefox in safe mode  ( aka "Restart with Add-Ons Disabled") and reset your bookmarks to default. You can try the trick below if your version of FireFox will support it.


==> Start > All Programs > Mozilla Firefox : Mozilla Firefox (Safe Mode)

==> "Reset Bookmarks to firefox defaults"


I hope this helps.


Recommended: How I BackUp FireFox Bookmarks and Transfer To Another Computer

Tuesday, 21 October 2014

You Don't Have Enough Privileges To Configure Internet Connection Sharing Error on Windows 7 Starter : The Solution

Earlier today, I set up an ad hoc network on my Solar-powered Samsung NC215 netbook, running on Windows 7 Starter; so I can share my glo data plan internet connection with my other devices (iPad, Infinix phone etc). I managed to do this by typing "adhoc" into the Windows search bar in the Start Menu.


However, after it was successfully created and ready to use, I saw a recommended option to "Turn on internet connection sharing". After clicking the button to enable the option, a new page was displayed with the message :


"you don't have enough privileges to configure internet connection sharing"


I was surprised because I logged on to the netbool as an administrator and I've used the same trick to set up wireless internet connection on my HP laptop.


After a quick google search for solutions to the problem, I discovered that it's a limitation imposed by Microsoft on PCs running on Windows 7 Starter. There is a Windows 7 edition compariosn chart on Wikipedia that clearly states that internet connectiong sharing (ICS) is not supported on Windows 7 Starter.


So, What Is The Solution?


You have to upgrade the Windows 7 Starter to at least Windows 7 Home Premium to unlock the limitations. Alternatively, you can install Windows XP on a seperate partition on the netbook.


I hope this helps.


If you know any other way of making the internet connection sharing to work on Windows 7 Starter without upgrading, kindly share via comments.

Friday, 15 August 2014

How To Change The Default Program For Opening pdf Files on Windows 7

After working on an invoice earlier today using Microsoft excel, I decided to convert it to pdf using primopdf software. After the conversion, the file appeared as if it is a Firefox html document on the desktop of my Samsung solar netbook (NC215).


I was surprised because Adobe Reader is installed on the PC and expect it to be the default program for opening .pdf files on the PC. I guess the association with Firefox happened because I installed it just yesterday and probably didn't notice the file associations option during the installation of the internet browser.


In this tutorial, I've decided to share with you how I changed the default program for opening pdf files on the windows 7 netbook from Firefox to Adobe Reader. Just follow me through the steps below:


==> Go to Start > Default Programs > Associate a file type or protocol with a specific program


file association on windows 7


==> Select .pdf, then click Change.


set default program windows 7


==> Select your preferred program for opening .pdf files, eg Adobe Reader


==> Click OK.


That's all.


You can buy cheap Samsung laptops and netbooks at Konga here

Sunday, 6 October 2013

Sharing Tab Missing in Network Properties Of Your Windows 7 Starter Netbook? This is Why

I am trying to create a wiFi hotspot on my HP 2140 Mini-Notebook PC running Windows 7 Starter so I can wirelessly share my internet connection on the net-book with my iPad 3. I set up wireless internet connection on the netbook by typing "adhoc" into the Windows search bar in the Start Menu; yet my iPad 3 won't connect to the internet.


One thing that I found to be strange was that the iPad3 connects fine to the wireless connection I created using the same "adhoc" trick on my HP Compaq laptop running Windows 7 Home Premium. After messing around with the netbook and laptop, I noticed that the "sharing" tab is missing in the properties of the internet adapter on my netbook.


Windows 7 Home Premium Sharing tab


As you can see from the screenshot above from my HP Compaq laptop, the tab is where you will have to enable other network users to connect through to the computer's internet connection but the netbook is missing the "sharing" tab. I think that this might be the problem.


I decided to google how I can enable the sharing tab on my netbook. After reading through different forum thread and blog posts, I was able to find out that Microsoft took out the Internet Connection Sharing feature in Windows 7 starter, the same way the company buried the Snipping tool in the OS. I also stumbled on this wikiPedia chart where it is clearly stated that Windows 7 Starter OS doesn't support internet sharing.


So, How Do I Share Internet Connection on My Netbook?


To share your wireless connection on your netbook, I suggest you upgrade your Win 7 Starter OS to the one that supports the feature or you install Windows XP on a separate partition on the netbook.


Are you experiencing similar problem? Are you able to share your the internet on your netbook running Windows 7 Starter? Please, let me hear from you via comments.


Cheers!

Saturday, 28 September 2013

AVG for Windows 8 Free Download

If you are in need of antivirus for Windows 8, you can consider downloading the AVG AntiVirus Free 2014. It is compatible not only with Win 8 but also with Windows XP and Vista.


The 2014 version of AVG not only helps keep your personal information safe when you're online and on your PC, but also protects your privacy in a better way with the new integrated File Shredder which deletes files permanently so it can't be accessed or recovered by someone else. It also allows easy access to AVG mobile apps while alos boasting of improved detection rate.


AVG AntiVirus 2014


To install the free AVG 2014 on your computer:


==> Go to : http://www.avg.com/ww-en/free-antivirus-download

==> Click on the "free download" button. You might be taken to a new page.

==> Click the "download now" button

==> If you are asked whether to run or save the file, select Save or Save as. Downloading the file to your desktop is recommended

==> Double-click the downloaded file to start the installation process and ensure you follow the instructions on your screen.

How I Make Windows PC Starts Directly Without Multiboot Option

Few days back, I gave out my HP 2140 Mini-Notebook PC to a friend to help me format it and load Windows 7 on it using his External DVD drive. On getting it back from him yesterday, I noticed he installed Windows 7 on the HD and Windows XP on a different partition, creating a Dual Boot.


On StartUp, it showed two OS options (Windows 7 and XP) to boot into and I have to select windows 7 to get started. Not satisfied with this, I decided to google how I can remove XP from dual boot and still be able to boot Windows 7.


Unfortunately, the guides I saw were so complex that I decided to just disable the multiboot option from showing up when Windows starts. This lets the PC boots directly with Win 7 although, the Windows XP still remains on the PC.


To make your PC boot directly With Windows 7 without prompting for boot screen,


==> Go to Control Panel

==> Click on "System" > Advanced System Settings (On left tab)

==> Select the "Advanced" tab and click Settings in "Startup and Recovery"

==> Select "Windows 7" as default operating system and Uncheck "Time to display list of Operating systems"

==> Select OK.


windows dual boot screenshot


That's all.


Anytime you start your Windows PC, you will no longer see the dual boot option.


Since I have a fresh install of both OS on my netbook, I will erase it all and start over so I can have one OS on it.


If you won't like to start all over, you can read how to remove the older version and just use Windows 7 or how to Uninstall Windows 7 on a multiboot system. You can also read more about having more than one operating system on a computer.


I hope this helps.

PLACE YOUR ADS HERE