Pages

Receive More Updates

Date: - Time:
SMS: Send FOLLOW BALLOWAP To 40404 For Free - EMAIL: azeezbello8@gmail.com

Friday, 12 June 2015

Permanent IMEI fix For Mediatek MTK6582 (Micromax A106) | Change IMEI

Permanent IMEI Fix for Mediatek Phones.
                 IMEI Stand for International Mobile Station Equipment Identity which is a unique 15 digit identity code of each phone. If you lose this code, you won't be able to make any calls or track your Phone once its lost. The IMEI number is used by a GSM network to identify valid devices and therefore can be used for stopping a stolen phone from accessing that network. For example, if a mobile phone is stolen, the owner can call his or her network provider and instruct them to "blacklist" the phone using its IMEI number. This renders the phone useless on that network and sometimes other networks too, whether or not the phone's SIM is changed. You can find you IMEI No by entering *#06# on the dialpad. In this guide I'll help you to restore your lost IMEI No. which is generally lost due to installing custom ROM, using improper method for rooting etc. One can easily find your phone's model through your IMEI No. 

Don't Miss : 
Tested On  Micromax Unite 2 (MT6582) :


Things needed :

1. A PC, data cable and a phone.

2. MauiMETA 3G :  
3. Android Gadget CDC driver :
4. SP drivers :
5. BPLGU modem file for MTK6582 (If U have Mtx 65XX then then Download BPLGU modem file for Your Mtk)
6. CDC drivers (if Sp Driver Not Work)
Procedure:

1. Download all above, extract as needed.

2. Connect Phone to PC in USB debugging mode and install drivers.

3. For windows 8.1/8, move your mouse to top right corner and click on settings-power. Now press and hold shift and click restart. from advance options select 7 to disable driver signing.

4. Once PC is restarted, press windows key+pause break to open system properties.

5. From left select device manager.

6. From actions menu click add legacy hardware.

7. Click next and select Install the hardware that i manually..... (advanced), click next, select show all devices, click next, click have disk, then browse, locate SP_Drivers folder and select CDC-acm.inf, click open, click OK, select Mediatek Inc. and MediaTek USB VCOM (Android), Click next and next again, click finish. Refer below image.
How to Install Mediatek Drivers if device is not shown in device manager.


8. Install MauiMETA and run it. Use USB COM and from Options menu select Connect smart phone in meta mode.
 Install MauiMETA in Mediatek.
 Install MauiMETA in Mediatek.
9. Press Reconnect and connect phone in switched off state with battery. The blinking led will become yellow and you can see "Connected with target"


10. Now from drop down menu select IMEI download. Click OK till you see IMEI download box.

11. Click Change NVRAM Database FIle and browse to MT6582 DB File\MT6582\BPLGUInfoCustomAppSrcP_MT6582_S00_MOLY_WR8_W1315_MD_WG_MP_V5_1_wg_n (BPLGU modem file for MTK6582). Click OK on any warning.

12. Leave IMEI Increasemnt 0. Write first 14 digits of your IMEI in IMIE box and last 15th digits will go in check sum(should be entered automatically). Eg:- if IMEI is 123456789123456, write 12345678912345 in imei and 6 in checksum. Do same for Sim_2

13. Press Download To Flash. You will see Download IMEI to flash successfully. Now close the box (or Alt+F4 or close from task manager if stuck).


14. Restart the phone, see the magic

Here are the detailed videos :
Credit-
              I Hope this method works for you. Don't forget to like, +1 & Share this post with all other Mediatek users. If you are stuck at any step, feel free to ask your doubts in the comment section. Have a good day ! -Vijay Jaiswal.

Wednesday, 20 May 2015

Install Original HTC BlinkFeed on any Android Smartphone without ROOTING.

HTC BlinkFeed Sense 6 or 7 for all Android Phones,
   HTC Blinkfeed (Sense 6 or Sense 7), Although HTC is not performing well currently against other Smartphone makers but it has got a really positive feature i.e HTC's Blinkfeed. Being the most Popular & loved Homescreen Blinkfeed has got some really cool features which is well said by the Tagline HTC Blinkfeed™ : Your world in one screen which means all your Social media Stuffs, Daily News & other stuffs in your homescreen which are arranged in a very beautiful manner. I personally being a Blinkfeed fan couldn't resist myself to post this cool App made by one of XDA member Xpirit. This Blinkfeed is extracted from the latest HTC Phones i.e M8 & M9 so it is exactly similar to the original one which has tones of customization options & a very Attractive looks which gives a Premium look to your Smartphone's homescreen. Install this is too easy, all you have to do is install this Apk files normally. Get up-to-date in an instant. Enjoy social posts, breaking news, sports updates and more—all based on what you like, all in one place. HTC Sense Home combines the power of BlinkFeed and the Sense Home widget to create a fully customizable and deeply personal experience. Apps and content appear automatically when you need them. 

What is HTC BlinkFeed™ ?


                    Personalize your own stream of online content in seconds, and stay updated in a glance. Swipe your home screen once for new Facebook posts, Twitter feeds, breaking news, sports scores, and a lot more. If you browse for it online, it’s on your HTC BlinkFeed. Only much easier to find. Over ten thousand sources from all over. Facebook, Twitter, ESPN, MTV, The Huffington Post, and many, many more. You'll also get recommendations for nearby restaurants, cafés and bars from BlinkFeed. Offline Reading mode lets you save articles to read later when you're on a plane, travelling abroad or just on-the-go.


HTC BlinkFeed Sense 7 :

Requirements : Android 4.4 or higher
Features : Infinite apps in folders
Includes :

  • HtcBlinkFeed - v7.0.498247 
  • HtcServicePack - v1.02.485370
  • MyHTC - v7.0.495204
  • Weather - v7.0.489623 
  • WorldClock - v7.1.498168 
  • HtcWeatherClockWidget - v7.0.497815 
  • HtcLocationServicesSetting - v1.0.481224
  • LocationPicker - v2.4.474239
Downloads :

1. HtcBlinkFeed, HtcServicePack & other Apps :

2. Facebook, Instagram, GooglePlus Plugins for BlinkFeed :
Screenshots :
               I have taken some screenshots by installing this on my Lenovo A6000 running on Android 4.4.4 with a custom skin VibeUI. But, i'm also attaching a screenshot from AndroidOne Phone to show you how it looks in stock Android.


HTC BlinkFeed Sense 6 :

Requirements : Android 4.4 or higher
Features : Custom colors & RSS through Gaku's BlinkManager - Infinite apps in folders
Includes :

  • HtcBlinkFeed - v6.3.840430 
  • HtcServicePack - v1.1.853606 
  • Weather - v6.2.836008 
  • WorldClock - v6.1.797217 
Downloads :

1. HtcBlinkFeed, HtcServicePack & other Apps :


2. Facebook, Instagram, GooglePlus Plugins for BlinkFeed :
Screenshots :

FAQ's :


1. How to Install ?
>  Download the zip file, extract it through any zip extractor then install all the Apk files normally.


2. How to show Facebook, Instagram & GooglePlus in Blinkfeed ?

>  After installing all the Apks install the Plugins given just below the link. Now, Go to BlinkFeed drag to left to see a Bar which shows Add Content for Sense 7 & 3 dots at the top corner in Sense 6. Go to Services & Apps and select Facebook,Instagram etc & Grant Permission. Google Plus is currently not working with Sense 7.


             If you don't understand anything you can head over to the Official thread of this App : HTC BlinkFeed | Sense7-6. If you really like this stuffs please make a small donation for Xpirit which would help him make more improvements in this. Don't forget to share this post with all the BlinkFeed lovers. You can also ask your doubts in the comment section, I would be glad to help you.

Saturday, 14 March 2015

How to Fix Screen rotation by 180 degrees after installing Custom ROMS

Android Screen rotation After installing Custom ROMS
            Few users have faced, screen rotation by 180,90 Degrees after installing custom ROM in their Android smartphone. This issue majorly occur due to improper phone software drivers or improper installation of ROM. 'Karbonn A26' again a poor work by Karbonn. Single phone with 2 mediatek version MTK6572 & MTK6577. This screen rotation bug is found in Karbonn A26 few Samsung, Xperia, Xolo & Micromax devices. Android being an open platform has few bugs too. But, there are solutions too but requires Root Access as you need to mess up with your system. So lets start with this simple tutorial. 


Don't miss : 
Method :
  1. Download any root file manager app like Root browser, ES file explorer from Google Playstore.
  2. I would recommended ES file explorer as it has better interface & its all in one.
  3. Open ES File Explorer
    • Press the Fast Access Menu button (top left)
    • Press Tools
    • Scroll down & locate Root explorer, switch the toggle to yes.
    • Click on the Root explorer; you will find a small popup box. Do as shown in below image :
  4. Now you have enabled root browser relaunch ES File Explorer & Click on above tab showing sdcard & Click on " / Device".
  5. Goto System folder & Open build.prop file as text.
  6. Search for line "ro.sf.hwrotation='value'" if you didn't find this line then copy this line at the end of the file.
  7. Now setting the value as per the rotation, if your screen is rotated by 180 Degrees i.e. upside down then enter 180 in place of value. if your screen is rotated by 90 Degrees i.e. right anglr then enter 270. 
  8. Value = 360 - Rotation Angle.


             That's all ! This is the easiest method to get rid of screen rotation bug. Please take a moment & Google +1,share this post if this helped you. If you are facing rotation bug even after making this changes leave your device name & info in comment section. Have a good day !

Monday, 29 December 2014

Get Android L, Xperia, IOS, Kitkat Status-bar & Navigation Bar on any Android.


  .          I have seen people searching for 'How to get Android L or Sony Xperia Status bar or Navigation bar?' First let me get this clear, customizing your Smartphone's system files requires Root Access. Today, i'm here with a trick to customize your Status bar & navigation bar with a single click. Get any Android phone's looks like Xperia, Nexus, Samsung even Apple IOS. I think this might be the simplest way to do this for the people who don't want to end up bricking your phone. I personally use this on my phone as its Simple, clean & easy to apply. Generally if you search for status bar customization people suggest Edit your systemui.apk, framework.apk & bla bla. What if i don't have any any technical knowledge & you want to do this without any trouble. I found this trick which is not mentioned any where on the internet as many of the people are not much aware about any such app. So, lets begin with customization ! Get Auto, mobile, car insurance easily.

           First of all you need to root your Smartphone which will void your warranty, so think before proceeding with this customization process. You can root your smartphone with any suitable method for your device mentioned on web. Also, checkout some steps given :  Get Auto, mobile, car insurance easily.
            Now, once you have rooted your phone check for root access using any Root checker app available on Google Play Store. So, you have proper root access download the below App named as Xposed Installer : Click here to Download. After downloading install this App in your phone through normal procedure of installing a App. After Installing Open Xposed App & Grant Root Access. Click on framework, click on Install/Update & Reboot your phone.  Get Auto, mobile, car insurance easily.

After Reboot download this App & Install : Click here to Download. After installing this App follow below steps :  Get Auto, mobile, car insurance easily.


1. This is my phone's screenshot before installing all this App i.e without any customization. If you don't believe its mine you can see my name on Whatsapp+'s widget. It's running on Android ICS 4.0.4. It's Nova launcher as you can see i have not customized anything & running stock ROM. The Status bar is of Stock Android & i don't have navigation bar (I have Hadware buttons).  Get Auto, mobile, car insurance easily.


2. After you have installed Xposed App, launch the app & Goto Module Option available on the main screen op App. You will see a screen some what similar to this without the Greenify & Tinted Statusbar. Just check the box in front of Xstana module as you can see in the image given. After this reboot your phone. Get Auto, mobile, car insurance easily.


3. After enabling the App as in Step 2. Open Xstana App that you have installed before. You would see a screen some what similar to this without the Arrows. I have made things clear in the image that the first option is for Selecting Status bar & second is for navigation bar. The navigation bar option works only if you have Navigation bar on screen as in Nexus, sony, LG, Titanium S5+ etc. This is the free version of App but it has enough option for us. The second image is of the Status bar option as you can see the Options it has so many Status bar themes which you can apply on your phone in just single click. 


4. After Selecting the desired theme of Status bar(1) & Navigation bar(2) from the options given click on the Correct button denoted by Number 3 in the image. Now reboot your phone & you are done.  Get Auto, mobile, car insurance easily.


Android L & Xperia Theme After Applying : 

Final words : 
       I Hope this method worked for your phone. Finally there is a working method for customizing your phone's Status bar & navigation bar in single. Please share this post so that your friends can use this method to customize their phone to a complete new look. If you find any difficulty in any step you can ask me below. Any feedback or suggestions are welcome in comment section. Have a good day !  Get Auto, mobile, car insurance easily.

Monday, 17 November 2014

[Guide] From Rooting to Installing Custom ROMS for Dummies.


         "Rooting." What does that mean, and why would you ever want to do something to your phone that sounds like the horrible torture your mother used to inflict on unsuspecting weeds in the garden? That's what we're going to discuss.You might have read some complex definitions of rooting your Android. So first of all let me tell you what is rooting & its Jaw dropping features. Google provides stock Android which has some limitations like you cannot kill System apps even if you use Any kind of Ram booster of anything, the app starts up the very next moment. There are many such issues faced by Android users & the Only solution for this is 'Rooting'. Once you root your phone you can Access, Change, Customize it any way you want. Rooting Not only increase you Battery life & Performance, but also Provides you option to unofficially Upgrade your Current Android version. There are many benefits of rooting your phone like : 
  1. Boost your Phone speed & Battery Life.
  2. Remove Preinstalled crapware like System Apps.
  3. Remove Bloatwares, Apps like Facebook, Chrome Keep sucking your Ram & battery by running in background So, Among the smartphone geek crowd, applications like these are referred to as "bloatware:" they do nothing but bloat the software by existing as unnecessary applications. 
  4. Tweak your phone like : Increase Video streaming speed, Increase Wifi Speed, Increase SIM detecting Speed, Increase SD read/write speed.
  5. Most Important & Best part, Install Custom Kernel & Custom ROMS ( I will explain about it in Installing Custom ROM section Custom ROM section )
  6. Finally, Truly Own your Device, Make it appear in the way you want.
             Having a rooted Android phone is also beneficial because there are several Android applications which are extremely useful and also require root menu access like Greenify ( Stops Background apps until you don't use it. ). Other applications allow you to uninstall bloatware entirely, and so on, and so forth, from basic functions to extremely technical on a level that even I fail to entirely understand.

                 But like Uncle Ben Parker said in Spider-Man: "With great power, comes great responsibility." Benefits of rooting an android phone to gain access to the functions and menus normally inaccessible to the typical cell phone user are many, but rooting is not a process that should be taken on halfheartedly. These benefits come at a cost-- almost all manufacturers warranties become void once you root your phone. So, either be prepared to accept that, or learn how to "un-root" in case of an emergency. 

How to Root ?

     I think this much Introduction is enough for you to understand what is rooting all about & what are its Benefits. So, Finally you have decided to root your phone. Let's Begin :
     Rooting Can be done by two method either from Computer or from your Android phone itself. 

1. From your Phone : You can use apps like Framaroot, Towelroot etc 
   For Complete Method head on to this Page : 

2 . From Computer : You can use Softwares like Root genius, Kingo ROOT, Unlock Root all this apps are once click root, that means they will root your smartphone in just once click.
          For Complete Method Head on to this page :  Root Your Android from Computer.

What After Root ? 


Check Root : 

            First thing to do before starting up customization is Check whether your device is properly rooted or not.You can do that by a number of ways, there are plenty of root checker apps that available in the Play Store. Try this : Root Checker.

Check for Root Apps : 

           If you don't want to install Custom ROMS or custom recovery & like to stay with your Stock rom then here is a solution, you can install Apps which require root permissions to remove Pre-installed Apps, Increase free ram, Customize themes etc. You can check on our Top 10 Rooted Apps. Best one to be used is Greenify & Titanium Backup.

Install Custom Recovery (CWM / TWRP) :

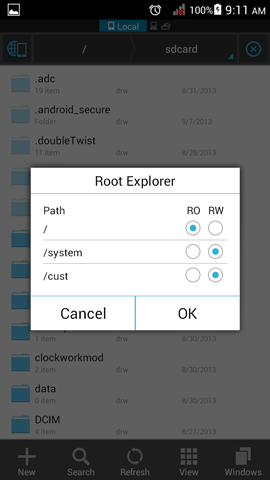
                Custom recovery  would replace the stock recovery that is Pre-installed on your Android Device. A Custom Recovery would allow you do various tasks and really make your life simple. It allows you to flash “Zips” right from the phone itself, there would be no need to use a PC Tool to do that in case. Wipe and manage cache partitions and also it allows to manage Nandroid Backups. So installing a custom recovery on your Android Smartphone stands third, in the list of things to do after you root your Android SmartphoneCWM is abbreviated form of Clockworksmod Recovery & TWRP is abbreviated form of  TeamWin Projects.

  1. For Mediatek (MTK) based phone install CWM by this method : CWM for Mediatek.
  2. For Karbonn users find CWM here : CWM for Karbonn phones. & Install it by this method : How to Install CWM.
  3. Other device users can find their Custom recovery on XDA or on CWM official site.
Increasing internal memory : 

            Also some Android Smartphones have really low internal memory like some low end smartphones from Smasung, HTC, Karbonn etc, which only have around 300 MB of internal memory, and in that case installing apps becomes a pain . As after installing the most required apps like, Facebook, Whatsapp, etc the memory is almost full and it won’t allow you to install any further app. But do no worry, if you have rooted your Android Smartphone, there is no problem. You can simply increase the internal memory of your Android Smartphone, and it definitely a must thing to do after you root android smartphone, if you specifically have a smartphone with very low memory.


Finally Installing Custom ROMS : 


             Being able to install and flash custom ROMS  is one of the biggest reason that today so many people are rooting their Android Smartphones. Why stick to the old and monotonous interface of the device, when you can get much more interactive looks as well as much more great tweaks with custom ROMs. You can flash custom ROMs and just sit back and enjoy the interface on your Android Smartphone. Actually that is one of the most entertaining advantage of rooting an Andriod Smartphone. Karbonn users can find custom roms for their device on our blog.
       I hope you understood what rooting is all about & how to root, install recovery & many more. Please Like & Share this article if it helped you. Let your friends know about this article. If you have any doubt regarding any topic you can comment below or contact us. Keep visiting, Have a good day !


Saturday, 13 September 2014

Easiest method to Increase Internal memory of Android device.


                       Internal memory of a device plays a major role in device performance & Storage. Few Apps can only be installed in Internal memory which in turn reduces device performance. Most of the low end device user experience this issue. After lot of request for 'Method for Increasing Internal Memory' i am writing this post. This might be the easiest & safest method to increase internal memory of your Android Device. 

Disclaimer : I am not responsible if you brick your device or if your device blows up, implodes, flames start shooting from it, or it kills your neighbor's dog.. It was the other guy... I swear.. :P But i can assure you that it will work if you do the same as i say.

Required softwares:

  1. Link2sd pro (unlocked version) -  Click here
  2. A SD card with two partition - second partition may be of any type. (use minitool or cwm to partition)
  3. Rooted phone -- to root your phone Click here
  4. Lot of patience.
Procedure:

For this method u have to partition your SDcard into two parts :
  • First partition as Fat32 (used as main SDcard)Auto Insurance
  • Second partition is EXT2  ( used as Internal memory )
1. Patition your SDcard using this method : Partition SDcard

2. Download Link2SD plus from above link and install it.

3. Now when you open it after installation. It will ask for the second partition type, select your second partition type you have partitioned to, and grant root permission. Now your your device will reboot automatically.

4. Now after reboot install any app and go to link2sd and select the app installed and click on "create link" and check all four options (Application file, Delvik cache, Library files, Internal data) 
  •  If u want to link apps automatically then go to settings, and check auto link and then go to autolink settings and select all four options there.
5. [Optional] Also select the Auto clear cache option in Link2SD settings.

6. Now after doing all these select the inbuilt apps one by one in  Link2SD and link their dalvik cache one by one .

7. After doing this clean your ram with Advanced task manager or any app. And see your internal memory now.  :D

8. Now even if u reboot your device, the low memory message will not appear

Note :  In some user apps there may be no library files present to link them in that case you will not be able to link lib files. Don't panic, its normal.

             I hope this article helped you. If you have any doubt or suggestions you can comment below. Do Like & Share this post . If this method didn't worked, you can use this method which has 100% Success rate : Increase internal memory.

PLACE YOUR ADS HERE