Pages

Receive More Updates

Date: - Time:
SMS: Send FOLLOW BALLOWAP To 40404 For Free - EMAIL: azeezbello8@gmail.com

Sunday, 1 March 2015

Why I Use owly URL Shortener When Scheduling Posts With Hootsuite

A URL shortener converts a regular URL into a more condensed format. In other words, it takes a long url and makes it shorter saving valuable space to be used in social media updates especially Tweets. To get a shortened link, you would simply plug your full URL into a link shortening service or tool and the tool would provide the shortened link.


ow.ly is Hootsuite’s built in URL shortener that you can access via your Hootsuite dashboard or on the ow.ly site. I use it alot when I schedule my social media updates using hootsuite.


ow.ly url shortener


Once you create a shortened link using owly URL Shortener and share it, you can plug it into HootSuite report: "URL Click Stats" to see activity for that specific link, regardless of where or when or how it was shared. You can use this insight to determine what Tweets resonate most with your followers.


owly click stats


If you also generate "Ow.ly Click Summary" report for your Twitter account from your hootsuite dashboard, you will be able to view click stats for all your Ow.ly Twitter links that were clicked on. This includes total clicks per day, clicks by region and the most popular clicks within a time range.


Since HootSuite metrics are dependent on the use of a HootSuite shortened link, and since it it best practice to use shortened links in your social media shares anyways, I think using a HootSuite or custom shortened link isn't a bad idea. .


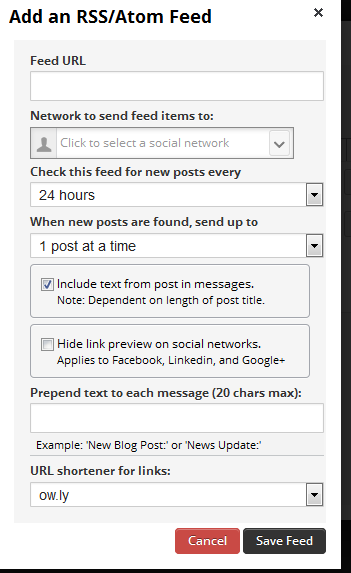
Note: The Hootsuite dashboard offers four URL shorteners: ow.ly, owl.li, ht.ly, and htl.li. You can select the one you prefer via the "Advanced Settings" while composing your message on the hootsuite dashboard. They all do the same thing.


Do you also use the Ow.ly URL shortener?

Saturday, 28 February 2015

How does Hootsuite Auto Schedule Work

One of the more powerful options within HootSuite is AutoSchedule. Instead of you manually selecting what time you want to schedule or post your social media messages using the hootsuite scheduling feature, you can opt to use the AutoSchedule option, to optimize and automate the scheduling process.


AutoSchedule simply chooses an optimal time for you to post, thereby relieving you of the stress of worrying about the best time of the day to share your posts.


Hootsuite claims that the algorithm uses a combination of your activity and your followers activity by looking at your personal history to determine sharing patterns from your past and post content accordingly whilst also looking at your followers feedback.


According to hootsuite, the best practice currently is to use the autoscheduling feature frequently, as it gets more "intelligent" at learning your patterns the more you use it. I've also read somewere that manually scheduling messages also helps to improve the autoscheduling algorithm.


AutoSchedule is activated by clicking on the Scheduler icon and turning AutoSchedule on.


Before using the feature, I recommend you set your time zone via "Settings" > "Account". Hence, if you are in Nigeria, you can set it to (GMT+1) Africa/Lagos.


I also recommend you configure your Autoschedule settings via "Settings" > "Autoschedule". Right there, you can set the number of posts to schedule within a time interval daily as well as select the days you want messages to be scheduled on.


hootsuite autoschedule


For example, the settings above simply means 6 Auto Scheduled posts will only go out on Monday, Tuesday, Wednesday, and Thursday between 10am and 11pm for the time zone I have my Dashboard set to. If you compose 25 messages in one sitting, only 6 of them will be AutoScheduled for that particular day and then they will be moved on to the next day in your settings.


Rest assured, like regular scheduled messages AutoSchedule messages can be viewed and rescheduled at any time. These messages will appear with a Clock Icon next to them in Publisher and can be rescheduled the same way as regular messages. After rescheduling, the Clock Icon will disappear confirming your new scheduled time.


If you are looking to set up multiple messages for specific times and repeat messaging I suggest hootsuite Bulk Scheduling. With Bulk Scheduling you can post up to 350 messages at once. These messages will go out at the time and frequency that you input.


How To Auto-schedule Updates Using Hootsuite


    ==> Just like scheduling your messages as explained here, select networks and type your message.

    ==> In the drop down menu, turn the AutoSchedule feature ON.

    ==> Click AutoSchedule and you’re done!


To ensure that your messages are sent at the exact date and time that you want, the best alternative would be to set your AutoSchedule to OFF. When you compose a message, simply click on the schedule icon, change AutoSchedule to OFF, then manually select the date and time for the post to go out.


I hope this helps.


Do you use the Hootsuite AutoScheduler? Kindly share your experience via comments.


How To Schedule Tweets and Facebook Updates Using Hootsuite

Few days back,  +Akpene Jacob  shared a tutorial on how to post blog posts automatically to Facebook using hootsuite. In the post, he explained how to add your Facebook account to your hootsuite account and how to integrate your blog feed so that hootsuite can be posting your latest blog updates to Facebook automatically.


Well, you can do more with hootsuite. The social media management tool helps you find balance between work time and free time. You can use it to grow your blog traffic with a continual presence online and enjoy the free time you deserve as a blogger.


Hootsuite allows you to schedule social media updates in advance and target your audience on the social channels you choose. Believe me, if you schedule Tweets and Facebook Updates, it will free up a lot of social media time.


There are many situations where being able to schedule Twitter messages comes in handy: you could have too many Tweets to handle at once, you may be out of town on vacation, or just out of office for a quick bite. Scheduling also comes handy for paid online campaigns.


Hootsuite supports manual scheduling and auto scheduling. The manual option lets you select date and time your update will be posted to your social media channels while the Auto-schedule claims to choose the best time slots to post your desired number of social network updates within your specified time interval.


How To Schedule Updates Using Hootsuite


I assume you've added your social networks as explained here.


==> Sign in to www.hootsuite.com or launch the hootsuite app on your mobile device


hootsuite schedule


==> Choose the social profiles you wish to send your messages to using the Social Network Selector.

==> Type your message in the compose message tool.

==> Click the calendar icon in the bottom of the compose message tool.

==> Set the date and time you want your message to send, and select if you want to receive a sent e-mail confirmation.

==> Click the "Schedule" button. That's all!


You will receive email notification once the scheduled message is published on the selected social media channel.


NOTE: If you use the hootsuite URL shortner, you will be able to track the stats of traffic you get from your hootsuite posts via the hootsuite reports.  It’s also important not to overwhelm your audience with too much content.


Want to edit your scheduled post?


==> Click the publisher icon on the left-hand side of the dashboard


==> Click the "Scheduled" tab

==> Edit any scheduled message by hoovering over it and clicking the edit icon.

==> Make your changes and Save.


If you don't want to be entering the date and time everytime you schedule a post, you can use the auto-schedule option. I use this option alot. With it, I can auto-schedule posts for one week within 15 minutes. So, when am at work during the week, my posts keep flying all across my social media channels :)


You can read how hootsuite auto schedule works here.


Do you use Hootsuite to schedule your tweets and Facebook updates?

Tuesday, 24 February 2015

How To Post Blog Posts Automatically To Facebook Using Hootsuite


This is a guest post compiled by Akpene Jacob  for OgbongeBlog


My fellow bloggers always send me mails and messages on how I use hootsuite to drive traffic to my blog, I always explain it to them but some will still be confused on how to use it effectively so i decided to write a tutorial on it so that they can fully understand it and those that have not heard of it too can use it.


So lets get started. You can use Hootsuite to drive traffic to your website or blog by connecting it with your   Facebook, Twitter or GooglePlus accounts so that you can schedule posts which will be posted automatically on this social media platforms.


hootsuite social media dashboard


Now you are ready use to Hootsuite, go to : www.hootsuite.com on your browser and sign up if you are a new user or log in if you already have an hootsuite account. After you finish setting up your Hootsuite account and you logged in you will see the screen below.


Click on ''Add Social Networks'', a new window will pop up as seen below :


You can connect only one social network if you're still using the free account but if you upgrade to Hootsuite Pro, you can connect as many as you want. See the screen below after I connected my Facebook account.


In the screen above you can see the Facebook groups I belong to but you I can only add 2 groups because I am still using free account, you should now add the two groups you want to be posting in.


Now we are done with the connecting ish, lets now link our Feeds to Hootsuite to so that it can do the work for us automatically.


 Go to Publisher and click on ''RSS Feeds''\


 A new window will pop up click on ''RSS/Atom'' so that you can connect your Feed to Hootsuite so that anytime you post it will automatically posted in your groups.


Now click on that Plus icon below ''RSS/Atom''


That's the screen you will see above.


Fill the form as explained below:  


Feed Url: Type in your blog address


Network to send feed items to: Select your Facebook profile or one of your groups.


Check this feed for new posts every: You can select every one hour, two hours and so on.


When new posts are found, send up to: You choose 1, 2 3 and so on.


Save your feed when you are done.


After you save the above, anytime you publish on your website/blog, Hootsuite will always be updating your Facebook for you with your latest blog posts.


In next tutorial, I will share with you, how to schedule your blog posts to be published on Facebook, Twitter etc using Hootsuite.


Are you also using hootsuite? Kindly share your experience.


This post was written by Akpene Jacob. He is a young Nigerian blogger and an internet Entrepreneur. He blogs at www.jaybossng.com. You can follow him on twitter @iamjayboss .

PLACE YOUR ADS HERE