Pages

Receive More Updates

Date: - Time:
SMS: Send FOLLOW BALLOWAP To 40404 For Free - EMAIL: azeezbello8@gmail.com

Sunday, 6 April 2014

How To Fix Broken Blogger Feeds

After Blogger restored my blog few days back, I noticed that the links of the Related Posts, Recent Posts widgets were all broken. Clicking on them leads to a 404 page. Twitterfeed and other applications using the Blog's feed were all affected.


While trying to find out what's wrong, I discovered that the blogspot feed url wasn't redirecting to the custom domain feed url i.e http://www.ogbongeblog.blogspot.com/feeds/posts/default?alt=rss wasn't redirecting automatically to http://www.ogbongeblog.com/feeds/posts/default?alt=rss.


broken Blogger feed


Instead of it redirecting automatically, it will display an error message that the blog is not hosted on Blogger blah blah blah as seen in the screenshot above. Also, Feed Validator coudn't validate the feed as seen in the screenshot below:


feed validator error


I reported the issue at Blogger forum and while waiting for feedback from Blogger top contributors, I decided to try something?


What's that?


I removed the custom domain from the blog to revert it back to www.ogbongeblog.blogspot.com. Without wasting much time, I reconnected it back to the custom domain. I refreshed my blog and was so happy when I noticed that all broken links have been fixed.


That's it.

Thursday, 3 April 2014

3AL.com: First Bank Portal For Individuals and SMEs To Sell Online

If you need to create an online visibility for your business at no extra cost, then you need to try the First Bank Nigeria 3AL portal; a self-service tool which enables businesses to set up their online store, upload their products and interact with potential consumers from all locations in Nigeria and globally.


3AL.com is a business networking portal, where you can buy and sell anything online from anywhere in the world. On 3AL, you can make connections and transact business from the comfort of your living room to any part of the world saving you time, money and stress.


The platform allows sellers to receive online payment for their products. You will pay transaction fee per product sold if you decide to use the
platform to process online payment for your products. 3AL will deduct
the transaction fee before you are paid into your registered bank
account. Online payment is processed by FirstEConnect, a robust payment gateway deployed by FirstBank.


For sellers that are not using the platform's online payment processor, buyers can easily contact them to arrange for payment and delivery of their orders.


All deliveries on 3AL are handled by DHL Nigeria International. DHL picks up the products from the sellers and get them delivered to the buyers. Buyers pay the shipping cost. Delivery of purchases within Lagos takes place within 48hours while delivery outside Lagos takes place within 72 - 96hours.


3al website
First Bank 3AL Portal


Other Features of 3AL Portal :


==> SMEs can list their business names and info free of charge on the portal. 

==> Business owners and consumers can login to the site with Facebook profile.

==> Businesses and consumers can post comments on displayed products.

==> Users can switch between individual and business profiles. 

==> Users can chat with other users and businesses through an online chat engine.

==> Users can Like, Tweet, +1 displayed products.


If you are a business owner, you will agree with me that this platform will help in reducing the cost of doing business since customers can order for goods without visiting business location.


Check out my personal 3AL store here


What's your take on this?


If you are already using 3AL, kindly share your experience via comments.


If you know other Nigerian eCommerce portals similar to 3AL, kindly share via comments too.


NB: A friend might be lucky to start making money with the help of this info. So, PLEASE, share this with friends. 

How to Add Numbered Page Navigation Widget for Blogger

In Blogger, we have the option to set the number of posts we want to display per page by going to the Settings menu > Posts and comments > Show at most ? posts. Once the number of total posts in our blog exceeds this number, we will see "Older Posts" and "Newer Posts" navigation links in our home page and archive pages footer as Blogger doesn't have any built-in function on page numbering. But page numbers instead of older and newer posts links could help our blog visitors to navigate quicker (jump from one page to another page or click on a specific page) and know the total number of posts published. Here's a tutorial on how to add numbered page navigation using Javascript to a Blogger/ blogspot blog. You can select any one of the 7 different styles that I have mentioned below.

numbered page navigation widget

Adding Numbered Page Navigation to Blogger

You can add this widget in just two steps.
1. Adding The CSS.
2. Adding The Script.

Now let's see how to add the CSS style for page navigation.

1. Adding The CSS

Step 1. Go to Blogger Dashboard > Template > click on the Edit HTML button:

blogger template html

Step 2. Click anywhere inside the code area and press the CTRL + F keys to open the Blogger search box.


... type or paste the following tag inside the search box and hit Enter to find it:
]]></b:skin>
Step 3. Now choose one of the following numbered page navigation styles and copy the code just below it. Just above ]]></b:skin> paste the code of the style that you want to use:

Style 1

numbered page navigation style 1
 #blog-pager{clear:both;margin:30px auto;text-align:center; padding: 7px;}
.blog-pager {background: none;}
.displaypageNum a,.showpage a,.pagecurrent{padding: 3px 7px;margin-right:5px;background:#E9E9E9;color: #888;border:1px solid #E9E9E9;}
.displaypageNum a:hover,.showpage a:hover,.pagecurrent{background:#CECECE;text-decoration:none;color: #000;}
 .showpageOf{display:none!important}
#blog-pager .showpage, #blog-pager .pagecurrent{font-weight:bold;color: #888;}
 #blog-pager .pages{border:none;}

Style 2:

numbered page navigation style 2
 #blog-pager{clear:both;margin:30px auto;text-align:center; padding: 7px;}
.blog-pager {background: none;}
.displaypageNum a,.showpage a,.pagecurrent{padding: 5px 10px;margin-right:5px; color: #F4F4F4; background-color:#404042;-webkit-box-shadow: 0px 5px 3px -1px rgba(50, 50, 50, 0.53);-moz-box-shadow:0px 5px 3px -1px rgba(50, 50, 50, 0.53);box-shadow: 0px 5px 3px -1px rgba(50, 50, 50, 0.53);}
.displaypageNum a:hover,.showpage a:hover, .pagecurrent{background:#EC8D04;text-decoration:none;color: #fff;}
#blog-pager .showpage, #blog-pager, .pagecurrent{font-weight:bold;color: #000;}
 .showpageOf{display:none!important}
#blog-pager .pages{border:none;-webkit-box-shadow: 0px 5px 3px -1px rgba(50, 50, 50, 0.53);-moz-box-shadow:0px 5px 3px -1px rgba(50, 50, 50, 0.53);box-shadow: 0px 5px 3px -1px rgba(50, 50, 50, 0.53);}

Style 3:

numbered page navigation style 3
 #blog-pager{clear:both;margin:30px auto; padding: 7px; text-align:center;font-size: 11px;background-image: -webkit-gradient(linear,left bottom,left top,color-stop(0, #000000),color-stop(1, #292929));background-image: -o-linear-gradient(top, #000000 0%, #292929 100%);background-image: -moz-linear-gradient(top, #000000 0%, #292929 100%);background-image: -webkit-linear-gradient(top, #000000 0%, #292929 100%);background-image: -ms-linear-gradient(top, #000000 0%, #292929 100%);background-image: linear-gradient(to top, #000000 0%, #292929 100%); padding: 6px;-webkit-border-radius: 3px;-moz-border-radius: 3px;border-radius: 3px;}
.blog-pager {background: none;}
.displaypageNum a,.showpage a,.pagecurrent{padding: 3px 10px;margin-right:5px; color: #fff;}
.displaypageNum a:hover,.showpage a:hover,.pagecurrent{background-image: -webkit-gradient(linear,left bottom,left top,color-stop(0, #59A2CF),color-stop(1, #D9EAFF));background-image: -o-linear-gradient(top, #59A2CF 0%, #D9EAFF 100%);background-image: -moz-linear-gradient(top, #59A2CF 0%, #D9EAFF 100%);background-image: -webkit-linear-gradient(top, #59A2CF 0%, #D9EAFF 100%);background-image: -ms-linear-gradient(top, #59A2CF 0%, #D9EAFF 100%);background-image: linear-gradient(to top, #59A2CF 0%, #D9EAFF 100%);text-decoration: none;color: #000;-webkit-border-radius: 3px;-moz-border-radius: 3px;border-radius: 3px;}
.showpageOf{display:none!important}.blog-pager-older-link, .home-link, .blog-pager-newer-link {background: transparent;}
a.blog-pager-older-link, a.home-link, a.blog-pager-newer-link {color: #fff;}
#blog-pager .pages{border:none;background: none;}

Style 4:

numbered page navigation style 4
#blog-pager{clear:both;margin:30px auto;text-align:center; padding: 7px;}
.blog-pager {background: none;}
.displaypageNum a,.showpage a,.pagecurrent{font-size: 14px;padding: 5px 12px;margin-right:5px; color: #666; background-color:#eee;}
.displaypageNum a:hover,.showpage a:hover, .pagecurrent{background:#359BED;text-decoration:none;color: #fff;}
#blog-pager .pagecurrent{font-weight:bold;color: #fff;background:#359BED;}
 .showpageOf{display:none!important}
#blog-pager .pages{border:none;}

Style 5

numbered page navigation style 5
#blog-pager{clear:both;margin:30px auto;text-align:center; padding: 7px; }
.blog-pager {background: none;}
.displaypageNum a,.showpage a,.pagecurrent{font-size: 13px;padding: 5px 12px;margin-right:5px; color: #3E5801; background-color:#E0EDC1;}
.displaypageNum a:hover,.showpage a:hover, .pagecurrent{background:#FEF6DF;text-decoration:none;color: #E16800;}
#blog-pager .pagecurrent{font-weight:bold;color: #D25E71;background:#FFDEDF;}
 .showpageOf{display:none!important}
#blog-pager .pages{border:none;}

Style 6

numbered page navigation style 6
#blog-pager{clear:both;margin:30px auto;text-align:center; padding: 7px; }
.blog-pager {background: none;}
.displaypageNum a,.showpage a,.pagecurrent{font-size: 13px;padding: 5px 12px;margin-right:5px; color: #AD0B00; background-color:#FAB001;}
.displaypageNum a:hover,.showpage a:hover, .pagecurrent{background:#DB4920;text-decoration:none;color: #fff;}
#blog-pager .pagecurrent{font-weight:bold;color: #fff;background:#DB4920;}
 .showpageOf{display:none!important}
#blog-pager .pages{border:none;}

Style 7

numbered page navigation style 7
#blog-pager{clear:both;margin:30px auto;text-align:center; padding: 7px; }
.blog-pager {background: none;}
.displaypageNum a,.showpage a,.pagecurrent{font-size: 12px;padding: 5px 12px;margin-right:5px; color: #222; background-color:#eee; border: 1px solid #EEEEEE;}
.displaypageNum a:hover,.showpage a:hover, .pagecurrent{background:#E5E5E5;text-decoration:none;color: #222;}
#blog-pager .pagecurrent{font-weight:bold;color: #fff;background:#DB4920;}
 .showpageOf{display:none!important}
#blog-pager .pages{border:none;}
Note: if you want to hide the "First" and "Last" buttons add this line below the CSS code:
.firstpage, .lastpage {display: none;}

2. Adding The Script

Step 4. Now find (CTRL + F) this tag:
</body>
UPDATED! Working version for more than 500 posts:

Step 5. Add the following script just above it:
<b:if cond='data:blog.pageType != &quot;item&quot;'>
<b:if cond='data:blog.pageType != &quot;static_page&quot;'>
<script type='text/javascript'>
  /*<![CDATA[*/
    var perPage=7;
    var numPages=6;
    var firstText ='First';
    var lastText ='Last';
    var prevText ='« Previous';
    var nextText ='Next »';
    var urlactivepage=location.href;
    var home_page="/";
  /*]]>*/
</script>
  <script src="http://helplogger.googlecode.com/svn/trunk/page-navigation2.js"/>
</b:if>
</b:if>

Configuration

After installing, you might want to change these default settings:
perPage: 7,
numPages: 6,
var firstText ='First';
var lastText ='Last';
var prevText ='« Previous';
var nextText ='Next »';
}
1) perPage: how many posts will be shown in each page (7). This value has to be the same as the number of posts on the main page. Otherwise, add the same number by going to "Settings" > "Formatting" and type it in the "Show at most" field, then click on the "Save Settings" button.
2) numPages: how many pages will be shown in the page navigation (6)
3) to replace the 'First', 'Last', "« Previous" and "Next »" texts, just type your own within the quotes.

Labels fix:

By default, Blogger will show 20 posts on label pages. To make this widget appear on label pages, we will have to cut down this down to the value that we gave for the perPage variable.

Find each occurrence of the following code snippet:
expr:href='data:label.url'
Replace it with this one below:
expr:href='data:label.url + "?&amp;max-results=7"'
Here 7 is the number of posts to be displayed per page.

Step 8. Click on the Save Template button and that's it! Enjoy!

Blog Restored 4 days After It Was Disabled by Blogger

Yeah! OgbongeBlog is back :)


Wondering..."from where" ?


Well, Blogger Spam Automated Classification System disabled it on Saturday afternoon.


Exactly same thing happened in October last year but this time around, it was restored 4 days after it was disabled unlike then which took almost a month to get the blog back online.


So fast?


Well, I submitted the unlock request same day it was disabled and decided to chill for 48 hours. 2 working days elapsed and didn't get any feedback from Blogger. So, yesterday, I went ahead to post the complain at the Blogger forum and did the needful.


I forwarded the discussion's link to the contact that helped me with it last year and I was so glad when I received a mail from Blogger this afternoon that my blog has been reinstated.


You can now keep enjoying free access to my tutorials. :)


During the downtime, I was able to move my new blog from Blogger to Wordpress.


Link? 


Don't worry, I will keep you informed once I'm through it. Still under construction...


Please, If you are on blogging on Blogger, always back up your blog and also ensure you set up a custom domain for the blog. Just my two cents...


Have fun!


Wednesday, 26 March 2014

Generate APK Files Online Without Chrome APK Downloader Plugin

While browsing through the pages of my favourite blogs this morning, I stumbled on an online APK downloader and I decided to share it with you. It is simply a web app that lets you pull an APK directly from Google's servers and side load it yourself.


It lets you download apk files from Google play store to PC without
worrying about country restriction and without logging in to your Google
account. The app requires you to enter the package name or Google Play URL for the app you want and after that, it will generate a download link for the apk file of the app.


Mind you, the site only works for apps that are available for free at the Google Play store. You are not allowed to download paid apps.


You can access the APK downloader at: http://apps.evozi.com/apk-downloader/


Below is a screenshot I took while trying to generate the apk of 2go chat application.


Apk downloader website


Right on the site, you can also download the Chrome plugin that lets you download apk files directly.


Have fun!

Monday, 24 March 2014

Floating Sharing Bar for Blogger Blogs


You might have seen some blogs with a vertical floating share bar widget where Facebook like, Tweet, Google+ buttons are present on the left or right side of the blogs. Adding this floating sharing bar to your blog will make it easy for your blog visitors to Like, reTweet, +1 and share your posts, which will help in increasing your blog traffic.


Though I've explained how to add the sharing bar when I published how to add Facebook Share & Like buttons, Digg and Tweet Button to the side of blogger/blogspot blogs, I've recoded a better one which I decided to share with you. I have replaced "Facebook Like button" with the new Facebook Share button and removed Digg and SU buttons.


More so, since displaying too many social media counters could affect the speed at which your blog loads, I've added a AddThis share button which provide your visitors with over 300+ social sharing options all in one place.


Below is a screenshot:


share_bar


So, How Do I add the Floating Share bar to my Blogger/blogspot blog?


Adding the Vertical Floating Bar to a Blogger blog is very easy. You just have to copy a snippet of code,and drop it into a HTML/JavaScript gadget.


STEPS


  • Log in to your Blogger account.

  • Go to Layout

  • Click "Add A Gadget"

  • In Add A Gadget window, select HTML/Javascript

  • Copy the code highlighted below and paste it inside the HTML/Javascript box


<!-- floating page sharers Start Share This With Friends-->
<style>
#pageshare {position:fixed; bottom:15%; right:10px; float:left; border-radius:5px;-moz-border-radius:5px;-webkit-border-radius:5px;background-color:#fff;padding:0 0 2px 0;z-index:10;}
#pageshare .sbutton {float:left;clear:both;margin:5px 5px 0 5px;}
.fb_share_count_top {width:48px !important;}
.fb_share_count_top, .fb_share_count_inner {-moz-border-radius:3px;-webkit-border-radius:3px;}
.FBConnectButton_Small, .FBConnectButton_RTL_Small {width:49px !important; -moz-border-radius:3px;-webkit-border-radius:3px;}
.FBConnectButton_Small .FBConnectButton_Text {padding:2px 2px 3px !important;-moz-border-radius:3px;-webkit-border-radius:3px;font-size:8px;}
</style>
<div id='pageshare' title="Share This With Your Friends">
<div class='sbutton' id='rt'>
<a href="http://twitter.com/share" class="twitter-share-button" data-count="vertical" >Tweet</a>
<script src='http://platform.twitter.com/widgets.js' type="text/javascript"></script>
</div>
<div class='sbutton' id='gb'>
<script src="http://connect.facebook.net/en_US/all.js#xfbml=1"></script>
<div class="fb-share-button" data-type="box_count"></div></div>
<div class='sbutton' id='gplusone'>
<g:plusone size="tall"></g:plusone>
</div>
<div class='sbutton' id='at'>
<a class="addthis_counter"></a>
<script type="text/javascript" src="//s7.addthis.com/js/300/addthis_widget.js"></script>
</div>
<div style="clear: both;font-size: 9px;text-align:center;"> <a href="http://www.ogbongeblog.com/2013/04/floating-sharing-bar-for-blogger-blogs.html" rel="nofollow">Get this</a></div>
</div>
<!-- floating page sharers End -->


Save the gadget and click "Save arrangement" button on the upper right corner.


View your blog and I hope it works for you.


Saturday, 22 March 2014

5 Easy Ways to Improve the SEO of a blog & Boost Traffic

5 easy ways to improve the SEO of a blog 

A blogger needs to know at least the minimum on SEO. For it, you don't need to be an SEO expert but you need to know the minimum so that your posts are well indexed in the search engines.

The phrase "content is king" is one of the widest spread Internet memes being used by so many bloggers, with the idea that you should focus on having quality content, while the rest don't matter much. This is not true. Quality content is important, but it shouldn't be the only concern of a blogger today. In addition to producing quality content, your text needs to be optimized for the search engines.

improve seo, seo tips, boost traffic
Boost traffic & increase SERP visibility with SEO

5 easy ways to improve the SEO of a blog

Now, let's see what would be the basics that any blogger needs to learn about SEO and other simple SEO knowledge. Below are 5 easy tips to improve the SEO of your blog:

1. Define the keyword

When you write a post, it is recommended to choose the keyword (or term) suitable for your text. What you want is that this keyword - or term - to be searched on Google, and then get your post among the top. For this, you need to use this keyword a few times in the text.

For example, here the keyword could be SEO, but this term is too generic and I could hardly get in the top for this search. Then I'll work with a phrase or a long tail keyword, so that this post will rank for the term "easy ways to improve the SEO of a blog". I will use this phrase a few times, but without overdoing it.

2. Use the keyword in the post title

Now that I have defined the keyword, I will use it in the post title. This step is very important, and certainly will help you to get a better rank in search engines. As you can see, what I have in the title is the easy ways to improve the SEO of a blog keyword, along with other words to form an attractive and optimized title for SEO.

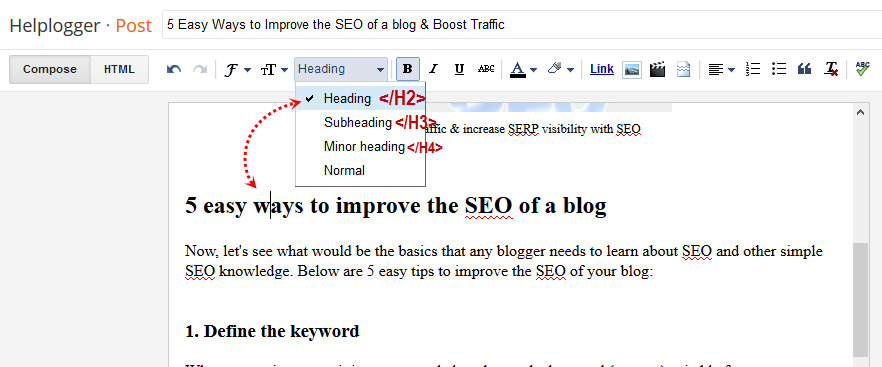
3. Use the keyword in the H2 tags

You must also use heading tags (h2, h3) in your posts. Here, I am using the keyword "easy ways to improve the SEO of a blog" in a H2 heading. Do this always, because it also helps to become well positioned in the search results. If you don't know or don't understand what are the heading tags, I would suggest to do a further research on this subject.

use keyword in h2 tags

4. Use the keyword in the text

Make use of your chosen keywords throughout the text. Especially in the first paragraph (please note that I have repeated the title in italics in the first sentence). But be careful when doing this, there is a maximum and minimum limit for that. A good keyword density is between 1.5% to 4.5% for best results. Less than that will have no effect and more than that can alert the search engines and your text might be considered spam.

5. Publish Posts with 300 words or more

Posts under 300 words have little chance to be among the top results in search engines. Of course, you will be able to rank for multiple keywords that are less popular with less than 300 words, but for the most competitive keywords that have the potential to bring a greater number of visits, it will be nearly impossible.

Thus, it is recommended to write posts with more than 300 words. It's not hard when you really understand the topic you're talking about.

Conclusion

As you can see, with some simple SEO techniques you can improve the traffic coming to your blog from the search engines. I hope you enjoyed these 5 easy ways to improve the SEO of a blog!

PLACE YOUR ADS HERE