Pages

Receive More Updates

Date: - Time:
SMS: Send FOLLOW BALLOWAP To 40404 For Free - EMAIL: azeezbello8@gmail.com

Thursday, 26 March 2015

How I Purchased a Software from Clickbank with Nigerian PayPal


This is a guest post compiled by Smart Nwosu  for OgbongeBlog


It's no more news that anyone in Nigeria can now open a verified PayPal account with his/her major Visa/MasterCard issued in Nigeria and use it to make payments online. Despite this, there is still this issue of Nigerians using their PayPal account to pay on Clickbank.


ClickBank up till this moment had not made up their mind to take Nigeria into consideration. Though, a Nigerian can create and operate ClickBank account without changing IP for free, but must register with a foreign country’s address supported by Clickbank.


I have being in need of a particular trading software to resume my forex trading business, but having difficulties purchasing it on ClickBank, despite the fact that I have a fully verified Nigerian PayPal account. The problem being that in the Order form on ClicBank's website, I was asked to select my country, enter my zip code or postcode, credit card information, and email address to enable me complete the transaction.


But, since I do not have any foreign Credit/Debit card, I decided to pay with PayPal which often times I was unable to complete the transaction because I selected US as my country in Clickbank order form, and was having problem with zip code or postcode because the US zip code I entered did not match with the zip code in my Nigerian PayPal account. Clickbank continued to decline the transaction for that reason.


I later contacted PayPal for help, but they told me that it was my bank (AccessBank) that declined the transaction. I argued with them over that, since I know that my Visa card is accepted worldwide and have been using it without any problems.


Still on that, I came up with another idea of trying Payoneer Debit Mastercard since it is issued in the US. But, after contacting payoneer for help, it proved abortive.  After trying different options which didn't work for me, I decided to try a new idea of using an African country supported by Clickbank.


So, Did it Work?


See below…. It worked!


How I did it:


•    If you want to buy a software or e-book sold on Clickbank, visit the vendors website and click the ‘Add to Cart or Buy Now’ button on the vendor’s website. Then you will be redirected to Clickbank to complete the transaction.

•    In the Clickbank Order form, I selected Ghana as my country and was prompted to enter zip code.

•    I left the zip code option blank by not entering any value.

•    I selected PayPal as a means of payment, and clicked the ‘Pay Now’ button on Clickbank’s website.

•    I was redirected to PayPal to complete the transaction.

•    I logged in into my PayPal account and selected my AccessBank Visa card linked to my PayPal account.

•    I clicked the continue button on PayPal website and was waiting for the result…

•    Finally, finally, I got this message from Clickbank ‘Thank you! Your payment was approved’.


Note: If you select US as your country when you are not in the US, ClickBank will request you to enter a zip code or postcode which must correspond with the zip code in your Credit card information.


Immediately, Clickbank and PayPal sent me an email regarding the successful payment. Within few minutes, AccessBank came up with a Debit transaction alert.


Email notification from Clickbank


I hope this will work for everyone! If you have tried many times buying from Clickbank and failed, try this method, I am sure it will work for you.


Have you been able to Pay Clickbank using your Nigerian Paypal account?


Kindly share your experience via comments.


This post was written by Smart Nwosu. He is a young Nigerian blogger. You can connect with him on Facebook here.

Tuesday, 24 March 2015

How To Hide Comments in WordPress Dashboard From Non-Admin Users

If you have multiple authors on your WordPress site and you don't want Authors, Editors, and Contributors to view ANY comment information(s) at all via the WordPress dashboard, you can get this done by using the Adminimize plugin for WordPress. I've successfully implemented this on one of my WordPress blogs.


Although you can do a lot with the plugin as explained in a post at WpBeginner, but in this post, I am sharing with you, how to hide comments in WordPress dashboard from non-admin users. The comments menu will be hidden as well as comments info displayed on the "At a Glance" section of the dashboard.

First thing you need to do is install and activate the Adminimize plugin. Upon activation, visit Setting » Adminimize to configure the plugin settings as explained below:


adminimize plugin for wordpress


1. Click on "Menu Options". Disable "Comments 1" for Authors, Editors, and Contributors. Click "Update Options". This will hide the "Comments" menu item on the dashboard.

2. Scroll up to the main options and click on "Dashboard Options". Disable "At a Glance" and "Activity" for Authors, Editors, and Contributors. Click "Update Options". These will hide the comments info on the dashboard.


wordpress plugin settings


That's all.

You can instantly confirm the changes if you've installed User Switching plugin. The plugin simply lets you switch between user accounts in WordPress.

I hope this helps.

Monday, 23 March 2015

How To Change Domain Nameservers at DomainKing

If you've registered a domain name at DomainKing and would love to connect it to a web hosting account you have elsewhere, then you will have to change the domain name servers at domainking to the ones provided by your web host.


Follow me through the steps below to get it done:


==> Sign in to your account at DomainKing website

==> Click on "My Domains"


==> Click the small arrow next to the domain name you want to edit it's nameservers.


==> Scroll down to the Nameservers section as seen in the screenshot below:


==> Select "Use Custom nameservers"


==> Delete the Namesevers and replace with the ones provided by your web hosting company.


==> Click "Save Changes"


That's all.


You can expect a propagation time up to 24 hours. This is because it takes time for the DNS to take effect across the internet. So, be calm.


Download LandX - Multipurpose Bootstrap 3 Landing Page Template FREE

One of the Envato Free files for the month (March 2015) is the LandX - Multipurpose Bootstrap 3 Landing Page Template. This means you can download it for free until the end of the month after which you will have to pay $14 to buy it at Themeforest.


LandX is a multipurpose responsive Bootstrap 3 Landing Page Template which you can use to create a simple website or landing page within few minutes. It features awesome 4 Homepage Styles you can easily modify as desired.


landx landing page template


Features

    Responsive Design
    Bootstrap 3.1.1 Compatible
    4 Homepage Styles
    8 Color Schemes
    Valid HTML5/CSS3 Markup
    Working Contact Form
    700+ Font Icons
    Video Intro
    Pricing Table
    Clean and Well Commented Codes.
    Mailchimp Subscribe Form

You can download the LandX template here.

Make sure you’re logged in with your Envato Account to get it for free. If you don't have one, sign up via the link  above.

NB: If you don't know how to use the template for your landing page, I can get it done for you. Contact Me.

Please, share this with your friends.

Saturday, 21 March 2015

How To Import Google Webmaster Tools Keyword Data To Statcounter.com

Since 2011 Google has been steadily expanding its policy of withholding keyword data for organic search. This means that website owners and professionals have limited access to the keywords used to find their sites. This is why you might have noticed “Keywords Unavailable” in your StatCounter reports.


In an effort to ensure Statcounter members have efficient, streamlined access to all available keyword data, Statcounter have integrated Google Webmaster Tools (GWT) keyword data into its reporting. This means that members don’t have to stress themselves separately accessing GWT, downloading the data,
merging with other keyword reports and attempting to analyze the combined information.


statcounter integration with google webmaster tools


The new feature is designed to access whatever keyword intelligence is available and provide this under one roof. Website owners only have to link their StatCounter account with GWT once and then they can leave the reporting to Statcounter to sort out.

GWT provides an aggregated list of the top 2,000 search queries that drove traffic to a site for the previous 90 days. StatCounter can now integrate this data into its reporting interface. 90 days of data can be stored within free StatCounter accounts. Upgraded accounts can retain five years of data for future reference
and analysis.

A step by step guide to setting this up is available on the StatCounter blog at: http://blog.statcounter.com/2014/07/google-keyword-problem/

Have you imported yours?

Friday, 20 March 2015

Google Mobile Friendly Test Tool

Last year, Google announced the launch of a mobile-friendly test tool which you can use to check if your website passes Google’s criteria for what it consider to be a mobile optimized site.


The tool will analyze a URL and report if the page has a mobile-friendly design.


Google mobile friendly tool


If your site doesn’t pass the test, the tool will point out exactly why you didn’t pass and give you some steps to follow to correct the issues.

If your site passes the test, your site will get a mobile-friendly label in the Google mobile search results.


You can use the tool check if your site is mobile friendly at: https://www.google.com/webmasters/tools/mobile-friendly/

Is your site mobile friendly????

How To Buy MB From Glo

If you want to access the internet with your PC or mobile device via the Glo network, then you will have to subscribe to a glo data plan. The data volume (MB) you will get depends on the plan you subscribe to.  There are different ways you can buy MB from Glo and that's what I'm sharing with you in this post.


1. Buy Glo Data Plan via Glo HSI Portal


You can buy glo MB at Glo HSI Portal at hsi.glo.com.


I use this portal alot especially whenever I want to subscribe to glo data plan on my iPad. If you've recharged your glo line, you can access the Glo HSI page on your device to buy your desired plan. Just click on the "BUY" icon next to the plan you want to purchase and you are good to go.


The Glo HSI portal works on other mobile devices and also on computer if you connect with a modem with a Glo line in it. You can also gift and share glo data plans at the HSI Portal.


2. Buy Glo Data Plan Via SMS


Each glo data plan has a string you can text to 127 with your glo line, for you to be subscribed to the plan. For example, to subscribe to Glo Always Micro Plan (N1000 for 30days) via SMS, you will have to text 53 to 127 with your glo line.


3. Buy Glo Data Plan via USSD


Instead of sending text messages to 127 to buy a glo data plan, you can as well dial a string to get hooked up to the glo data bundle of your choice. For example, to subscribe to Glo Always Micro Plan (N1000 for 30days) via USSD, you will have to dial *127*53#.


That's all.


Kindly note that you must have enough airtime in your Glo line main account balance, if not you won't be able to buy MB from Glo.


You can check the full list of all glo data plans and their codes here.


Have fun!

Wednesday, 18 March 2015

Take a Screenshot of a Whole Web Page Online At Web-Capture

Web-capture.net is the website I use to take a screenshot of a whole web whenever I need such screenshot in showcasing websites and blogs I design for my clients. So, if you are looking for how to take screenshot of entire web page on firefox, safari, chrome etc without using any addon, you need to try the online free service.


The free web page screenshot tool at web-capture.net is the simplest way to grab a page copy. Nothing to download and install, the whole process takes place online. You simply get a full page screenshot quickly, without installing additional software on your PC.


You will get a screenshot of a long vertical web page in 1 click and you can even save the screenshot as a pdf file.


Below is a sample screenshot I captured using web-capture free online tool.


bloggers lab website
bloggerslab.org


How to take a screenshot of whole web page


==> Go to : www.web-capture.net

==> Enter the URL of the page you want to capture

==> Choose the file format you want

==> Click the "capture web page" button.


Wait for the site to process your link.


Once processed, you can download the file or ZIP archive.


Great...huh?


Do you know alternatives to web-capture.net?

Tuesday, 17 March 2015

Awesome Sidebar Feedburner Email Subscription Form For Blogger and Wordpress Blogs

While googling for awesome opt-in-forms yesterday, I stumbled on an attractive Feedburner Email Subscription Form. I copied its code from the blog post, made some changes to the code and embedded it on the sidebar of my blog. I'm loving it and I decided to share it with you.


feedburner email subscription form


You can place the Feedburner Email Subscription Form on the sidebar of your Blogger and Wordpress blogs. All you need to do is to edit the code below, copy and paste it in HTML/Javascript gadget of a Blogger blog or Text widget of a Wordpress blog.


<link href="http://fonts.googleapis.com/css?family=Open+Sans:300italic,400italic,600italic,400,300,600,700" rel="stylesheet" type="text/css"></link>

<div id="Subscription">

<div class="heading">

Sign Up in Seconds</div>

Sign up with your email address to receive latest updates straight in your inbox.

<div class="emailsub">

<form action="http://feedburner.google.com/fb/a/mailverify" method="post" onsubmit="window.open('http://feedburner.google.com/fb/a/mailverify? uri=secretinfos-ogbongeblog', 'popupwindow', 'scrollbars=yes,width=550,height=520');return true" target="popupwindow">

<input name="email" placeholder="Your Email" type="text" /><input name="uri" type="hidden" value="SecretInfos-Ogbongeblog" /><input name="loc" type="hidden" value="en_US" /><input class="button" type="submit" value="Sign Up Now!" />

</form>

</div>

</div>

<style type="text/css">

#Subscription { width: 300px; height: 200px; border: 1px solid #51C0F9; border-radius: 5px 5px 0px 0px; }

#Subscription .heading { padding: 10px 20px; line-height: 20px; font-size: 20px; font-weight: 600; font-family: open sans; color: rgb(38, 38, 38); text-align: center; text-shadow: 0px 1px rgba(255, 255, 255, 0.75); background: none repeat scroll 0% 0% rgb(81, 192, 249); }

#Subscription p { font-family: open sans; font-size: 13px; color: rgb(12, 12, 12); line-height: 25px; padding: 5px 15px 0 15px; margin: 0; }

#Subscription .emailsub { padding: 0px 20px 10px 20px; }

#Subscription .emailsub input { color: rgb(170, 170, 170); padding: 10px; margin-top: 10px; font-size: 15px; font-family: open sans; width: 92%; border: 1px solid #ccc; border-bottom: 2px solid #ccc; border-radius: 5px; transition:border 0.15s linear 0s, box-shadow 0.15s linear 0s, color 0.15s linear 0s; }

#Subscription .emailsub input:focus { border-color:#F4836A; outline: none; box-shadow: 0 0 2px 1px #F4836A; }

#Subscription .emailsub .button { background: #F4836A; color: white!important; border:none; outline: none; border-bottom: 3px solid #B3614E; transition:background .4s linear; width: 90%; margin-right: 5%; margin-left: 5%; font-weight: 600; cursor:pointer; }

#Subscription .emailsub .button:hover{background: #DD7761;}

#credit {margin: -5px 0 0px 15px!important;text-shadow:none; opacity:.6;}

</style>


You can customize as desired if you have basic knowledge of html and css.


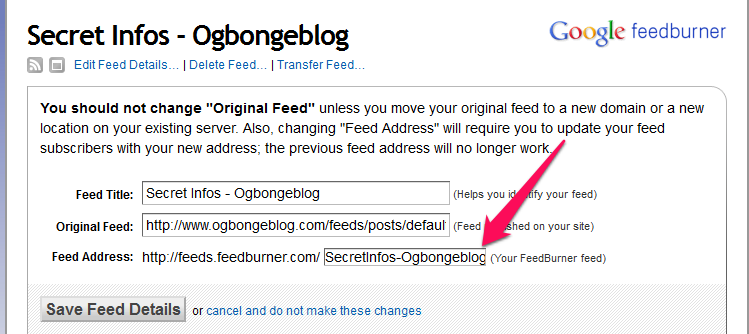
Ensure you carefully REPLACE the "secretinfos-ogbongeblog" in the code with your blog feedburner ID. You can get it via feedburner.com. Click on your feed, then click on "edit feed details". It will be displayed as seen in the screenshot below:


Do you like the email subscription form?

Monday, 16 March 2015

Database Connection error (2) : Could not connect to MySQL - How I Solved It

Last week, a friend notified me that he couldn't access my bulk sms site powered by Joomla. I tried accessing it by myself and I was also unable access it. The site was only displaying a page that reads 'Database connection error (2): Could not connect to MySQL.'


I googled the problem and saw alot of recommendations including changing the database user and password and editing it in the configuration.php.


Instead, I decided to contact my host. They requested for my cPanel login details. After some minutes, the problem was resolved and my bulk sms site was restored. When I asked them what went wrong, I was told it was caused by a problem with the MySQL server. .


So, if you experience such problem, try to talk to your host before making changes to your config file.


Have you experienced same? How were you able to resolve it?


How To Detect Hidden Camera With Mobile Phone and Camera Detectors

As technology advances, privacy is getting vanished. So, it's no more news that hidden cameras are now been planted in some locations. If you frequently make use of hotel rooms, trial rooms, changing rooms etc, then the chance of getting spotted by a hidden camera is very high. In this blog post, I've decided to share with you, how to detect a hidden camera with your cell phone and camera detectors.


How To Detect Hidden Camera With Mobile Phone


1. When you are in a private room, turn off the lights, and close the curtains. Launch your phone camera but do not turn the flash light on. Turn around the room with your cell phone. When tiny red or green LED light is found, that means that a hidden microphone or camera is installed. If no LED light, the room is OK.

2. Place a call on your cell phone, then wave the device around where you think there might be a hidden camera or microphone. If you can hear a clicking noise on the call, it means your phone might be interfering with an electromagnetic field.

If you can’t make a call there is a chance of a hidden camera too. The scientific explanation behind this phenomena is “interference of fiber optic cable during the signal transfer”.

3. Launch the flashlight of your smartphone and carefully examine books, clocks, air purifiers, lamps etc. If you notice any pinhole-sized holes, you might have a hidden camera in the room.


How to detect hidden camera behind mirror


Launch the flashlight of your smartphone and shine it directly onto a wall mounted mirror. Take the flashlight and move it progressively closer to the mirror until it touches the mirror. If you can see through the mirror, or notice the light shining through it, you have a one-way mirror, and possibly a hidden camera behind it. A mirror should always reflect light, not allow the light to penetrate through it.


Using Hidden Camera Detectors


hidden camera detector


Alternatively, you can buy hidden camera detectors. That's much better than searching for minuscule cameras hidden somewhere among the hundred possible places in the room. These portable devices are of different types, small and simple to use. 


You can hold one of them up to your eye, and look around the room. When it finds a camera, you'll see the light reflection from the cameras LED. Another one vibrates when you're close in close vicinity to a hidden camera. Others give off flashing lights or beeping sounds when you sweep specific objects that contain hidden cameras.

I hope this info  helps.

Kindly share with friends.

Saturday, 14 March 2015

How to Fix Screen rotation by 180 degrees after installing Custom ROMS

Android Screen rotation After installing Custom ROMS
            Few users have faced, screen rotation by 180,90 Degrees after installing custom ROM in their Android smartphone. This issue majorly occur due to improper phone software drivers or improper installation of ROM. 'Karbonn A26' again a poor work by Karbonn. Single phone with 2 mediatek version MTK6572 & MTK6577. This screen rotation bug is found in Karbonn A26 few Samsung, Xperia, Xolo & Micromax devices. Android being an open platform has few bugs too. But, there are solutions too but requires Root Access as you need to mess up with your system. So lets start with this simple tutorial. 


Don't miss : 
Method :
  1. Download any root file manager app like Root browser, ES file explorer from Google Playstore.
  2. I would recommended ES file explorer as it has better interface & its all in one.
  3. Open ES File Explorer
    • Press the Fast Access Menu button (top left)
    • Press Tools
    • Scroll down & locate Root explorer, switch the toggle to yes.
    • Click on the Root explorer; you will find a small popup box. Do as shown in below image :
  4. Now you have enabled root browser relaunch ES File Explorer & Click on above tab showing sdcard & Click on " / Device".
  5. Goto System folder & Open build.prop file as text.
  6. Search for line "ro.sf.hwrotation='value'" if you didn't find this line then copy this line at the end of the file.
  7. Now setting the value as per the rotation, if your screen is rotated by 180 Degrees i.e. upside down then enter 180 in place of value. if your screen is rotated by 90 Degrees i.e. right anglr then enter 270. 
  8. Value = 360 - Rotation Angle.


             That's all ! This is the easiest method to get rid of screen rotation bug. Please take a moment & Google +1,share this post if this helped you. If you are facing rotation bug even after making this changes leave your device name & info in comment section. Have a good day !

Introducing Bloggers Lab Website : bloggerslab.org

I've set up bloggerslab.org as the official website for BloggersLab.


There is nothing much on the site as at the time of publishing this post but we hope to use it to showcase Bloggers Lab events, freebies and many more.


You can check it out at : www.bloggerslab.org


Kindly let me know what you think of the design and probably ideas of what we can do on the site.

Friday, 13 March 2015

Android L (Lollipop) CyanFox Custom ROM for Karbonn A2+ | MTK6572 ubifs

           Best Android L Custom ROM for Karbonn A2+ UBIFS system MTK6572. Android L slowly gaining its popularity because of bug fixes & new material design updates. This ROM completely looks like, latest Android 5.1 material interface. This ROM is completely clone of the latest update available in Moto G i.e Android 5.1. I'm sure this rom won't disappoint you in any aspects. Best Performance & Sound quality with Apolo music player. Added build tweaks & much more. This ROM is also known as "CyanFOX Android L ROM". Android Developers, Insurance Policy.
Don't miss : 
    ROM Features :
    1. Pure Android L 5.0 Interface.
    2. Framework Lollipop.
    3. Pure Android 5.1 Notification bar.
    4. Transparent App drawer.
    5. Pure Android L Dailer & Icons.
    6. Android L transitions & Ringtones.
    7. Changing Statusbar Color as per App.
    8. Attractive Boot Animation.
    9. White Status bar Icons.
    10. Added Apollo Music player.
    11. Google camera and gallery
    12. Lollipop apps like messenger,calculator.
    13. Modules & Apps Pre-Installed.
    14. Butter Smooth Performance.
    15. Build.prop Tweaks ( 3G Tweaks, Image & Video tweaks, Performance tweaks)
    16. Supports INIT.D
    17. Xposed setting in system settings.
    18. Android L type call screen with Fox as default image.
    19. Pure Android L themed Apps.
    20. At the end you will love it.
    Bugs : 
                   This ROM was tested for about 2 days to find bugs but we didn't found any bugs except few minor one's which are bearable. This ROM is Pure Android L & offers zero Lag. But if you find any bugs you can report about it in comment section which would be a very rare case. But before reporting about any bugs try these steps : 
    • Goto CWM Clear cache partition & Dalvik cache.
    • Goto Advanced & Fix Permissions.
    Screenshots : (Click on any one link)
    Downloads : (Click on any one link)
    How to Install :
    1. Root your Karbonn A2+ by this method : Root A2+
    2. Install Carliv touch recovery in your ubifs A2+ using this tool : Recovery Magic. (Connect your phone, enable USB debugging & Start the tool & Follow the onscreen Instructions).
    3. Install ROM by this method : Install Cyanfox ROM in A2+.

             I hope you enjoy the latest Android L interface with lots of cool features & Clean interface. Don't forget to like,share & +1 this post. I would love to hear your views regarding this ROM so don't forget leave your feedback in comment section. Have a good day !

    Wednesday, 11 March 2015

    Building a List/Grid View Switcher in Blogger with Auto Read More

    A list of posts in grid or list view provides a more defined canvas with which a blogger or website owner can use as a guide in creating content. This concept has extended to visitors, where they can have control on whether or not they wish to view posts in list or grid view. While custom modification codes are shared by some blogging sites, others are not. Some that are shared, however, can be complex even to bloggers themselves, such as JQuery.

    The good news is there are lightweight codes available, including the Auto Read More in Blogger. Through it, a blogger can add two buttons that will enable visitors to switch between grid view and list view, depending on what they prefer. These buttons, however, are only visible on limited pages - homepage, label page and archive page. Nonetheless, it is better than not having this particular feature at all.

    Unlike JQuery, the Auto Read More uses HTML, CSS and JavaScript. To view posts in a list view, two sets of CSS codes are added as one. Another set is added to view posts in grid view. Other combination of codes is used to enable easy switch between views, particularly at a click of a button.


    How to Add a List/Grid View Switcher in Blogger

    Step 1. Log into your Blogger dashboard and select your blog, then go to "Template" > press the "Edit HTML" button.

    Step 2. Click anywhere inside the code area and press the CTRL + F keys to open the search box. Type this tag below inside the box and hit Enter to find it:
    </head>
    Step 3. Just above the </head> tag, copy and paste the following CSS style and scripts:
    <script type='text/javascript'>
    function list_view(){
    if(document.getElementsByClassName(&quot;post&quot;)) {elementArray = document.getElementsByClassName(&quot;post&quot;); while (elementArray.length) {elementArray[0].className = &quot;post-grid-view&quot;;}}
    if(document.getElementsByClassName(&quot;post-title&quot;)) {elementArray = document.getElementsByClassName(&quot;post-title&quot;); while (elementArray.length) {elementArray[0].className = &quot;post-title-grid&quot;;}}
    }
    function grid_view(){
    if(document.getElementsByClassName(&quot;post-grid-view&quot;)) {elementArray = document.getElementsByClassName(&quot;post-grid-view&quot;); while (elementArray.length) {elementArray[0].className = &quot;post&quot;;}}
    if(document.getElementsByClassName(&quot;post-title-grid&quot;)) {elementArray = document.getElementsByClassName(&quot;post-title-grid&quot;); while (elementArray.length) {elementArray[0].className = &quot;post-title&quot;;}}
    }
    </script>
     <script type='text/javascript'>
    posts_no_thumb_sum = 100;
    posts_thumb_sum = 350;
    </script>

    <script type='text/javascript'>
    //<![CDATA[
    function removeHtmlTag(strx,chop){
    if(strx.indexOf("<")!=-1)
    {
    var s = strx.split("<");
    for(var i=0;i<s.length;i++){
    if(s[i].indexOf(">")!=-1){
    s[i] = s[i].substring(s[i].indexOf(">")+1,s[i].length);
    }
    }
    strx = s.join("");
    }
    chop = (chop < strx.length-1) ? chop : strx.length-2;
    while(strx.charAt(chop-1)!=' ' && strx.indexOf(' ',chop)!=-1) chop++;
    strx = strx.substring(0,chop-1);
    return strx+'...';
    }
    function createSummaryAndThumb(pID, pURL, pTITLE){
    var div = document.getElementById(pID);
    var imgtag = "";
    var img = div.getElementsByTagName("img");
    var summ = posts_no_thumb_sum;
    if(img.length>=1) {
    imgtag = '<span class="posts-thumb" style="float:left; margin-right: 10px;"><a href="'+ pURL +'"><img src="'+img[0].src+'" /></a></span>';
    summ = posts_thumb_sum;
    }

    else {
    imgtag = '<span class="posts-thumb" style="float:left; margin-right: 10px;"><a href="'+ pURL +'" title="'+ pTITLE+'"><img src="https://blogger.googleusercontent.com/img/b/R29vZ2xl/AVvXsEgiZIsj32WSPqx9lXn58fuJGGpQvysZPNz7SCKKmF157Zfoqmt7gAJFJSHlksLjSTvceSv-Z1Mw7kBfSVTwrOSkyfYrWK6WsmXJ98H1NKwFAKFRo43Jaer74Dw7nOlFQTwO4L6Wj3G_3Npn/s1600/sorry-image-not-available.png" style="margin-top: -30px;" /></a></span>';
    summ = posts_thumb_sum;
    }

    var summary = imgtag + '<a href="'+ pURL +'"><div class="post-summary-text">' + removeHtmlTag(div.innerHTML,summ) + '</div></a>';
    div.innerHTML = summary;
    }
    //]]>
    </script>

    <b:if cond='data:blog.pageType != &quot;static_page&quot;'>
    <b:if cond='data:blog.pageType!= &quot;item&quot;'>
    <style>
    #list-view-button {font-family: Verdana; text-align:left;cursor:pointer;font-size: 14px;border-bottom: 5px solid #eaeaea;text-decoration: none;}
    #list-view-button a{text-decoration: none; color: #666;}
    .grid-view-button {background-color:#efefef;color:#666;padding:5px 10px;border-radius: 5px;font-size: 12px;}
    .list-view-button {background-color:#efefef;color:#000;padding:5px 10px;border-radius: 5px;font-size: 12px;}
    .post-grid-view {width:100%;height:250px;overflow: hidden;float:left;margin:0px 0px 20px !important;position:relative;display: block; -webkit-transition:all 0.5s ease 0s; -moz-transition:all 0.5s ease 0s; -o-transition:all 0.5s ease 0s; transition:all 0.5s ease 0s; }
    .post-grid-view .posts-thumb {width:40% !important;height:250px !important;float:left;margin:0px;position:relative;border-top: 0px solid transparent !important;overflow: hidden;}
    .post-grid-view .post-header {display: none;}
    .post-grid-view .post-body img {min-width: 300px !important; min-height: 250px !important;display:block;width:100%!important;height:auto!important;max-width:800px!important;max-height:400px!important;border:none;outline:none;position:relative;margin: 0px;padding:0;}
    .post-grid-view .post-summary-text {opacity: 1; background: none; width: 58%;font-size: 120% !important;clear: none !important; display: inline-block !important; padding: 80px 0px !important; color: #666 !important; text-shadow: none !important; float: right !important; text-align: left; position: relative !important; font-family: &#39;Open Sans Condensed&#39;, sans-serif;}
    .post-grid-view .post-body {height: 250px;background:#f5f5f5; box-shadow: none !important;}
    .post-title-grid a { font-size:170%;color: #777;font-family: &#39;Open Sans Condensed&#39;, sans-serif;}
    .post-title-grid { position: absolute; left: 42%; top: 5%; z-index: 1;}
    .post-grid-view .post-footer {left: 41%; display:block;position: absolute; bottom: 2%;font-size: 120%; background: transparent !important; border: 0px solid transparent !important;font-family: &#39;Open Sans Condensed&#39;, sans-serif;}
    .post-grid-view .post-footer a{color: #128EC9;}
    .post-grid-view a.comment-bubble {display: none;}
    .main-inner .column-center-inner .section {margin: 0px !important;}
    .post { -webkit-transition:all 0.5s ease 0s; -moz-transition:all 0.5s ease 0s; -o-transition:all 0.5s ease 0s; transition:all 0.5s ease 0s;}

    #blog-pager {clear:both;}
    .post {height:auto;width:32.2%;display:inline-block;text-decoration:none;float:left;margin:0 1% 1% 0%;overflow: hidden;padding:0!important;}
    .date-header {display: none;}
    h3.post-title a {font-size:90%;font-family: &#39;Open Sans Condensed&#39;, sans-serif;text-transform:uppercase;color:#fff;text-shadow: 1px 1px 0 rgba(0, 0, 0, 0.1);font-weight: bold;}
    h3.post-title {text-align: center; position:absolute;top:0;width:100%;overflow:hidden;margin:0px !important;padding-top: 30%; background-color: rgba(50, 126, 213, 0.8);transform: scale(1);opacity: 0;z-index: 10;height: 100%;transition: all 300ms ease-out 0s;}
    h3.post-title:hover {opacity: 1;}
    .posts-thumb {width:100%!important;height:200px!important;overflow:hidden;clear:both;}
    .post-body {border-radius:2px;box-shadow:0 5px 4px 1px rgba(0,0,0,0.1);position:relative;overflow: hidden;}
    .post-body a {text-decoration: none;}
    .post-body img {display:block;width:100%!important;height:auto!important;max-width:800px!important;max-height:400px!important;min-width:200px!important;min-height:200px!important;border:none;outline:none;position:relative;margin: 0px;padding:0;}
    .post-summary-text {display: none;}
    a.comment-bubble {color:#fff;text-decoration:none;font-size:100%;width: 100%;text-align: center;position:absolute;top:175px;left: 0px;text-shadow:1px 2px 1px #333;font-family: &#39;Pacifico&#39;, cursive;z-index: 122;}
    a.comment-bubble:before { content: &quot;Comments: &quot; url(https://blogger.googleusercontent.com/img/b/R29vZ2xl/AVvXsEihVvY53W9nl9Ajg7h2HuD2o7L0fTgKRoujJPZ_AKDoI0TIWwtzuE30NfcyqyzotJwxE89DuhoPL-rTDeJ63FvQbIfBysLMHb3g3Khr_mpw3jWrkht46ezT0NVs4gtafC55metV2air2kfL/s1600/heart-active.png);}
    .post-header,.post-footer {display:none;}
    </style></b:if></b:if>
    <link href='http://fonts.googleapis.com/css?family=Open+Sans+Condensed:300' rel='stylesheet' type='text/css'/>
    <link href='http://fonts.googleapis.com/css?family=Pacifico' rel='stylesheet' type='text/css'/>

    Step 4. Next, search for the following line:
    <b:section class='main' id='main' showaddelement='no'>
    ...in case you can't find it, search for this one instead:
    <b:section class='main' id='main' showaddelement='yes'>
    Step 5. Just above this line, add the following code:
    <b:if cond='data:blog.pageType != &quot;static_page&quot;'>
    <b:if cond='data:blog.pageType!= &quot;item&quot;'>
    <div id='list-view-button'><a class='grid-view-button' onclick='grid_view()'><img src='https://blogger.googleusercontent.com/img/b/R29vZ2xl/AVvXsEjFMddfCWvRAVPpbNo8Hd0JmUwIDk6ax3MLymN6PM53ir5R9BY5fKwUCqVYXxaO88lLrPtCUElPS1WnOJ3fDBRFc1JuCQ-CEy7VjFA0Lh7ahhqr-gnl-BhTkGgOZj0MD4w80ZHMA1GpdtAa/s1600/search-grid-icon.png' style='margin: -8px 1px -3px -6px;width: 16px;'/> Grid View</a> <a class='list-view-button' onclick='list_view()'><img src='https://blogger.googleusercontent.com/img/b/R29vZ2xl/AVvXsEi1bHQNEbhpSYa5utQpJsheH4xUEFyTa-gJIV4qq3rKV-18lzwXq_Fi5OMLvToVXZy1ubGObcLs3LtMq8Wy7DISLbC8jq6w87utCCPXNSp4hYl7iaj5WsmH7F-tjP5P5rM2yebHtw76qfcV/s1600/icon-list-view.png' style='margin: -8px 1px -3px -6px;width: 16px;'/> List View</a></div>
    </b:if></b:if>
    Step 6. Now, search the code below:
    <data:post.body/>
    Step 7. You will find 3 occurrences of this code, replace only the second and third one with this one below:
     <b:if cond='data:blog.pageType != &quot;static_page&quot;'>
        <b:if cond='data:blog.pageType != &quot;item&quot;'>
            <div expr:id='&quot;summary&quot; + data:post.id'>
                <data:post.body/>
            </div>
            <script type='text/javascript'>createSummaryAndThumb(&quot;summary<data:post.id/>&quot;,&quot;<data:post.url/>&quot;);</script>
            <b:if cond='data:post.allowComments'>
                <a class='comment-bubble' expr:href='data:post.addCommentUrl' expr:onclick='data:post.addCommentOnclick'>
                    <data:post.numComments/>
                </a>
            </b:if>
        </b:if>
    </b:if>
    <b:if cond='data:blog.pageType == &quot;item&quot;'>
        <data:post.body/>
    </b:if>
    <b:if cond='data:blog.pageType == &quot;static_page&quot;'>
        <data:post.body/>
    </b:if>
    Important: if you already added the auto read more script, remove the previous one in order to make this work.

    Step 8. Finally, click "Preview" to see if everything looks good and press the 'Save Template' button to save the changes...

    That's it!

    Adding a dynamic view switcher on a blog will make viewing content a lot easier for visitors. Whether using a list or grid view, a more compressed list of posts will eliminate the need to click on the next page, which could take time if loading takes a while to complete. For a blog archive, using the Auto Read More codes in Blogger will surely make everyone's viewing experience very convenient.

    Considering the ease with which the codes can be customized, building a list/grid view switcher would be completed in no time. A real bonus is that Auto Read More works on all platforms, with cross-browser support as well.

    Ogbongeblog Redesigned Again

    Barely few weeks after I changed the look of Ogbongeblog, I've redesigned it again. The new design is also responsive but features two sidebars, both on the right side of the blog posts if viewed on PC. I've coded it in such a way that the narrow sidebar won't display on small screens.


    New Look


    Old design


    Old Look


    The new design is a modification of a responsive Blogger Magazine template I purchased online. It is neat, fast, responsive and well optimized for search engines. If you need it, I can sell the template to you for just N5,000.


    The previous design is still available as free download here.


    Ensure you join my Facebook group here if you don't want to miss out on fee templates, ebooks etc


    So, What's your take on this?

    Monday, 9 March 2015

    How To Use Skitch

    Earlier, I published a post on what Skitch app is, the features and the Skitch download link. In this post, I've decided to share with you, how to use Skitch tools on Windows PC.


    Once you understand how to use it, you will be able to put it into use in different ways. You can use it to edit and annotate images you use in your blog posts. You can use it for images in your ebook. I even read how Jamie used it in the process of digitizing his house.

    Once you launch Skitch for Windows, it opens directly into the Skitch Editor. From here you can capture a new image  using "Screen Snap" or annotate an image.

    The Skitch toolbar features annotation tools you can use to add new annotations to your Skitch Note.

    Annotating your image is easy. Just click any of the annotation tools on the toolbar, select a color and start annotating. I will explain briefly, how to use some of the Skitch tools.


    skitch toolbar


    The Arrow tool lets you easily point out an exact spot or item as seen in the screenshot above. To use this tool, click the arrow icon. Then, Click and drag to the spot on the image you want the arrow to point.


    The Draw tool allows you to freehand draw with digital ink, while the Highlight tool allows you to add a transparent color overlay. To use this tool, click the Draw and Highlighter icon to show the available tools.


    skitch highlight tool


    Click the Draw icon to freehand draw on the image, or the Highlighter icon to highlight anything with a transparent ink. With either tool, click and drag the cursor over the image to draw with digital ink.

    The Pixelate tool is perfect for blurring portions of images that need to be kept anonymous, such as faces or other personally identifiable information. To use this tool, click the Pixelate icon. A cross-hair will be displayed. Click and drag the cross-hair over the area you want to pixelate.


    To resize an image using the Crop & Resize tool, click the Crop & Resize icon. The Crop & Resize screen will be displayed. Select Resize Mode from the drop-down in the lower-left corner of the screen. Use the Resize slider at the bottom-center of the screen to change the size of the entire image. Then click the Apply button.


    The Stamp tool lets you quickly add simple sentiments like, "Yes," "No," or "Approved" to an image with images and a bit of text.

    I hope this helps.


    You can download Skitch here

    Do you use Skitch?

    Skitch Lets You Take Screenshots on PC, Erase, Add Arrows,Texts etc

    Lately, Skitch has become an invaluable tool for editing images that I use in tutorials I publish on this blog. I use it to capture, annotate, crop and resize images. I also use it to blur out portions of an image that need to be kept private eg personal info.


    Skitch gives you all the tools you need to get your point across faster.  With Skitch, you can open an existing image or capture a new one, then add shapes, write on it, draw on it, annotate it any way you like, and save to your PC or mobile device. You can as well save it to your Evernote account so that it is available everywhere Evernote is.


    skitch annotating tool


    Skitch tools include: an arrow tool; a text tool; a color picker; line and shape tools; a draw and highlight tool; crop & resize tool and a Pixelate tool that lets you to erase portion of an image that needs to be kept private.


    Skitch also features stamps tool that lets you quickly add simple sentiments like, "Yes," "No," or "Approved" to an image with images and a bit of text.


    Yes, Skitch is free, and it's owned by Evernote. Integration between the two makes perfect sense, allowing you to save images directly to Evernote.


    Skitch is fun and simple to use, and you don't need to read manuals before you start using it.


    Skitch is available for just about every platform and device, including:


        iPhone, iPad, iPod Touch

        Android devices

        Mac OSX

        Windows 8

        Windows Desktop


    To download, visit the Skitch download page.


    Recommended: How To Use Skitch

    Friday, 6 March 2015

    Sony Xperia Z2 Custom ROM for Karbonn A25

            Sony Xperia Z2 Custom ROM for Karbonn A25 (MTK6577 ICS). Best Performance, battery life, Interface & Bug Free ROM. Music experience enhanced with latest Sony Xperia Z4 Walkman update which has lots of cool features & Interface. Perfect ROM for Gamers & Music lover.  Sony a well known mobile brand because of its Popular engine, interface & hadware. I can't change your hadware but provide you with its Bravia engine & Interface. Not just interface but also the awesome music Apps namely Walkman which is one of the best music player.

    Don't miss :


    ROM Features :
    1. Xperia C Lockscreen
    2. Xperia Z1 Small Apps
    3. Xperia Z1 Themes
    4. Xperia Z1 Launcher
    5. Xperia Z1 Movies  Get Auto, Mobile Insurance.
    6. Xperia Z1 Albums
    7. Xperia Z1 Wallpapers
    8. Xperia Z1 Walkman
    9. Xperia Z1 Calculator
    10. Xperia Z1 Clock
    11. Xperia Z1 Calender
    12. Xperia Z1 Email
    13. Xperia Z1 Widgets
    14. Xperia Z1 Sounds
    15. Xperia Z1 Bootanimation  Get Auto, Mobile Insurance.
    16. Xperia Z1 Fonts
    17. Xperia Z1 Framework
    18. Xperia Z1 Keyboard  Get Auto, Mobile Insurance.
    19. Xperia Z1 Sketch App
    20. Xperia Z1 Notes App
    21. Sense Me Feature
    22. Downlaod Music Info
    23. Xperia C SystemUI
    24. Xperia C Settings
    25. Xperia Honami Album Share
    26. Xperia Honami Sound Enhancement
    27. Xperia C Icons
    28. Adjust All Background Color to Album Art on Walkman
    29. Music Control on Notification
    30. Clear Bass  Get Auto, Mobile Insurance.
    31. Clear Stereo  Get Auto, Mobile Insurance.
    32. Clear Phase
    33. Dynamic Normalizer
    34. xLoud  Get Auto, Mobile Insurance.
    35. Surround Sound VPT
    36. Walkman Music Widget
    37. Walkman DLNA
    38. Friend Music FB
    39. FB Music Like
    40. Music Extension for find info on internet
    41. Walkman More Stable
    42. X-Reality Engine for Album & Movies
    43. Photo & Video widget
    44. Faster And Smoother
    45. Pre-Rooted
    46. busybox
    47. Performance Tweaks
    48. Faster Streaming
    49. Net Speed Tweaks
    50. No Delay In Making Call
    51. Battery Tweaks
    52. Proximity Tweaks
    53. More RAM Free  Get Auto, Mobile Insurance.
    54. Added one key clean in Recent Apps.
    55. Signal Tweaks  Get Auto, Mobile Insurance.
    56. Better Responsiveness & Speed
    57. Ziplagined and Deodexed.

    Bugs : 
               This ROM has no bugs. But, if in case you find any bug, first try to solve it by doing a Fix Permissions through your ClockworkMOD recovery. But if you find any major bug you can report about it in comment section i would try to get back to you as soon as possible.

    Screenshots : (Click on any one link)
    1. Link 1 : Screenshots of XperiaZ2 ROM for Karbonn A25.
    2. Link 2 : Screenshots of XperiaZ2 ROM for Karbonn A25.
    Downloads : (Click on any one link)
    1. Link 1 : XperiaZ2 ROM for Karbonn A25.
    2. Link 2 : XperiaZ2 ROM for Karbonn A25.
    How to Install : 
    1. You need to have a rooted Karbonn A25 phone : How to Root A25.
    2. After rooting Install Clockworkmod custom recovery : Install CWM recovery.
    3. Install the ROM as mentioned in this post : Click here.
                That's all ! I hope you enjoy using this ROM & would also recommend to other Karbonn A25 user by sharing your thoughts & feedback regarding this ROM in comment section. Don't forget to +1 & Share this post. Hope to see you again here, Keep visiting !

    Wednesday, 4 March 2015

    How To Upgrade Mad Mimi Account in Nigeria

    Yesterday, I exceeded the 100 contacts limit of the free mad mimi basic account. So, I decided to upgrade to a paid Pro plan and it was successful using my Nigeria Access bank Visa card. I was charged N2,488.80 for the $12 plan and I received an sms debit alert from the bank.


    I first tried paying with my GTBank Mastercard but it failed telling me it wasn't honored. I've contacted GTBank on how to resolve this and I'm waiting t hear from them.


    If you want to upgrade your mad mimi account, sign in to your account and click on the "Go Pro" tab. Select the number of contacts you want and enter your card details to complete the transaction.

    I didn't use token nor OTP to complete the transaction with my Access bank Visa ATM card.

    Note: The mad mimi free plan lets you store 100 contacts and send out unlimited emails. You can sign up for your free account here.


    About Mad Mimi


    Mad Mimi is a simple lovely email marketing service. You can use it to create, send, share and track email newsletters.

    Tuesday, 3 March 2015

    Essential Tips to Remember For Good Oral Hygiene


    Good oral hygiene is essential to a happy and healthy life. If you skip out on proper oral hygienic practices, you may be putting yourself at risk of developing dental problems and dealing with the discomfort and costs that come with them.


    And since poor oral health is linked to serious illnesses, you could become more prone to conditions as serious as diabetes or heart disease. So it goes without saying that you should never take your oral health for granted.


    Brush twice a day


    If you don’t brush your teeth twice on a daily basis, plaque could build up and make you more prone to tooth decay and gum disease.


    The best technique is to stroke the toothbrush with a short, circular motion at a 45-degree angle. When brushing your molars, the toothbrush should be positioned perpendicular to the lips, with the bristles resting gently on the surface of the teeth. Move it from the back of the mouth to the front with no sideways motion.


    For the inner surfaces of your teeth, hold the brush so its head points toward the gum line. Then, brush every tooth vertically. Do this gently to avoid hitting the gums. Lastly, use the bristles to carefully clean your tongue.


    Always take your time. Don’t be hasty, and spend half a minute on each of your mouth’s quadrants. Once you’re done, you can rinse your teeth with an antibacterial mouthwash for good measure.


    Keep in mind that you should replace your toothbrush at least once every four months. If you have braces, you may need to use a special toothbrush or another tool to clean your teeth.


    Floss daily


    Your teeth can’t be completely clean if you don’t floss at least once a day. While the soft bristles of your toothbrush can thoroughly remove plaque from the surface of your teeth, getting rid of the food particles between them is a job for the dental floss.


    Just remember to be careful when inserting the floss between your teeth. Do it gently so you won’t damage your gums. And if you have braces, you can use a wooden or plastic dental pick in lieu of floss.


    Use fluoride


    Fluoride is the mineral in your toothpaste and mouthwash that improves the strength of enamel and prevents tooth decay. You can also ask your dentist if you want to have fluoride applied on your teeth.


    However, young children should use it sparingly; copious amounts of it can lead to tooth discoloration and gastrointestinal distress. In fact, your dentist will most likely tell you to use only a small amount of fluoride-filled toothpaste whenever you brush your teeth.


    Applying too much toothpaste may put you at risk of ingesting fluoride, which can be very detrimental to your health.


    Maintain a healthy diet


    The food you eat can have a significant impact on the health of your teeth. Did you know that a diet that consists of dairy products, fruits, vegetables and other whole foods can help keep your teeth and gums resilient against damage? It is also believed that the omega-3 fatty acids can help prevent and alleviate sore, swollen and bleeding gums.


    It is important to avoid binging on sweet food. When simple sugars are broken down, they produce acids that damage tooth enamel, thus causing tooth decay. Sipping on soft drinks or juices is also not advisable, as it can cause avid levels to rise for extended periods.


    Say no to tobacco


    Tobacco is notorious for causing tooth discoloration. What’s more, long-term smoking is proven to increase the risk of gum disease. Whether you smoke cigarettes or just chew tobacco, you should think about kicking the habit as soon as possible.


    Say yes to that piece of gum


    Did you know that sugar-free gum can help prevent oral health problems? Chewing it helps increase the flow of saliva and gets rid of harmful bacteria. What’s more, it can help you quit smoking cold turkey and avoid eating unhealthy snacks.


    Protect your teeth from trauma


    If you engage in strenuous physical activities on a regular basis, wear protective gear. Aside from putting on a helmet if you are skateboarding, biking or engaging in any other intense activity, make sure that your teeth are protected. Wear a mouth guard to minimize the risk of mouth injury.


    Visit your dentist


    While there are proven home remedies to stop a toothache, you should not underestimate the importance of regular dental appointments. Be sure to schedule an appointment with your dental practitioner at least once every six months.


    Aside from giving your teeth a thorough cleanse, your dentist can identify any semblance of decay as well as early signs of oral cancer and gum disease.


    With good oral hygiene, you can avoid discomfort and expensive treatments, and of course, have a sparkling smile. Follow proper hygienic practices, and you will have healthy teeth and gums for a lifetime.

    PLACE YOUR ADS HERE