Pages

Receive More Updates

Date: - Time:
SMS: Send FOLLOW BALLOWAP To 40404 For Free - EMAIL: azeezbello8@gmail.com

Saturday, 31 August 2013

Download Jumia App for Online Shopping

M-commerce is exploding in Africa – the number of users who access the internet via their phones is growing rapidly and leapfrogging the traditional desktop users. Hence, it’s immensely important for online StartUps to also offer a mobile solution to their customers. M-commerce is not just an additional channel, but might be the entry point to gaining many more customers in a market. 


In a bid to make it convenient for customers to shop online with their smartphones, Jumia has announced an m-commerce app for users in Nigeria, Morocco, Kenya and Ivory Coast. With the new Jumia's App, selection of 50.000 products is just a few clicks away and makes online shopping even easier and totally flexible.


http://www.jumia.com.ng/


According to a press release by Jumia, the app offers:


  •  International known brands and product assortment

  •  Fast and intuitive navigation

  •  Simple, flexible and secure online payment

  • Push notifications for exclusive updates on new arrivals and special sales. 


    The JUMIA’s App is only available for Android phones.


    Settings to do before downloading the app


    1) On your Android phone, go to Settings > Applications

    2) Check the box next to Unknown sources

    3) Confirm


    Happy Shopping!


    JarusHub Free Career Mentorship Conference

    In less than one year of existence, Jarushub, a Nigerian career and mentorship blog with focus on young Nigerians, is redefining blogging in Nigeria.


    Apart from providing useful and practicable tips for career success, the platform showcases interviews of successful professionals who share their success stories so that the young ones can learn from them.


    The blog's founder, Suraj Oyewale, a Chartered Accountant with experience in Nigeria's top Oil and Gas companies, consulted me when he wanted to start the blog and I am really impressed he is doing fine in just six months of existence.


    In line with his vision, Jarushub is taking career information sharing to another level with a new initiative, an offline conference scheduled to hold on September 21, 2013 in Lekki, Lagos.


    Top talented Nigerian professionals and CEOs will be at the career conference to discuss topical career and mentorship issues with young Nigerians. Some of the speakers are:


    ==> Mr. Robert Ikazoboh (CEO, Dragnet Solutions)

    ==> Mr. Tope Fasua, FCA (CEO, Global Analytics)

    ==> Mr. Akeem Oyewale, FCA (Director, Equities Brokerage, Standard Bank)

    ==> Mr. Olufemi Awoyemi, FCA (CEO, Proshare)

    ==> Mr. Niyi Yusuf (CEO, Accenture Nigeria)


    TOPICS


    1, Academic & Professional Qualifications: Balancing the Mix


    2, Standing out in Nigeria’s Competitive Job Market


    3, Mentor: Why you need one


    4, Climbing the Career Ladder in Corporate Nigeria


    5, My First Job. My Next Job. What do I Need to Know?


    6, Quitting Your 9-5 Job: Why, When and How?


    7, Enhancing the Employability of Nigerian Graduates


    8, Straight from the Heart Tips to Young Nigerians


    DATE: Saturday, September 21, 2013


    TIME: 9am – 3pm


    VENUE: Elizabeth Hall, Citilodge Hotel, 1 Goshen Estate, Marwa Bus-Stop (after 2nd Roundabout, coming from VI), Opposite Ecobank (formerly Oceanic Bank), Lekki Expressway, Lekki, Lagos


    Get info on how to register for Jarushub conference here.


    Registration is FREE.

    Friday, 30 August 2013

    New Glo BIS Codes for Blackberry Subscription and Prices

    Recently Globacom Nigeria introduced new codes for the Glo Blackberry plans (Glo Blackberry Complete and Absolute plans) with a reduction in the subscription rates.


    In this post, I am sharing with you the features, prices and new codes of the Glo BIS plans.


    1. Glo Blackberry Complete Plan


    The reviewed Glo BB complete plan offers subscribers with access to BBM, internet browsing, blackberry app world, 3rd party apps and integration of 1 third party email address as well as @gloworld.blackberry.com email account. There is no access to Blackberry Protect on the complete plan.


    What is the Code for Glo Blackberry Complete Plan?


    ==> To subscribe for one month plan (3Gigs), text "BBCMonth" to 777 or dial *777*21#

    ==> To subscribe for one week plan (700MB), text "BBCweek" to 777 or dial *777*22# 


    How Much is Glo Blackberry Complete Plan? 


    ==> One month Glo BB Complete plan costs N1,000 while one week plan costs N400.


    2. Glo Blackberry Absolute Plan


    The Glo BB Absolute plan offers subscribers full access to BBM, internet browsing, blackberry app world, Blackberry Protect 3rd party apps and integration of  up to 10 third party email address as well as @gloworld.blackberry.com email account.


    What is the Code for Glo Blackberry Absolute Plan?


    ==> To subscribe for one month plan (3Gigs), text "BBAMonth" to 777 or dial *777*23#

    ==> To subscribe for one week plan (700MB), text "BBAweek" to 777 or dial *777*24#


    How Much is Glo Blackberry Absolute Plan?


    ==> One month Glo BB Absolute plan costs N1,500 while one week plan costs N500.


    How To Check balance of Glo BIS


    Text ‘STATUS’ to 777 to check the usage status of your current subscription. You will receive a text containing info on how many MB you have left on your Glo BIS.


    That's all.


    NOTE


    ==> You cannot renew the old BIS plans using the new codes. If you try it, you will receive "sorry, you are not allowed to make this change. Kindly choose another data plan" as a response via text message. Allow the old plan to expiry and subscribe manually using the new codes.


    ==> Ensure you use the new Glo BIS keywords to benefit from the new rates and pricing.

    ==> For more help and information, please call Glo BB Customer Care on 333.


    Thursday, 29 August 2013

    How To Make Related Posts To Show On Blogger Mobile View

    After showcasing the redesigned mobile view of Ogbongeblog yesterday when I published "how to make addynamo ads appear on blogger mobile view", I have received mails from some blogspot users, asking me how I make the related posts widget to appear on the mobile view of my blogger blog.


    Well, you can get it done if you've switched to blogger custom mobile template and would be easier for you if you've installed my related posts widget to your blog. All you will just need to do is to carefully add some few lines of code to your blog's html.


    How To Get Started


    ==> Click here to install my related posts widget


    *** Change the width in the css from 350px to 300px; perfect for the screen of most mobile phones.


    ==> If you have not enabled custom mobile template, login to your Blogger dashboard, go to "Template". Under "Mobile", select "Yes. Show mobile template on mobile devices" and choose "Custom" from the "choose mobile template" dropdown box and save your settings.


    ==> Now, we need to find the code for the default mobile share buttons so we can place the related posts gadget directly below it.


    ==> So, back up your template and go to "Template" > "Edit HTML"


    ==> Click inside the HTML and use CTRL F to find <b:if cond='data:top.showMobileShare'>


    ==> Carefully find the ending </div> as seen in the screenshot below


    ==> Directly below it, copy and paste the code below:


    <br>

    <div style='float:left;'>

    <!-- Related Posts with Thumbnails Code Start-->

    <b:if cond='data:blog.pageType == &quot;item&quot;'>

    <div id='related-posts'>

    <font
    face='Arial' size='3'><b>Related Posts:
    </b></font><font
    color='#FFFFFF'><b:loop values='data:post.labels'
    var='label'><data:label.name/><b:if
    cond='data:label.isLast !=
    &quot;true&quot;'>,</b:if><b:if
    cond='data:blog.pageType == &quot;item&quot;'>


    <script
    expr:src='&quot;/feeds/posts/default/-/&quot; +
    data:label.name +
    &quot;?alt=json-in-script&amp;callback=related_results_labels&amp;max-results=5&quot;'

    type='text/javascript'/></b:if></b:loop>
    </font>


    <script type='text/javascript'> removeRelatedDuplicates(); printRelatedLabels();

    </script>

    </div>

    </b:if>

    <!-- Related Posts with Thumbnails Code End-->

      </div></br>


    ==> Save your template


    ==> View any blog post that has labels and you should see related posts links appearing right below the mobile share buttons.


    Note: If you did not add a label (category) to a post, you might not see the related posts below it.


    Did it work for you? Please, let me hear from you via comments.

    Wednesday, 28 August 2013

    How To Make Ad Dynamo Advert Appear On Blogger Mobile View

    Recently, I redesigned the mobile view of ogbongeblog using the blogger mobile template. One of the changes was enabling Addynamo mobile ad unit to appear whenever you view my blog on a small screen especially on opera mini browser.


    I decided to do this as an alternative to monetizing my Opera Mini blog's traffic since Google ads still refuse to be displayed on Opera Mini without using mobstac.


    If you are interested in making addynamo adverts to appear on the mobile view of your blogspot blog, follow the steps below:


    ==> Log in to your ad dynamo account to generate the code for the mobile ad unit.


    *** If you want to get the code for "300x50" mobile ad unit, make sure you click the "mobile" tab before clicking the "New Channel" button. You can also try the "300x250" ad unit from the "Web" tab.


    ==> Log in to your blogger dashboard, go to "Layout" and click on "Add a gadget".


    *** If you want it to appear at the top of your mobile view, add the gadget to the header section. If you want it down the mobile view, add  it to the sidebar or footer section.


    ==> Select the "HTML/Javascript" gadget, copy and paste the Ad dynamo ad code into the box, then SAVE.


    ==> After saving, click the "edit" link under the Addynamo widget. Get the widget ID (eg HTML13) from the URL bar as seen in the screenshot below and take note of it.


    ==> Go to "Template". Under "Mobile", select "Yes. Show mobile template on mobile devices" and choose "Custom" from the "choose mobile template" dropdown box.


    ==> Save your settings.


    Now, we need to activate the Addynamo ad to be displayed on the Blogger mobile view.


    ==> Go to "Template" > "Edit HTML"


    ==> Click on the "Jump to Widget" tab and click on the widgetID of the Addynamo unit you added to your blog earlier. This will take you to the code of the widget in your HTML.


    ==> Add mobile='yes' to the line of code as seen in the screenshot below.


    ==> SAVE your template.


    View the mobile view of your blog by adding ?m=1 to your blog address eg www.ogbongeblog.com?m=1 and you should see the Addynamo ad been displayed on the mobile view.


    NOTE


    If you want it to display ONLY on the mobile view and not on the desktop view, use mobile='only' but if you do this, you will keep seeing an error message anytime you want to re-arrange the widgets on your blog layout.


    Please, relay your comments, contribution etc via the comment form below.


    Do not forget to share this with your friends.


    You can read more Addynamo tips here


    Tuesday, 27 August 2013

    How Can I Generate and Place Jumia Ad Banners/Links On My Blog?

    UPDATE: Jumia has moved from CJ to a new platform. Read more about how to generate ad banners from the new Jumia Affiliate platform here.  


    You've read about the Jumia Affiliate Program, you've seen how I earned $27.50 from one product sold for Jumia and you are ready to try the program but don't know how to get your unique Jumia affiliate banners and links? Well, that's exactly what am explaining to you in this post. So, keep calm and continue reading.


    Before you can generate your Ad banners to promote Jumia products, you must have been accepted into the program by Jumia and must be able to log in to your affiliate account at CJ.com because that is where you will generate your ad banners and text links.


    How To Get Jumia Advertisement Banners and Links From CJ.com


    Before you proceed to generate your banners and text links, read Jumia's Affiliate restrictions here. If you are OK with the restrictions, you can go ahead to create your advertisement banners as explained below.


    ==> Log in to your account at www.cj.com

    ==> Click on the "Links" tab

    ==> Type "Jumia Nigeria" in the search box. It will appear with the ID 3850063


    ==> Click the "Search" button


    You will see the list of text links and banners you can use to promote Jumia's products. You might have to click through the pages to see ALL because all the links might not display on one page.


    ==> Click the "Get code" icon next to the link you want to promote

    ==> Copy the HTML code somewhere e.g in a notepad.

    ==> If you ONLY need the link, click the "click URL" tab, to get it


    How To Add Jumia's Banner and Text Link To A Blogspot and Wordpress Blog


    If your blog is a blogspot blog,


    ==> Log in to www.blogger.com

    ==> On your dashboard, go to "Layout" and click on the "Add a gadget" link

    ==> Click on the "HTML/Javascript" gadget.

    ==> Copy and paste your Jumia's code in it and SAVE.


    If your blog is a wordpress blog, use the Text widget. Alternatively, you can try the plugin HTML-Javascript-Adder which allows you to easily place your banner in all pages or in specific pages.


    If you want to use the text links, you can use them in your blog posts if you review the products. Please do this carefully and read Google's policy on promoting affiliate programs.


    That's all.


    NOTE:


    As at the time of publishing this post, Jumia's commission structure is as follows:


    ==> Electronics (Mobile Phones, Electronics in general, Home Appliances) 3%

    ==> Toys/Kids 5%

    ==> Fashion 9%

    ==> Beauty 9%

    ==> Books 9%


    I hope this helps.


    Please, let me hear from you via comments if you've got questions to ask or anything to say as regards this.


    Do not forget to share this post with your friends too.


    Cheers!


    Monday, 26 August 2013

    Glo Bounce Tariff: Call ALL Networks at 12k/sec and Get free 30MB

    2014 Glo Bounce Update: The free 30MB now expires in 2 days and bounce to bounce calls is now 9k/sec


    As a truly Nigerian brand that understands the needs and aspiration of the Nigerian youth and those who are young at heart, Globacom Nigeria has again set another trail with the launch of Glo BOUNCE to the Nigerian market.


    What is Glo Bounce?


    Glo Bounce  is a new prepaid price plan with very attractive calling rates and so many added value services, available to new and existing prepaid Glo subscribers.


    It is an innovative product which meets the lifestyle needs of the Nigerian youth and offers the best value for money in the market.


    To start enjoying Glo Bounce benefits, dial *170*4#.


    Key Features of Glo Bounce Tariff Plan


    ·         Flat calling rate: Customers enjoy onnet and offnet calling rate of 12K/s i.e 12K/s to call ALL networks in Nigeria, after 1st minute of the day at 40K/s.


    ·         Peeps rate: Customers on Bounce can call other Bounce subscribers at a heavily discounted rate of 5K/s and send SMS to same at N3.


    ·         Campus zone: Customers who are under the sites classified as campus zone enjoy 5K/s on calls to ALL Glo customers. Customers must opt for this service and it is exclusive to Glo Bounce. Dial *170*9# to opt in


    ·         Free night calls: Use N30 between 00:01 and 23:59 and enjoy free onnet calls from 00:00 to 04:59 every day.


    ·         Free data: Get 30MB free on recharge of N200 and above. Valid for 7 days.


    ·         Zero Facebook: Enjoy free facebook browsing at http://0.facebook.com


    ·         Free RBT: One month free RBT to be enjoyed by customers on migration to Bounce


    ·         Unlimited Free SMS: Enjoy free SMS on every charged SMS sent (onnet, offnet or IDD). Free SMS can only be used for SMS to all networks in Nigeria.


    How Can I Migrate To Glo Bounce?


    The migration code for Glo Bounce is *170*4#


    Dial it on your Glo line and when asked for the confirmation press 1


    NOTE:


    ==> Campus zone refers to a territory under sites classified as campus site. Campus sites are base station sites serving campuses of tertiary institutions across the country.

    If you are under a campus site and you call a Glo customer, you will be charged campus rate of 5K/s but you must first opt in for this by dialing 170*9#.


    ==> You get free 30MB on every recharge of N200 or more and only a SINGLE recharge of N200 and above earns you the free 30MB which is valid for 7days. If you recharge with another N200 while you are yet to exhaust the previous 30MB free data, you will get additional 30MB and this extends the validity of the previous 30MB by another 7 days.


    ==> To enjoy the zero facebook, log on to http://0.facebook.com


    How Can I Check My Glo Bounce MB Balance?


    You check your Glo bounce MB by dialing #124# then 4 or by dialing #122#


    How To DeActivate/Leave Glo Bounce


    You can de-register from the Glo BOUNCE package by dialing the respective USSD code of the new package to which you want to migrate. Check codes for Glo tariff packages here.


    If you don't have a Glo SIM but interested in this fantastic plan, read how to port to Glo without changing your phone number.


    What's your take on this Glo Bounce plan? Pls, let me hear from you via comments.


    2014 Glo Bounce Update: The free 30MB now expires in 2 days and Bounce to bounce calls is now 9k/sec


    Source: Glo Portal 


    Sunday, 25 August 2013

    Jumia Affiliate Program: How To Apply and Start Making Money From Product Sales

    UPDATE: Jumia has moved from CJ to a new platform. Read more about the new Jumia Affiliate platform here.  


    After publishing the $27.50 I earned from one product sold for Jumia Nigeria, I have been receiving some mails on how to join and start making money online from Jumia affiliate program. So, I've decided to share with you in this post, the steps involved so you can get started asap.


    If "Jumia" is new to you, it is an online shop that offers thousands of products for sale ranging from electronics to beauty products. Games & consoles, fashion products, laptops and latest phones are also available at their online store. The site runs a partner program through which anyone who helps in selling their products earn some commission.


    The Jumia Partner Program is a pay per sale program that pays affiliates for referring sales or customers to Jumia. If a customer referred to Jumia purchases a product within 30days after clicking on an affiliate's link, the affiliate will get a percentage of the sale price as commission.


    Commission Junction manages the affiliate program on behalf of Jumia. You will generate your affiliate banners and links from Commission Junction's website; cj.com and it is also from the site that you will be tracking your performance and payments.


    How To Join Jumia Affiliate Program


    To become Jumia affiliate, you need a blog or website with some reasonable traffic. You can learn how to create a free blog here if you don't have one.


    To get started, go to : http://www.jumia.com.ng/jumia-affiliate/ and click on the "sign up" button. You will be redirected to CJ website to fill the application form.


    If you are not already a Commission Junction publisher, complete the short application form to get started earning commissions from Jumia.


    If you are already a Commission Junction Publisher, you can skip the form and sign up for the Jumia Nigeria Program directly through the Commission Junction Member's Area.


    If accepted, you will get a confirmation from Jumia with your account information. Thereafter, you can log in to your account at CJ.com to generate the Jumia banners and text links you can use on your blog or website.


    How To Make Money Online from Jumia


    To make money from Jumia Affiliate Program, you have to help Jumia in selling their products. You get paid if someone you refer to Jumia via your affiliate banner/link buys something at Jumia. If you refer one million customers to Jumia and none makes a purchase, Jumia won't pay you a dime. So, you have to sell, sell and sell.


    You can easily refer customers to Jumia by placing Jumia ad banners and text links on your blog or website. If you are using banners, ensure you choose banners according to your target audience and place them in clearly visible positions on your blog. If you are using textlinks to promote Jumia products, try to use short, descriptive texts that will attract clicks eg "Buy latest Blackberry phones at Jumia here".


    You can write about their products in your blog posts and embed your affiliate links in the posts. If you have an existing blog post that is related to a product at Jumia, you can also add your link to such post. Be careful, don't add links to unrelated posts or else, it might affect your ranking in Google search.


    Keep driving traffic to your blog and always track your performance at CJ.com.


    Once you reach your threshold, ($100) you can request for your check from CJ.com. Once delivered to you, you can take it to your bank. 


    I hope this helps.


    If you have questions or want to contribute to this, kindly use the comment form below.


    Cheers!


    Wednesday, 21 August 2013

    Earned $27.50 From One Product Sold via Jumia Affiliate Program

    Jumia Nigeria, the No 1 Nigerian online shop, has a program that allows website/blog owners to promote their products and get a commission for every order. The Jumia Partner Program is a Pay Per Sale affiliate program which pays affiliates when the visitors referred to Jumia's site purchase something.


    I enrolled in the program some few months back as another means of making money with my blog. Since then, I have been promoting Jumia products in some blog posts.


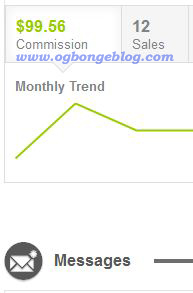
    So far, I have earned $99.56 from 12 sales via my unique Jumia affiliate link. Mind you, commission per sale depends on the type of product sold. The more expensive the product is, the more the commission.


     Yesterday, while checking my performance report at CJ.com, I noticed that I earned $27.50 from a product sold via my affiliate link. See details in the screenshot below:


    Right now, I need some few cents to reach my $100 threshold after which I will be anxiously waiting for my first Jumia check from commission Junction.


    Once I get the check and successfully cash it, I will consider marketing Jumia products with full force..smiles**


    Are you also making money with Jumia Affiliate Program?  Don't you think this is another cool way of monetizing Nigerian traffic? Please, let me hear from you via comments.


    You might also be interested in "How I Make $622 (N97,000) in 15 Days From Google Adsense"'

    Tuesday, 20 August 2013

    How I Make Google Adsense Ads Display on Opera Mini Browser

    It is no more news that Google Adsense ads on blogspot blogs do not show on Opera Mini browser even if you add the new asynchronous and responsive Google ad codes to your blog.


    The mobile ready Adsense units (300x50 and 300x250 ad units) which I've added to my custom blogger mobile template, display on the default mobile browsers of blackberry, iPhone, Android but not on Opera Mini browsers. They turn blank anytime my blog is viewed with Opera Mini.


    I am still wondering if it is a bug with Opera's server,  Opera's and Google's agreement, or something else because ads of other ad networks eg Addynamo display fine on Opera Mini browser.


    The same problem was reported at Google's forum but the issue has never been addressed by Google.

    While waiting for Google to address the issue, I decided to try third party services that help in rendering sites for mobile compatibility. I tried dudamobile and mobstac and out of the two, mobstac works fine for me.


    Adsense ad On Opera Mini


    With mobstac, you can create a mobile compatible version of your blog, which when viewed on Opera Mini, will display your Google ads to your blog readers. The service now costs $19 per month.


    I have been using mobstac for over a year now to monetize my blog's opera mini traffic and it has really helped me in making some cool money from Google Adsense. Anytime I decide to switch back to blogger mobile template, I always notice a sharp drop in my Adsense earnings. This is simply because the highest percentage of my blog's traffic use Opera Mini in accessing my blog.


    Mobile readers are increasing, even larger in number, comparing to those who browse the internet from desktop browsers like Firefox, Safari and Chrome. As more people adopt mobile phones for internet browsing, your Adsense earnings might be decreasing day by day if majority of your readers use Opera Mini.


    You can use Opera Mobile Emulator to check if Google Ads on your blog display on Opera Mini.


    If you are interested in monetizing your Opera Mini traffic with Google Adsense, you can check out my mobstac tutorials to get started.


    Are you also worried that majority of your blog readers are using Opera Mini? Do you know other ways of monetizing traffic from Opera Mini browsers? Please, let me hear from you via comments.


    NOTE: You will only see Google ads when viewing my blog on Opera Mini, provided you are viewing the mobstac version and not the mobile version powered by Blogger.

    Mobstac: How To Switch from Pro to Starter Plan

    Mobstac makes it possible for me to display Google ads to people that access my blog with Opera Mini browser. Few months back when I decided to stop subscribing to the Mobstac pro Blogger plan, I waited till the plan expired before changing the plan to the free starter plan.


    Unfortunately, I realized I couldn't switch due to some restrictions from mobstac leaving me with the option of re-subscribing or my site gets deleted from mobstac's server.


    I decided to re-subscribe to see if I can switch when I have an active plan and it worked. My subscription will expire tomorrow but I have been able to successfully downgrade my account to the free plan yesterday.


    So, if somehow you still want to be using mobstac but don't want to keep paying for their service, follow the steps below in switching to the free plan.


    STEPS


    ==> Log in to your account at mobstac.com


    ==> From your site's mobstac dashboard, go to Content > Sections and make sure u don't have more than one section. If you have more than one section, delete all.


    ==> Then, go to "Account", click on "change plan"


    ==> Right under starter plan, click the "switch now" button


    ==> If successful, you will see : "Switched to Starter. Your account settings have been updated. Your site has been now switched to the Starter plan".


    That's all.


    If you want to stop using mobstac completely, you can delete the CName created for your mobstac site from your DNS dashboard and delete your mobstac site from your mobstac dashboard.


    I hope this helps. 

    Sunday, 18 August 2013

    Display Automatic Post Thumbnail Images On Blogger's Blog Homepage Without Javascript

    With a little tweak in your Blogger blog's html, you can easily display automatic thumbnails in post summaries on your blog's homepage when viewed on PC (desktop view). No need for any javascript nor complex css customization.


    The tweak will enable the display of thumbnails automatically generated from images used in your posts on your homepage, while the full-sized images display on post pages.

    Post Thumbnails will make your blog look fine if you are using the Blogger Jump break feature to add "read more.." option to your blog posts. Below is a screenshot of a post excerpt on my blog with a post thumbnail aligned to the right and also with a "read more" icon.


    How To Add Post Thumbnails To Blogger Homepage


    ==> Log in to www.blogger.com
    ==> Back up your blog template
    ==> Go to "Template" > "Customize" > "Advanced" > "Add CSS"
    ==> Copy and paste the code below in the css window:


     .postthumb {
    padding: 5px;
    float:left;
    border: 1px solid #eeeeee;
    -moz-box-shadow: 1px 1px 5px rgba(0, 0, 0, .1);
    -webkit-box-shadow: 1px 1px 5px rgba(0, 0, 0, .1);
    box-shadow: 1px 1px 5px rgba(0, 0, 0, .1);
    }


    ==> Click "Apply to Blog"
    ==> Click "Back to Blogger"
    ==> Go to "Template" > "Edit HTML"
    ==> Click inside the HTML editor


    ==> Use CTRL F to find the second <data:post.body/>  in your blog's HTML


    ==> Copy the code below, directly above the second <data:post.body/>


    <b:if cond='data:blog.pageType == "index"'>
    <b:if cond='data:post.thumbnailUrl'>
    <img class="postthumb" expr:src ="data:post.thumbnailUrl" expr:alt="data:post.title"/>
    </b:if>
    </b:if>


    ==> Save your template

    ==> View the homepage of your blog and you should see the post thumbnails appearing on each post excerpt.

    NOTE: There must be an image in your post and you must have added the read more option to your post.

    I hope it works for you.

    Larrie Peniel: Nigerian Master of Ceremonies that Redefines Event Anchoring / Compering

    Ever been to an event and you feel pity for the host or organizers because you know they have spent a lot of money on organisation, yet the M.C. makes everything dull and uninteresting?


    Have you ever stepped into the venue of an event and you become a lot more confused than you were before you stepped in?


    Have you ever had to go for a corporate or social function with the intent of having fun, only to get there and you had to endure the ceremony rather than enjoy it just because the Compѐre/M.C. was lifeless, drab and very dull?


    Have you attended a gathering of very distinguished personalities but the Compѐre's level of spoken English is embarrassingly  lower compared to a Primary 3 student, yet he is attempting to rehearse jokes for his next comedy show, such that guests are more infuriated than engrossed?


    Have you gone for a corporate function but the Compѐre is struggling with the pronunciation of the Company name (and members of staff) and still manages to make a mess of the brief/unique company objectives?


    Well, if the answer to any or all of the above is Yes, then you are surely not alone in this forgettable experience.


    Larrie Peniel, a Nigerian Compѐre who has redefined the art of public speaking and emceeing/anchoring events, comes at a time when many guests are already bored just a few minutes into most events, perhaps silently praying or wishing it will be time for tea break, lunch or dinner, as the case may be.


    Well, do not worry anymore, it needn't be time for food for your event to come alive and that is the reason Larrie is the man to be associated with when it comes to having an enjoyable, memorable, lively and fun-filled event.


    Apart from his unique dress style, Larrie engages your guests and makes sure they are part of the function, without taking anything away from the brief or ceremony. He is witty without overly or consciously trying to make people laugh, yet he humorously ensures all the attention does not shift from the organisational objectives of having the event.


    Through his engaging style, witty delivery, knack for professionalism and eloquence, respect for etiquette, time consciousness and appearance, Larrie distinguishes himself from the rest of the pack.


    He understands no two corporate events or social functions can ever be the same and strives to give a unique flow to your occasion. Larrie Peniel gives professional advice when necessary and assists you to develop a schedule/programme, where none is available.


    With over 300 corporate and social events to his credit, Larrie is ready to take the brief of your event and make it come to live, just as you have envisaged. Be it a corporate event such as a Product Launch, Convention, Company ball and Award, Investiture, Seminar, Fund-raising and Conference or a social function such as a Wedding, Party, Team-Bonding, Anniversary and End-of-Year Party; whatever the occasion may be, Larrie Peniel is the man to make it very memorable for you.


    He has a Masters degree in Management with specialisation in corporate communication.


    You can view his portfolio at his website: http://penielplus.com/main/portfolio/


    Links to Newspaper interviews Larrie Peniel granted:


    Contact Details


    You can get in touch with Larrie:


    P: 08022947579; 018830592

    W: www.larriepeniel.com or http://penielplus.com

    E: info@larriepeniel.com

    F: www.facebook.com/larriepenielmsc

    T: www.twitter.com/larriepeniel

    Y: www.youtube.com/larriepeniel


    Differences between Tecno L3 and P3

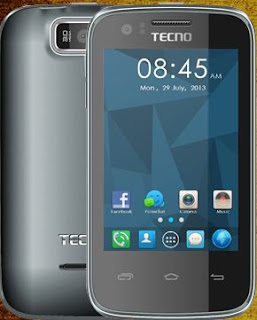
    Tecno L3 is one of the latest tecno phones released after I published the list of Tecno Android phones on this blog. The new Tecno phone is an improvement on the Tecno P3, as it is packed with more internal memory, more RAM, a more recent version of the Android OS, a better processor, and a stronger battery.


    Preloaded with Android 4.1 OS, L3 operates faster, smoother and it is more responsive compared to P3 and N3. You can upload and download whatever you want at a fast speed with 3G network.


    Image of Tecno L3
    Picture of Tecno L3


    So, if you think you’re loving your N3 or P3, this new phone may just tempt you to start a desperate search for someone to buy your phone.


    Below are the Major differences between Tecno P3 and L3:


    •  The Tecno L3 runs on one of the latest version of Android (4.1.2 — Jelly Bean), as against version  2.3.5, on which the Tecno P3 runs.

    •  The L3 is packed with a 1GHz processor, while the P3 has an 800MHz processor.

    •  The L3 has 512MB of RAM, which doubles the P3′s 256MB

    •  The L3 has a 2400mAh battery, which is stronger than the P3′s 1400mAh


    So, if you’re considering buying the P3, then you should buy the L3 instead – Tecno L3 rocks!


    jumia ng


    Where Can I Buy Tecno L3 in Nigeria?


    You can get it from ParktelOnline.com here.


    Price of Tecno L3 in Nigeria as at the time of publishing this post is N15, 000 at ParktelOnline.


    Wednesday, 14 August 2013

    MadAdsMedia.com: CPM Ad Network That Pays Bloggers Even If Readers Don't Click On Ads

    MadAdsMedia is a global advertising network which works with top advertising networks to serve their ads on publishers websites. Instead of paying publishers per click like Google Adsense, the ad network pays publishers on CPM (Cost Per 1000 Impressions).


    MadAdsMedia pays an average (not fixed, might be more) of $0.05 per 1000 views of their ad banner on a publisher's site. This simply means if you are blogger, visits to your blog will earn you money even if your readers don't click on ads. You just have to increase traffic on your site to earn more and more money using CPM.


    The CPM ad  network aligns 100′s of ad networks, ad exchanges, and RTB advertisers to compete for publishers inventories.  Hence, if you place MadAdsMedia ad code on your blog, you might notice Google ads, Addynamo ads and ads of other networks been rotated on the ad space. Their optimization technology assures the ad provider with highest CPM is served, earning you the most for every impression.


    The screenshot below illustrates how MadAdsMedia works: 


    MadAdsMedia threshold is $50 and the network pays by check and through Paypal. Earnings are not updated real time, might take 48 hours. It takes 45 days after the current month end to receive payment if you have reached your set minimum payment.


    Can I Make Money With MadAdsMedia?


    MadAdsMedia ad network was recommended to me by a friend at Bloggerslab, while searching for best alternatives to Google Adsense apart from Chitika and Ad Dynamo.


    After reading some MadAdsMedia.com reviews, I decided to give it a try for 3 days. To be honest with you, I wasn't satisfied with what I earned for the 3days.


    I earned less than $0.10 per day, for the 3 days I placed MadAdsMedia 160x600 ad banner on my blog's sidebar. Imagine, I will need like 40,000 impressions to make just $2 per day based on $0.05 per 1000 impression. Earning such peanut for 30 days doesn't even makes sense to someone like me.


    If I could have Adsense that pays me very well per click, I do not see any reason to keep allowing MadAdsMedia ads compete for clicks with my Google ads. Hence, have removed their ad banner from my blog.


    If my dedicated account manager can contact me for an improved eCPM and if they can allow me to use their mobile banners, I might re-consider them.


    Nevertheless, If you've been banned by Google Adsense, you can try them. If you have a site that get lots and lots of traffic, you can be making some money with them.


    Remember, MadAdsmedia.com pays for impression and not clicks.


    Do you have MadAdsmedia.com ad banners on your blog? Do you earn some good $$ with them? I will love to hear from you via comments.


    Please, if you know other Ad networks that pay for impression, kindly share them via comments.


    Cheers!


    Monday, 12 August 2013

    How To Add Adsense To Blogger Posts Using New HTML Template Editor

    Adding Google ads inside Blogger posts is highly recommended if you really want to get the maximum clicks on your ads. There is no way someone will read your blog post without seeing the ads, be it under the post title or immediately after the blog post.

    The Adsense ad at the top of my blog posts is the best so far; even earns me more money than the 728x90 leatherboard ad unit. So, if you are yet to insert Adsense ads inside your Blogger post, try to do so and see if your Adsense revenue will increase or not.


    Placing the Google ads inside your blog post is not possible without having to edit your blog's HTML template. You cannot insert the ads with Blogger widgets just as you do on the sidebar, header or footer sections of your blog. Even if you place the ad codes in the wrong location in your HTML, the ad will not display when you view your blog. 


    Today, I am sharing with you, the correct way of adding Adsense ad codes inside your blog posts using the new Blogger HTML template.


    How To Get Started


    ==> Log in to www.google.com/adsense

    ==> Click on "My ads" tab

    ==> Click the "New ad unit" button

    ==> Select the 300x250 Medium rectangle ad size

    ==> Fill other options, save and get your ad code.


    Now, we need to parse the ad code.


    ==> Go to http://www.freehtmlparser.blogspot.com/

    ==> Copy and paste your ad code inside the box and click the "Encode" button

    ==> Copy and paste the code somewhere eg in a notepad


    Now you will add your parsed code in the codes below before using it in your blog's template.


    ==> If you want your ad to display at the left side inside your post


        <b:if cond='data:blog.pageType == "item"'> 

        <div style="float:left;">

        Paste your parsed adsense code here

    </div>

        </b:if> 


    ==> If you want your ad to display at the right side inside your post


        <b:if cond='data:blog.pageType == "item"'> 

        <div style="float:right;">

        Paste your parsed adsense code here 

    </div>

        </b:if> 


    The codes above are conditional tags that restrict the Ads to post pages ONLY.


    ==> After adding your parsed codes inside the conditional tags above, copy and paste it somewhere. The customized code is what you will paste in the template.


    Now, we need to add it to the new blogger HTML template


    ==> Log in to www.blogger.com

    ==> Go to "Template" > "Edit HTML"

    ==> Once the HTML loads successfully, click inside it

    ==> Press CTRL F on your keyboard to bring up the "find" box as seen below


    ==> Copy and Paste <data:post.body/> in it and hit the ENTER key on your keyboard. This will help you locate the code in the HTML.


    The code might appear more than once in your HTML. So, click inside the find box and hit the ENTER key again. You will know if it appears more than once if you look closely at the corresponding "line number" on the left side of the new Blogger HTML editor as illustrated below.


    Now place your Adsense customized code in this way:


    If you find <data:post.body/> more than once in your template, paste your Adsense code above the SECOND and THIRD <data:post.body/> if you want your ad to be displayed below the post title/at the top of the post.


    If you want it to display after the post, paste the code below the second and third <data:post.body/>. Alternatively, you can find the second <div class='post-footer'> and place the ad code directly under it. You can also place it under <div class='post-footer-line post-footer-line-3'>


    Save your template and view your blog. The ads should appear in your post.


    NOTE: Only three ad units can be displayed per page. So, if you already have three ads units on your page, the ad in your post might not display.


    I hope this helps.


    Questions? Contributions? Kindly relay them via comments.


    Recommended: How To Add Adsense After Blog Post

    Sunday, 11 August 2013

    How To Join Affiliate CPA Networks and Get Accepted With Ease


    This is a guest post compiled by +Jaunty NairaCoded for OgbongeBlog


    Making money online is both a combination of working hard and working smart, and with the many scam programs online, it is always hard finding a good and concrete method of making money online. One of genuine method which I always recommend is CPA affiliate marketing.


    Cost per Action (CPA), which is sometimes known as Cost per Lead or Cost per Conversion is a type of affiliate program where you help promote offers and get paid for a specific action.


    For instance, you can be asked to promote an offer where the advertiser pays you when an action is taken, such submitting an email, filling a form or making a purchase. I actually love CPA networks because I get paid for as little as someone submitting their email.


    Peerfly.com is on such CPA networks, and one of my favorite. Maxbounty and Neverblue are also good too. One thing that usually discourages most people from this CPA networks is the difficulty in getting accepted.


    It took a while before Peerfly approved my application, but the key factor that got me approved is being honest with them. Peerfly work with some of the world leading brands, and I strongly recommend them. The tips I am going to share works when applying for any CPA network.


    REGISTRATION


    First you will have to sign up at their website. You will be asked for your details and basic information which I will strong advice you to fill correctly. You MUST use a valid email and phone number because you will need them for your verification. Remember to include your country prefix. For example +234.


    You will also be asked how you intend to promote their offers, and this is one important determinant of whether you will get approved or not. This is because CPA network always want to get quality traffic to their advertisers, so be honest with them. I suggest you choose PPC (pay per click), PPV (pay per view), search engines and social media adverts.


    For some CPA networks, there will be an additional column where you will be asked to explain how you intend to use the methods you have mentioned to promote the offers. This is an opportunity to sell yourself and let them know why they need you to help them promote their offers. (Consider this like a job application)


    Next you will be asked if you own a website, I strongly suggest that you have at least a blog before applying, although it’s not compulsory, it will give you a better chance of getting approved. I simply typed in one of my self-hosted blog. Most CPA networks consider website owners are serious publishers who can send quality traffic to their advertisers, and when asked if you have been approved into other CPA networks, just answer honestly.


    Some CPA networks like Peerfly will ask you to upload a valid ID card showing your picture. They might not consider your application without this ID.


    VERIFICATION PROCESS


    Verification for most CPA networks is similar but can differ slightly. You will be asked to verify the email address you provided by sending you a link. The second verification is through phone calls.


    Like I said before, these CPA guys are serious about the quality of people they accept into their networks and will call you to confirm that you are real, and will ask you some question, mostly about how you want to promote their offers.


    Alternatively, instead of a phone call, you might be required to provide a code that will be read to you through an automated call machine. I didn't get a call from Peerfly, just their machine reading out some digit codes to me which I immediately entered on their site.


    Here is my little secret;


    After submitting my application, I called them to tell them that I applied for their network and that it should be approved. They were nice and they just asked some few questions. You can also add one of the account managers on twitter and tweet them about your application.


    When you finally get approved, be careful to follow their guidelines so that you don’t get ban.


    I hope this tips helps.


    Don't forget to ask your questions and drop your comments.


    This post was written by +Jaunty NairaCoded. He is a blogger, affiliate marketer, SEO coach and author of  NairaCoded blog. Catch him on  FaceBook, Twitter (@nairacoded). 


    Saturday, 10 August 2013

    Sefan Games Download for PC, Android and Symbian Phones

    If you are looking for a site where you can download games for mobile phones and computer for free, you need to bookmark sefan.ru. The Russian wapsite is loaded with free games you can download for PC, Android (Tecno, Samsung, HTC etc) and Nokia Java/Symbian phones.


    Some of the featured games include: Ultimate Mortal Kombat 3, Assassin's creed 3, GT Racing 2, Iron Man 3, Monsters University, WWE Smackdown, Real Football Manager 2013, PES pro evolution Soccer etc Apart from games, you can also download free themes for sony Ericsson, Siemens, Nokia and Motorola phones.


    The free downloads at sefan are divided into categories which include special categories for Android OS and Symbian phones. The Android OS downloads category includes games, animated wallpapers, apps, widgets and other decors you can download to your Android phone. All you just need to do is to load the .apk files and you are good to go.


    You can download the top 100 games at sefan ru by clicking on the "New Java Games" link on the homepage.


    Visit www.sefan.ru now to start downloading free games. You will see three flags at the top of the site. Click the middle flag if you want the site to be displayed in English.


    Have fun!


    Do you know other websites for free mobile phone games download? Please, let me hear from you via comments.


    Thursday, 8 August 2013

    Download Quickvoice : Free Call Recording Software for PC and Mobile Phones

    You can download Quickvoice app if you are in need of free voice recording software for your PC or smartphone. The free digital recorder can be used to record ideas, voice memos, voice email, interviews, meetings and lectures!


    It is the most popular, full-featured iPhone/iPad/iPod voice recorder available at the App store. There are lots of other voice recorders in the App Store but am in love with QuickVoice because of the multi-tasking feature.


    The Multi-tasking support makes it easy for me to use other apps while still recording in the background. This makes it possible to use Quickvoice app as a call recorder. I use it alot in recording Skype calls on my iPad.


    Ringtone recording
    is also possible with QuickVoice. You can produce your own custom ringtones easily using music recordings on your device, then assign different ringtones tones to different contacts.


    Quickvoice recorder app for iPhone and iPad is free for download but there is a pro version which allows you to send up to 20MB of voice recordings via email. The free version offers the ability to send up to 5MB of voice emails.


    If you purchase the QuickVoice Pro Recorder for your iPhone, you will get a free bonus copy of the award winning QuickVoice software for Mac and Windows PCs. The PC versions offer a full featured audio editor which makes it possible to use Quickvoice as a music production software.


    NOTE: The iPhone version syncs its recordings with the computer version.


    You can read about Quickvoice files transfer to computer process here and also check out how to convert Quickvoice recordings to mp3 files.


    If you know alternative call recording apps, please let me know via comments.


    Happy Recording!


    Back Up Blogspot Blog Posts and Comments WIth Google TakeOut

    Backing up your blog posts and comments is highly recommended for many reasons. For instance, if you mistakenly delete your blog or Blogger deletes your blog after violating their terms and conditions, you will be able to get your deleted posts back easily if you have a back up. More so, it will be handy if you want to migrate to wordpress or any other blogging platform.


    Although there is an "export" option via Blogger settings page but am sharing with you in this post, how to use Google Takeout to back up your blog post (including drafts) and comments. At Google Takeout, you can easily download the blog content of all the blogs in your Blogger dashboard. You can import the processed file into another blog e.g when merging two blogspot blogs together.


    How To Get Started


    ==> Go to www.google.com/takeout and log in with the same Google account which you are using for your blogger blog.


    ==> Click on "Choose services" tab


    ==> Click on "Blogger" tab


    ==> Click on "Configure"


    ==> Select your desired back up option


    If you want to back up a single blog, select "download a single blog" option. You will see the list of your blogs. Click inside the box and select the blog you want to back up.


    ==> Click the "create archive" button


    ==> Watch the progress bar. Once completed, click the "download" button


    ==> Verify your password if prompted to do so


    ==> Save the zip file to your computer.


    That's all.


    Remember, your data is important! Do not download archives on public computers.  If you use a public computer, ensure you attach and send to your mail. Then, delete it completely from the computer, even from the recycle bin.


    I hope it works for you.


    To back up ONLY the look and design of your blog, read how to download/backup blogspot template.


    Wednesday, 7 August 2013

    Beware of Eskimi Chat Scams

    No doubt, Eskimi is one of the top websites where you can easily meet new friends to chat, flirt or date in your city but if you are not careful, you can easily fall for scammers right there.


    There are many tricks been used by the scammers but am sharing with you the "travel" scam.


    How It Works


    The scammers create female profiles on Eskimi and upload some sexy pictures.  While some won't upload more than two pictures, the professional ones who know how to get hot pictures will upload more.


    They usually set their location to cities very far from Lagos because they assume many Eskimi users might be in or around Lagos.


    Thereafter, they keep updating their status on Eskimi with stuffs like :


    "I can travel anywhere for sex. That's what I do for money. Call... If you are interested"


    "I am tired of this place. So boring. I need to travel. Pls call...if u want me to come and see you".


    .....etc

    If you call or send a message to the scammer on Eskimi, she will ask for your location.  If you tell her you are in Lagos, she will tell you she is in Kano. If you tell her you are in Jos, she will tell you she is in Ogun state.


    The logic is just to let you know that she is very far from you. 


    If you complain about the distance, she will tell you that it doesn't matter if both can sort out the transport cost.  She will request you both share the cost. So, you will have to send part of it to her so she can complete it with her money, then come over to see you.


    If you fall for the crap, oh boy, just kiss goodbye to your money or recharge cards (some will tell you to send cards so they can sell and turn to cash).


    You will keep getting different excuses for not making the journey. Some will even request for extra money till you get fed up and back out of the deal.  If your wahala is too much, she will block you on Eskimi or even won't mind changing her phone number because of you.


    In short, guys wise up oo!!.


    Anytime you see updates like the ones I quoted earlier, just try and contact them with  two different numbers or Eskimi accounts and see how they will lie to you about their location.


    Have you experienced such before? Do you know other tricks been used by scammers on Eskimi? Please, let me hear from you via comments.


    Please always report such accounts to Eskimi admin.


    Tuesday, 6 August 2013

    Glo Recharge2Stardom Promo: Recharge and Win Millions of Naira

    In continuation of celebrating the 10th anniversary with teeming customers, Glo Nigeria has unleashed a recharge-based promotion which will reward the highest number of consumers ever rewarded in a promo in Nigeria. Over 25,000 customers will win CASH prizes of varying amount!!!


    N500,000,000 up for grabs in 100 days!!!


    •  200 winners of N10,000 every day!

    •  50 winners of N25,000 every day!

    •  5 winners of N1m every 10 days!

    •  2 winners of N5m every 10 days!

    •  1 winner of N25m after 100 days!


    •       To win any of the cash rewards below N1m, customers must recharge a minimum of N200 EVERY DAY to stand a chance of winning N10,000 and N25,000 every day. Multiple recharges of N200 in a day will increase your chances of winning the Daily prize.

    •       To win any of the cash rewards between N1m and N5m, customers must recharge a cumulative of N1,000 in 10 days. They can appear in every draw of N1m and N5m if they recharge N1,000 every 10 days.

    •       To win the GRAND PRIZE of N25m, customers must recharge a cumulative of N5000 during the promo period. Recharges in multiples of N5,000 will give more entries and chances to win the Grand Prize.

    This promo is open to ALL subscribers on the Glo network, new and existing, prepaid and postpaid.


    NOTE:


    ==> All your recharges of N200 and above qualifies you for the promo.
    ==> Physical and electornic recharges qualify you for the draws.

    ==> If you win, you will receive a call from a Glo staff. Glo will never send an SMS to you to notify you of your success in the promo. You will only be contacted by a phone call from Glo customer care.

    The promo commenced on 24th of July, 2013 and is expected to run for 100 days, .

    Best of luck!

    Friday, 2 August 2013

    Download Eskimi Mobile Chat Application

    Eskimi chat application is a mobile chat and dating app with 11,000,000+ users worldwide which allows users to find friends, chat, flirt and meet people in their city, state or across the world!


    Eskimi is currently one of the top free online dating sites in Nigeria where single meet and have fun chatting with themselves. Personally, I prefer Eskimi to 2go chat for many reasons. At Eskimi, it is so easy to find friends around you, easy to get eskimi jobs in your state as well as enjoy eskimi music powered by iRoKing, while having fun on eskimi website.


    The current version of the ESKIMI app download is aimed at existing users of the service. Newbies are welcome to sign up on m.eskimi.com. Registration is free and you can even connect Eskimi to your Facebook account for easy access. You can read more on how to join eskimi chat here.


    If you download eskimi chat app to your phone, you will get ESKIMI icon in the homescreen for easy access. You will be receiving real-time notifications about new messages, votes and profile visits. You will be able to take photos with your camera and upload them to ESKIMI straight from the app. Getting Eskimi coins is just a click away and you can update and share your status faster than ever.


    NOTE: For now, you can add friend on eskimi at www.eskimi.com but not on the eskimi mobile site


    Have fun!

    PLACE YOUR ADS HERE