Pages

Receive More Updates

Date: - Time:
SMS: Send FOLLOW BALLOWAP To 40404 For Free - EMAIL: azeezbello8@gmail.com

Sunday 31 August 2014

How to Easily Setup Twitter Cards for Your Blogger Blog

Few days ago, I wrote an article on the 3 Easy Steps to Setup Twitter Cards for Your WordPress Blog but I had the intention of doing the same for Blogger blogs immediately. I was just reminded of that by a commentator on the post. If your blog is on the blogger platform, you will find here how to easily setup Twitter Cards for your blog.


Twitter cards is one of the ways you can use to generate more views for your blog and your blog posts. With Twitter Cards, you can attach rich photos, videos and media experience to Tweets that drive traffic to your website. Simply add a few lines twitter meta tags to your blog, and users who Tweet links to your content will have a “Card” added to the Tweet that’s visible to all of their followers.


There are 7 types of Twitter Cards


Summary Card: Default Card, including a title, description, thumbnail, and Twitter account attribution.

Summary Card with Large Image: Similar to a Summary Card, but with a prominently featured image.

Photo Card: A Card with a photo only.

Gallery Card: A Card highlighting a collection of four photos.

App Card: A Card to detail a mobile app with direct download.

Player Card: A Card to provide video/audio/media.

Product Card: A Card optimized for product information.


You can setup any of the Twitter Cards the same way. You just need to select which one you want while setting the Twitter cards.


Here is an example of the Twitter Card for this post.


Here is how to easily setup Twitter Cards for your blog.


1. Edit your template to add the Twitter card metadata. 

Login to your Blogger account and go to Template > Edit HTML 


2. Click within the Template Editor and press Ctrl + F to search within the template for </head> and paste the below code just above that . You will have to modify the @mmonigeria in the below code with the name of the twitter account you use for your blog. The second @mmonigeria should be changed to the name of the blog author’s twitter account. Make sure you save your template after pasting.


<b:if cond='data:blog.pageType == &quot;item&quot;'>

    <b:if cond='data:blog.postImageThumbnailUrl'>

      <b:if cond='data:blog.metaDescription'>

        <meta content='summary' name='twitter:card'/>

        <meta content='@mmonigeria' name='twitter:site'/>

        <meta content='@mmonigeria' name='twitter:creator'/>

        <meta expr:content='data:blog.pageName' name='twitter:title'/>

        <meta expr:content='data:blog.metaDescription' name='twitter:description'/>

        <meta expr:content='data:blog.postImageThumbnailUrl' name='twitter:image:src'/>

        <meta expr:content='data:blog.homepageUrl' name='twitter:domain'/>

      </b:if>

    </b:if>

</b:if>


3. Configure and validate your Twitter Card on the Twitter Validation Page


- twitter:card -> should be the type of Twitter Card you want

- twitter:site -> The Twitter username of the owner of this card’s domain.

- twitter:title -> The title of your content as it should appear in the card.

- twitter:description -> A description of the content in a maximum of 200 characters.

- twitter:creator -> If the content of this card was authored by someone, include their Twitter username here.

- twitter:image:src -> A URL to the image representing the content.

- twitter:domain -> your blog’s domain name.


4. Click “Update Preview” after inputting the above twitter settings. If all looks fine, apply for approval by clicking on the “Validate & Apply” tab. Enter the URL of the post and click on “Go”. After validation, you can then request for the final approval for your card. You will get email when Twitter approves your request. This can be immediate or can take like 48 hours.


This is all you need to do to setup Twitter cards for your blog. You can monitor the traffic generated by the Twitter card via your Twitter analytics. Once approved, all your posts which have an image and description will start showing twitter cards when you or anyone else shares your post to twitter. So, it is important that while making a blogger post, you should add a "Search Description" and an added an image to the post. If you don’t do any of these, the post won’t display a twitter card.


If you need assistance with this, you can ask using the comment box provided further below.


Yours,


Adesoji Adegbulu


12 Making Money Online Facts You Must Know

I know you might have stumbled on websites or blogs that claim they can show you how to make thousands of dollars a day and retire in a month or probably have received emails where the sender claimed to have made thousands of dollars by working only for a couple of hours. Interesting...right?  


Well, all these are just popular tricks to deceive you in believing making money online is easy. Those sites that boast that you can get rich over night are not telling you the whole truth and if you fall for the bogus claims, you might end up frustrated in your quest for making money online.


Now let me make something clear to you… the truth is that online business is real but it takes time to build a way to make money online. You can make residual income online just like I do but there are some facts you must know, which are highlighted below:


1. With a computer, Internet access and a phone, it's possible to earn a living and make money from home, on the internet.


2. Starting an online business requires a very low start-up capital. You just need ideas, personal computer, internet access and some softwares installed on your computer. Although, you can start from Cyber-Cafes.


3. People who work from home are not necessarily involved in scams or illegal business. There are plenty of legal ways to earn money from home.


4. Nothing like overnight wealth on the internet. Working online does not make a lot of money for most people, but over time it is certainly possible to make a strong full-time income.


5. It takes a lot of serious hard work to make money online, and a lot of the work you need to do is learning about the process. You reap what you sow.


6. It is not compulsory you know html, programming, graphic design etc before you can start making money online. You can find someone else that can do any of those things for you. Fiverr.com/jideogunsanya is an example of one of the sites where you can get your job done at very cheap price.


7. You just have to sell something, be it a product (physical/digital) or services for you to make money online. If you don't sell something or render a service, then what will people be paying you for if they are to send money into your account or send cheques to you?


8. You will need to set your own schedule and rely on your own motivation and will-power to succeed in making money online.


9. Internet businesses run 24/7. Your website or blog where you will be making money online will always be available for people to access anytime anyday unless you have issues with your server.


10. You can work once and keep earning on the internet eg. You can create an information product which will keep earning you money for life.


11. Not everybody can make money online. There is no guarantee you will succeed just as there is no guarantee that you will make money if you invest in any business offline.


12. You do not have to be jerk of all trades to make money online. In fact, if you try to do everything people are doing to make money online, you might end up in confusion, which might lead to failure. Hence, pick a model and focus on it. For example, I am focusing on creating content (info marketing, blogging) despite knowing that I can also make money trading forex online, buying/selling stocks online etc


I believe this article should be an eye opener for you if you just want to get started in making money online. Remember, if you stumble on anything that sounds too good to be true, just RUN. There is no magic on the internet. You have to work in other to be making cool money online like I do.


If you've got any suggestion or question concerning this article, kindly relay your comments in the box below.


Feel free to check out : 12 Ways I Make Money Online

Solution to TEMPLATE ERROR: Invalid data reference bl: No dictionary named: '' in: ['blog', 'skin', 'view']


Problem


==> TEMPLATE ERROR: Invalid data reference bl: No dictionary named: '' in: ['blog', 'skin', 'view'] displays in the header section when blog is viewed on PC and on mobile devices.


==> The "Live On Blog" and Mobile Template previews display looks broken as seen below:


Cause


I found out that the problem started when I added the codes below to the head section of my Blogger blog's html


        <meta expr:content='data:blog.pageName' name='twitter:title'/>
        <meta expr:content='data:blog.metaDescription' name='twitter:description'/>
        <meta expr:content='data:blog.postImageThumbnailUrl' name='twitter:image:src'/>
        <meta expr:content='data:blog.homepageUrl' name='twitter:domain'/>


Solution


==> Sign in to Blogger dashboard

==> Go to "Template" > "Edit HTML"

==> Use CTRL + F to find the codes above, delete them and SAVE the template.


That's all.


I hope it works for you.


Friday 29 August 2014

[4.2.2] Galaxy Note3 Custom ROM for Karbonn A25 | Optimized with Build Tweaks by Ajinkya.

ROM Features :

  • Note III launcher.
  • Note III lockscreen.
  • Samsung Dialer.
  • Samsung Task Manager.
  • Samsung Style Toggles and Quick Settings.
  • Multi Windows (Working).
  • Note 3 Interface.
  • Added many wallpapers.
  • Transparent Statusbar.
  • Based on jellybean 4.2.2
  • Custom Build.prop tweaks :
    • Speed and Performance Tweaks.
    • Battery Life enhancements.
    • Wifi Tweaks
    • Fast 'GPS'  On/Off Tweaks.
    • Camera tweaks.
    • Boot tweaks.
  • Full Theme and UI in hub
  • Settings
  • Accuweather Widget
  • Launcher
  • Launcher Theme Chooser
  • Messaging
  • One Handed Operation
  • Optical Reader
  • Kids Mode
  • Magnifier
  • My Files

Bugs : 

 All bugs are fixed. But if you find any major bugs you can report about it in the comment section.

Screenshots : (Thanks to Vjay Gopal)

 
Downloads :
    ROM :
    Camera & Gallery app : There is no Camera and gallery in this rom. So install this apk file to get it ! 
"After Installing the ROM do a factory reset again.To fix any bug."

            I hope you like this Note3 UI . If you found this post helpful please Like & Share this post. Comment section is always open for any kind of query & Bug report. I would love to hear about this ROM do leave your feedback. Have a good day ! 

Thursday 28 August 2014

How to Increase Internal memory of your Android device ( Easiest way)


               Internal memory of a device plays a major role in device performance & Storage. Few Apps can only be installed in Internal memory which in turn reduces device performance. Most of the low end device user experience this issue. After lot of request for 'Method for Increasing Internal Memory' i am writing this post. This might be the easiest & safest method to increase internal memory of your Android Device. 


Disclaimer : I am not responsible if you brick your device or if your device blows up, implodes, flames start shooting from it, or it kills your neighbor's dog.. It was the other guy... I swear.. :P But i can assure you that it will work if you do the same as i say.


For this method u have to partition your SDcard into two parts :

  • First partition as Fat32 (used as main SDcard)Auto Insurance
  • Second partition is EXT2  ( used as Internal memory )
Do not forget to take a nandroid backup of ur phone before doing this .
CWM recovery > Backup & Restore > Backup

NOTE :

  • If you have already 'PARTITIONED' your SDcard into 'FAT32' & 'Ext2' then Skip Step 1&2.Auto Insurance
  • If you have already partitioned your SDcard. But made the second partition of other file type then 'EXT2'  EG : FAT32 , EXT4 then Skip Step 1.
  • If you are new to Partitioning then Follow each step carefully.

Things you Require : 

Step 1 : 

To create a SDcard partition with Minitool :
  In this process your memory card will be formatted.

1. Install Minitool partition on your pc.

2. Copy any data you want from your SDcard to a file/folder in your computer.

3. Launch MiniTool Partition Wizard and wait for the application to recognize and display your drives.

4. Right-click on the heading for your SD card and select "Delete." Any existing partition on     your card and all data stored on the card will be deleted.


5. Now again right click on the sdcard & Click the "Create" button and select "Primary." in    Create as .Auto Insurance

6. Select "File System: FAT" if your card's capacity is less than 2GB;  select "File System:  FAT32"  if the card is 4GB or greater.

7. Select the amount of space you wish to allocate for regular file storage from the Partition Size menu(the remaining space will be the internal memory of ur android).  Then click "OK" to close the menu.

8. Now there will be two partitions of your SDcard now right click on the second partition of your SDcard(which will be showing as unallocated) and Click "Create" and again select "Primary. "Choose "File System: EXT2" 


10. Click "Apply" when finished. None of the actions described above will occur until you click this button – MiniTool Partition Wizard queues actions to run in sequence instead of processing them when entered.
Auto Insurance


Thats all, after the process finishes you will have two partitions. when you connect your SDcard next time, in 'My Computer' it will show the capacity as the first partition.Auto Insurance

Step 2 :

This is for those who have already created a partition but have set their 2nd partition as fat32 or other but now want to convert them into ext2 partition.

NOTE : In this process your main memory card is not formatted. But still have a backup.

1. First uninstall all the apps like link2sd (if u have linked any app then delete all the links) and app2sd and do a factory reset of ur phone and then connect ur memory card through a card reader or through usb cable with pc .

2. Open Minitool partition u will be able to see ur two partition.

3. Right click on the second partition( mostly the one with smaller size) and click on delete  (do not disturp the first partition) and click OK now your second partition will be shown as unAllocated.Auto Insurance

4. Right click again on the second partition and click on create and choose "primary" in create as. and "Ext2" in file system.

5. Now click OK and then click on apply on the top left corner and wait for the process to finish thats all you have created a EXT2 second partition.Auto Insurance

Step 3 :

Install Busy box and init.d support .

1. Use this tutorial to install init.d support - Init.d.

2.  Download Busybox pro from above link.

3. After installing it open Busybox, slide left side see on up it should be install busybox.
  

4. Under smart install it will be loading some file let them load and wait till the above screen comes. Now select  'Install', And then it will ask you to choose smart or normal Choose 'Smart install'. Done !

Step 5 : 

To install and use Mounts2SD Auto Insurance

1. Download and install Mounts2SD on your Android from playstore.

2. Launch Mounts2SD. Click on the options button ( the botton left to the home button of your device) and select "Applications Setting".

3. Now in 'Application settings' select "Install scrips on start up". and wait till process is over.

4. Now press back now you will be on the main screen of Mount2SD. Now goto settings (the Wrench icon - it will be next to the eye icon on the top).Auto Insurance

5. click on cache and enable it . Check the applications , data , and dalvik cache .( do not select system apps) and now close the mounts2sd .

6. Now reboot your device . ( The boot may take long time but its normal so don't panic.. and also a android upgrading message may come on boot )Auto Insurance

 Wait till everything is over and your mobile is booted . Now go to "Settings > Apps" and see the internal memory.  Now
 install any app or game and again check the internal memory . it will still be the same  :D 


 NOTE : If you want to check the remaining memory of your second partition open the Mounts2SD  and in "Storage" tab see the external it is your second partition. Auto Insurance

              I hope this article helped you. If you have any doubt or suggestions you can comment below. Do Like & Share this post . If this method didn't worked, you can use this method which has 100% Success rate : Increase internal memory.

8 Causes Of Bad Breath You Should Know About

[caption id="attachment_681" align="aligncenter" width="187"]bad breath causes of bad breath[/caption]

Different people from different locations around the world call it bad breathe but medicine and science has named it halitosis. Whatever the name should be I bet you it is not what anybody would like to experience. You must have woken up from sleep and something moved you to speak, exhale or whatever, with your palms around your mouth? The awful odor that oozes out is almost normal if the odor disappears after you have freshened up for the morning by brushing your teeth and cleaning your mouth. You must know that the rate of flow of saliva decreases during sleep and saliva helps with its cleansing effect to wash away and kill bacteria in the mouth. But in its excessive absence, bacteria’s build up is tremendous which will cause the early morning bad breath. But in the case whereby the bad breath continues immediately or few minutes after you have brushed; that is when you should raise up the red flag. Also, if you experience this condition often, you should also raise the red flag up higher.

Bad breath can be so intimidating, embarrassing and tend to make you miss out on most of the good things in life. With bad breath, nobody will like to stay around you; of course who will feel comfortable doing so when the smell from the mouth is like a time bomb that just blew up.

Okay, enough with the talking let us go over to the subject topic. So, what are the causes of bad breath that are putting so many in such an unwanted dilemma? I have got about eight (8) of them here, although there are a whole lot of them but i think this are the prime causes of bad breath and I am going to list them out. Knowing the causes of bad breath also called halitosis will go a long way to help you figure out ways to prevent and treat this embarrassing condition if the case applies.

  • The type of food you eat:


Inasmuch as some foods are very important for the growth and development of the body. In some cases, they can also be seen as enemies because they are a contributing factor to the causes of bad breath. Such foods, like garlic, uncooked onions and others will make your breath bad and unpleasant. This foods after being digested has a way of moving away from the bloodstream, diffusing together with the carbon(di)oxide during expiration into the alveolar sac in the lungs and out through the  air pathway to the outside world. It is not that the smell they produce is that bad but it can never be pleasant to anybody's sense of smell.

  • Poor Brushing Habit:


Brushing your teeth is a common everyday habit. Most people think  they can brush but in real sense they don’t. Brushing your teeth is not all about moving your toothbrush headed with some pastes toothpaste all over your teeth but like every other daily activity it has its own method and if not followed properly you might end up thinking that you  have just brushed your teeth while in real sense, you did nothing. The right way to brush your teeth

  1. Clean the outer surface of your upper teeth, then the lower teeth

  2. Clean the inner surface of your lower teeth then that of your lower teeth

  3. Clean the chewing surface

  4. Be sure to clean your tongue properly as that is the most important part


You should try to replace your tooth brush every three months or if it starts to wear off before the three months range.


  • Smoking Indian hemp or cigarette:


Smoking Indian hemp, cigarette can also be a contributing factor to the causes of bad breath and it also changes the color of the teeth. Read:

5 Reasons why Many Smokers Will Die Early While Few Others Will Live Longer. The cells in the mouth are killed due to the heat and when they decompose they produce the awful odor. Also, cigarette smoking dries up the saliva in the month.


  • Gum Disease:


Gum diseases like gingivitis can cause bad breathe, to treat this type of bad breathe caused by a gum diseases you have to first of all treat the gum disease. Gum diseases caused by infections have its origin from an injury to the gum and it is common among children and mostly caused when using a tooth brush that its bristles are hard.


  • Yeast Infections Of The Mouth:


Certain mouth infections like the yeast infection that affects the mouth and be contributing factor to the causes of bad breath. Infections increase the population of bacteria in the infected part of the body and while the infection is in the mouth the increased amount of bacteria will cause bad breathe.


  • Dry Mouth (Xerostomia)


Just as I stated above that saliva helps to wash away and cleanse the mouth from bacteria. It also washes down dead and about to decompose red blood cells. Any factor that decreases the level of saliva in the mouth by making the mouth dry is an additional factor that can be the cause of bad breathes. Smoking makes the tongue dry, alcohol also does the same, some diseases do that too and I know of one called sjogren syndrome or scleroderma syndrome.

  • Disease


Certain diseases like pneumonia, kidney problems, liver problems, acid reflux and diabetes can have bad breath as one of its symptoms.


  • Eating Late At Night:


Some people take their dinner very late. Some take their dinner and zoom off to sleep immediately. When this happens the body finds it hard to digest all the food particles and before dawn the undigested food must have gone so bad inside the stomach. The effect is a bad breathe.


If you are suffering from bad breathe, before you conclude to see a doctor, try examining and making changes to your every day hygiene, try brushing twice daily, and if possible after eating, using dental floss, drink plenty of water and if you are a smoker, quit smoking. After all this, if the bad breathe continues, you may consult a dentist who will examine you and diagnose you of any further causes of bad breathe, which will also include most of the points I have stated above, like the disease, yeast infection, the doctor might advice you to do a full colon rinse to detoxify yourself of the toxins that might be causing your bad breathe. Whatever the cause of the bad breathes may be. Knowing the cause and origin will give you something to hold on to when seeking for a solution.


MyNotJustOK: Nigeria Music Site Where Artists Can Upload Songs

NotJustOK; Nigeria's number 1 music website has launched a new music sharing community for the music industry : www.mynotjustok.com.

On this new platform, artists can upload songs to share with friends, fans, and followers and also link up with iTunes so that listeners can purchase their music.


notjustOk.com music upload
How To Upload Music To MyNotJustOK


So, if you've been frustrated because your content have not made it onto Notjustok.com, this is an opportunity for you to let music lovers discover your creative with ease on a platform that will foster the sharing, listening and monetizing of your music online.

MyNotJustOK promises to enforce that everyone who uploads content has the right to do so and if any Copyright is being infringed upon by any user, the track will be taken down once the owner of the audio track submits all necessary evidence that they own the song or audio.

The web application also boasts of very personalized experiences for each user. Users can search the site for songs to listen to online. Users can download Nigerian music from the site provided the user that uploaded it enabled the "download" option. Users can follow and be followed.

When you follow someone, you will see every song that they upload appear in your Home page after logging on. Your homepage will show only songs uploaded from people you are following as soon as they upload. Also, you will see their reposts, likes of every song and playlist.

When someone follows you they get to see every song you upload as soon as you upload them. They will also see every song and playlist that you like and repost. When you see a song that you like, you can repost it to share it with all people following you.

Fans can also post comments, create their own personal playlists and have conversations with the MyNotjustok community on topics that they care about via the NotJustOK Forums.

Also lookout for the Notjustok iOS and Android Apps set to launch shortly.

Wednesday 27 August 2014

How to Display Most Commented Posts in Blogger

One of the best gadgets for your Blogger blog is a popular posts widget for your sidebar. This lets visitors see what your trending posts are right now and encourages them to click on them to read them. This basic widget is just a little too basic, however, for the modern day website visitor. Not only do they want to see your trending posts, but they also want to join the discussions that are happening on your blog. To do that, you'll need a most commented posts widget for Blogger.

Having a customized widget on your site is a lot easier than you might think. In order to have an effective widget, however, you're going to need a few specific things to help you out.

most commented posts widget


Here's What You're Going To Get

There are certain aspects in the design of a most commented posts widget that you should expect. That's why you'll find these specific components with this custom widget:

  • Ordered by popularity. The posts that have the most comments are the most likely to have visitors want to read the post and join in with the conversation. By ordering your posts based on the popularity of them, you'll give each visitor the chance to see what the hype really is about! This lets you have a charted graphic that gives a visitor easy recognition, but also allows you to keep it straight and aligned if you're looking for a cleaner look.
  • Graphic incorporation. Blog posts that have at least one graphic incorporated with them will receive 100% more traffic than posts that have no images at all. For every graphic that you include with a blog post, the more likely you are to get a click! The same is true with your most commented posts widget, so be sure to incorporate graphics that stand out with your design.
  • Descriptions that blend in. The internet today revolves around the value that you can provide each individual user. People don't just click on things because they look visually tempting. They click on them because they promise a level of value that another website like yours isn't able to provide. By having descriptions that blend in, you'll be able to enhance the perceived value that your site can provide. This leads to more clicks!

Related: Add Multi-Colored Popular Posts to Blogger

Add the Most Commented Posts Widget to Blogger

Step 1. Log in to your Blogger account and go to Template, press the "Edit HTML" button.

Step 2. Click anywhere inside the code area and press the CTRL + F keys to open the Blogger' search box. Type the following tag inside it and hit Enter to find it:
</Group>
Step 3. Just below </Group>, add this code:
<Group description="Most Commented" selector=".most-commented">
<Variable name="most.commented.background1" description="background color1" type="color" default="#fa4242" value="#ee377a"/>
<Variable name="most.commented.background2" description="background color2" type="color" default="#ee6107" value="#fcad37"/>
<Variable name="most.commented.background3" description="background color3" type="color" default="#f0f" value="#f8e000"/>
<Variable name="most.commented.background4" description="background color4" type="color" default="#ff0" value="#c7e93d"/>
<Variable name="most.commented.background5" description="background color5" type="color" default="#0ff" value="#5ebded"/>
</Group>

add code to blogger html
Note: if you can't find the </Group> tag, try to find the following tag instead and add the variables just below it:
<b:skin><![CDATA[

Step 4. Now search for the following tag (CTRL + F):
]]></b:skin>
Step 5. And just above it, add this CSS code:
.comment-count {
    padding: 3px 10px;
    background: #fff;
    color: #000;
    font-size: 10px;
    float: right;
}

.most-commented ul {
    padding: 0px !important;
    font-family: Century Gothic, sans-serif;
}

.most-commented ul li {
    list-style-type: none;
    padding: 10px;
    color: #555;
    margin-top: -10px;
}

.most-commented ul li a {
    color: #444;
    font-weight: bold;
    text-decoration: none;
    font-size: 11px;
}

.most-commented ul li img {
    float: left;
    margin: 0px 5px 0px 0px;
    width: 60px;
    height: 60px;
}

.most-commented:nth-child(3n+0) {
    background: $(most.commented.background1);
    width: 100%;
}

.most-commented:nth-child(4n+0) {
    background: $(most.commented.background2);
    width: 95%;
}

.most-commented:nth-child(5n+0) {
    background: $(most.commented.background3);
    width: 90%;
}

.most-commented:nth-child(6n+0) {
    background: $(most.commented.background4);
    width: 85%;
}

.most-commented:nth-child(7n+0) {
    background: $(most.commented.background5);
    width: 80%;
}
Step 6. Save the template.

Now, let's add the Most Commented Posts widget to the Layout of our Blogger blog. Head over to the "Layout" section of your Blogger dashboard and click on the "Add a gadget" link on the right side. From the pop-up window, scroll down the list and select the "HTML/JavaScript" gadget:

blogger html javascript gadget

Copy and paste this script inside the content box:
<script type="text/javascript">
function stripTags(s,n) {
    return s.replace(/<.*?>/ig,"").split(/\s+/).slice(0,n-1).join(" ")
}
function mostcommented(feed) {
    var i;
    for (i = 0; i < feed.count ; i++) {
var postURL = "'" + feed.value.items[i].link + "'";
var postTitle = feed.value.items[i].title;
var postthumbnail = "<img src="+feed.value.items[i].postthumbnail+" />";
var postDescription = feed.value.items[i].postdescription;
var postComments = feed.value.items[i].commentcount;
var postList = '<div class="most-commented"><ul><li><div class="comment-count">' + postComments + "</div>" + postthumbnail + "<a href="+ postURL + '">' + postTitle + "</a>"  + '<p>' +stripTags(postDescription,10)+'...</p>' + '</li></ul></div>';
 document.write(postList);
     }
 }
 </script>
<script src="http://pipes.yahoo.com/pipes/pipe.run?
AddUrlHere=http://helplogger.blogspot.com
&NumberofPosts=5
&_id=2cb5eb603ed55a6264ee1484e5fdd45c
&_callback=mostcommented
&_render=json"
type="text/javascript"></script><span style="font-size: 80%; float:left;"><a href="http://helplogger.blogspot.com/2014/08/most-commented-posts-blogger-widget.html">Add this widget</a></span>
Here, change http://helplogger.blogspot.com with your blog URL. If you want to add more characters to the description, modify the "10" value in red from "postDescription,10".

If you want a more simple look (without the thumbnails and post snippets), add this script instead:
<script type="text/javascript">
function stripTags(s,n)
    {
    return s.replace(/<.*?>/ig,"").split(/\s+/).slice(0,n-1).join(" ")
}
function mostcommented(feed) {
 var i;
 for (i = 0; i < feed.count ; i++)
 {
var postURL = "'" + feed.value.items[i].link + "'";
var postTitle = feed.value.items[i].title;
var postComments = feed.value.items[i].commentcount;
var postList = '<div class="most-commented"><ul><li style="margin-bottom: 10px"><div class="comment-count">' + postComments + "</div>" + "<a href="+ postURL + '">' + postTitle + "</a>"  + '</li></ul></div>';
 document.write(postList);
 }
 }
 </script>
<script src="http://pipes.yahoo.com/pipes/pipe.run?
 AddUrlHere=http://helplogger.blogspot.com
&NumberofPosts=5
&_id=2cb5eb603ed55a6264ee1484e5fdd45c
&_callback=mostcommented
&_render=json"
type="text/javascript"></script>
<span style="font-size: 80%; float:left;"><a href="http://helplogger.blogspot.com/2014/08/most-commented-posts-blogger-widget.html">Add this widget</a></span>
.... and replace http://helplogger.blogspot.com with your address.
To add the "comments" text after the comments number, replace the line in red:
<div class="comment-count">' + postComments + "</div>"
with:
<div class="comment-count">' + postComments + " comments" + "</div>"
Once you have finished adding your own settings, press the "Save" button to enable the gadget in the sidebar of your blog. That's it!

configure html javascript gadget

To change the background colors of the most commented posts, go to "Template" > hit the "Customize" button and navigate to "Advanced" > "Most Commented" tab. Here you can pick 5 different colors by clicking on the color boxes:

blogger template designer

Once you've selected your favorite color scheme, click the "Apply to blog" button to save the changes... and you're done.

Why Use the Most Commented Posts widget?

The basic psychology in every human is that they want to feel like they belong to a community. That's exactly what this customized widget will bring to your site. No matter what content drew a visitor to see your content, this widget will invite them to join the lively parts of your piece of the internet. This helps to build relationships, with you and with other visitors, and this relationship-building engagement is what you need to start having real value.

Take the time to install this most commented posts widget on your site and you'll see for yourself why this is one of the most useful widgets that is available right now. Enjoy ;)

How To Renew Domain Name at Namecheap.com in Nigeria


Wondering why renew a domain name?


Well, it simply prevents expiration of your domain name.


Forgetting to renew your domain name before it expires can have a huge impact on you and your business as everything connected to your domain will stop working immediately it expires. Someone else can even register your non-renewed domain names after they might have expired.


If you've registered your domain name at namecheap.com, you can autorenew, renew it before it expires and you can also reactivate it after it might have expired provided it is still available for registration.


I recommend Namecheap for Nigerians because the site is very easy to use and it also accept most of Nigerian ATM/debit cards. I have used my GTB NairaMastercard, UBA Visa AfriCard and Access bank Visa Card to make payments on the site. The site also accepts payment with Paypal account opened in Nigeria.


Renewing Namecheap domain names is very easy. Just follow me through the steps below:


==> Log in to your account at namecheap.com

==> Click on your username - it will be on the black bar located at the top of the page

==> Click on Manage Domains

==> Click on the domain name you wish to renew

==> Scroll down the page and click "Add More Years to Domain" link in the left side menu

==> Click OK to confirm that you want to add more years to the domain name. You will be redirected to the shopping cart


renew namecheap domain name


==> Select the number of years you wish to renew your domain for and proceed with the checkout by clicking on the "confirm order" button

==> You will be redirected to a page where you can select your payment option: secure card payment, PayPal and namecheap account funds. Select your desired payment option and click "continue"


If payment is successful, the specified number of years will be added to your domain name.


If the domain name is expiring within the next 30 days or less, you can renew it by clicking on "Renew Now" red flag next to the domain name in your domains list.


If your domain has already expired, click "Reactivate Domains" on the left side menu after clicking on "Manage Domains".


That's all.

How To Install a Wordpress Theme from Themeforest

Themeforest, a part of Envato marketplace, is a popular website where you can buy premium wordpress themes with prices ranging from just $5 up to $40. Right there, you can also buy Joomla templates, Blogger templates and themes for other popular CMS products. Purchases are available through credit/debit card (Buy Now only), PayPal, or Moneybookers.


After you might have purchased a theme at Themeforest, a zip package will be available for you to download via the "downloads" page. At the "downloads" page you should see a list of all the items you’ve bought.  You can acces the page by hovering over your username at the top of the Marketplace page, when you sign in to your account.


The actual theme zip you will upload to your Wordpress site is inside the full zip package that you will download from Themeforest. Hence, you will first have to unzip the full zip package for you to see the actual theme zip. The full zip package downloaded from themforest will likely contain other files like documentation, licensing file, quickstart or demo file, help file etc


Upload Themeforest theme to Wordpress


To install the actual theme zip extracted from the zip package downloaded from themeforest, sign in to your wordpress site with your admin credentials and go to Appearance > Theme.


Click "Upload", browse to choose the zip file and click "Install".


If you upload the correct zip file, the theme will install susccessfully.


Below is a visual guide provided by Themeforest support team to guide you in the installation process.


themforest theme installation guide


Also, don’t forget to read the documentation in the zip package you download from ThemeForest. It usually explains how to make use of the theme. It may also contain some video tutorials.


Go to Themeforest Wordpress section here to sign up and download beautiful themes.


Tuesday 26 August 2014

How Firebug Helps You Design Your Blogger Blog

For most bloggers, the idea of adjusting the coding of their blog to improve the user experience is daunting at best and often quite frightening. HTML5, CSS, and other coding elements are their own virtual language and for the average Blogger user looking to update a personal blog, the automatic settings are about as good as it gets. What if there was a better way to code a blog, whether a beginner or a pro, that could be done within the browser itself?

If you're using Firefox or Chrome, then you should also be using Firebug. It allows you to code your website in real time, so you can maximize the UX of your blog in no time at all.

You No Longer Need To Edit Through Blogger!

If you've ever tried to update a Blogger theme through the editing functions of the website, then you know how difficult it can be. You can preview your designs, but you can't save any changes to officially see what is going to happen with your site until you publish the edits. If you've missed just one line of code or forgotten one small element, you're going to have to go back into the editing matrix, find the error, update it again, and repeat until you have a responsive blog once again.

What Firebug allows you to do is see all of those elements that make up a website in real time. Instead of editing and then publishing, you can edit in real time and see updates happen, all without affecting the user experiences of visitors that are coming to your site while you're editing. You can change the fonts, colors, or virtually anything else within the design of the site quickly and see the results of your work as it happens. Don't like it? Just undo your changes.

It's really that easy.

Using Firebug to Customize CSS in Blogger

This guide will show you how to modify the CSS code of a Blogger template. Usually, the Blogger Template CSS style declarations are editable through the style.css file, found between the <b:skin> and </b:skin> tags.

To download Firebug and get more details regarding its powerful features, visit: Firebug for Firefox, or if you are using Chrome, get the Firebug Lite app. I would recommend to use Firefox, which is more complete and quick, but, nevertheless, both work the same.

Once Firebug is installed, a small bug icon will be available in the upper right of your Web browser's address bar. Clicking it, a horizontally split screen will be shown at the bottom of the browser's window. The page will continue to show in the upper half, while the lower half will show the HTML of the current web page.

firebug

To customize any web element from a Blogger template, just click either on the Firebug icon in the toolbar, or the "Inspect Element with Firebug" item in the context menu. Next, click the blue cursor button to Inspect and place the cursor right over the element to customize.

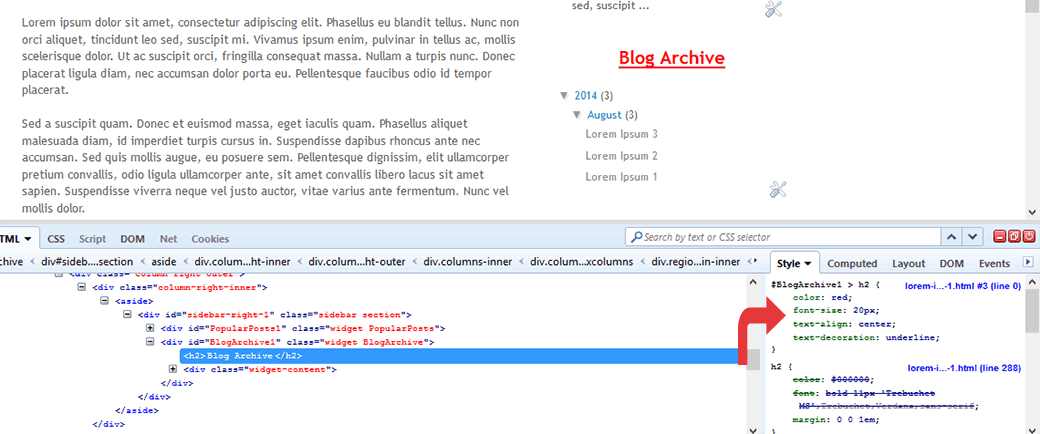
For example, let's say that we want to change the title of the "Blog Archive" gadget. After we clicked the inspect button, mouse over the "Blog Archive" title which will be highlighted as shown in the screenshot below. To change this element, click on it:

inspect element using firebug

Now that we decided which element we want to change, right click on the "Style" panel and select the "Add rule" option:

add CSS rule in firebug

This will give the class or the id of the highlighted element - in our case, the heading of the Blog Archive (#BlogArchive1 > h2). To edit this rule that we just added, click anywhere near the left curly bracket that will open a text box, so that we can type a new CSS declaration:

firebug css declaration

And here comes the fun part. Let's say that we want to make the title red. We will type color and hit Enter, then we will type the color value or the red text and hit Enter. We will also set the set the font size to 20px, text alignment to center (text-align: center) and make the text underlined (text-decoration: underline):

modify blogger css with firebug

The cool thing about Firebug is that when modifying any CSS property, you can see the results directly applied on the page. So, after adding these declarations, we'll see a big red underlined title for our Blog Archive gadget (see in the screenshot above).

To apply this CSS rule on a Blogger template, just select it beginning from the right curly bracket and to the #(id) or .(class) symbol, then right click it and Copy the CSS code.

copy firebug css rule

Before making any change, it's highly recommended to make a backup of your current template. Go to "Template" and click the "Backup/Restore" button on the upper right side. On the same "Template" location, click on the "Customize" button and navigate to "Advanced" > "Add CSS". Paste the CSS rule that you just copied into the CSS box:

add firebug css to blogger template

Click the "Apply to blog" button on the upper right corner to save the changes and view your blog.

Firebug Also Gives You One Distinct Advantage...

One of the best reasons to install Firebug into Chrome or Firefox is that it allows you to emulate some of your favorite website designs quickly and easily. Instead of hiring a web designer to do the work, which could cost you thousands, you can simply start Firebug and see what the CSS styles are for your favorite site. This allows you to create a similar widget.

From there, all you've got to do is change the coding to make the design elements work under the rules of your own custom.css. This means you can make easy design changes to your Blogger blog without having to go through all of the menus and editing functions so that your template can truly be your own. Do you have some work to do? Sure - but Firebug does all of the primary work for you.

All you've got to do is have a creative mind and a few minutes to make changes to the coding design. Whether you've been coding for years or are just starting your first blog, this is definitely the best way to make sure that your visitors have the best experience possible!

PLACE YOUR ADS HERE