Pages

Receive More Updates

Date: - Time:
SMS: Send FOLLOW BALLOWAP To 40404 For Free - EMAIL: azeezbello8@gmail.com

Wednesday 26 March 2014

Generate APK Files Online Without Chrome APK Downloader Plugin

While browsing through the pages of my favourite blogs this morning, I stumbled on an online APK downloader and I decided to share it with you. It is simply a web app that lets you pull an APK directly from Google's servers and side load it yourself.


It lets you download apk files from Google play store to PC without
worrying about country restriction and without logging in to your Google
account. The app requires you to enter the package name or Google Play URL for the app you want and after that, it will generate a download link for the apk file of the app.


Mind you, the site only works for apps that are available for free at the Google Play store. You are not allowed to download paid apps.


You can access the APK downloader at: http://apps.evozi.com/apk-downloader/


Below is a screenshot I took while trying to generate the apk of 2go chat application.


Apk downloader website


Right on the site, you can also download the Chrome plugin that lets you download apk files directly.


Have fun!

Monday 24 March 2014

Floating Sharing Bar for Blogger Blogs


You might have seen some blogs with a vertical floating share bar widget where Facebook like, Tweet, Google+ buttons are present on the left or right side of the blogs. Adding this floating sharing bar to your blog will make it easy for your blog visitors to Like, reTweet, +1 and share your posts, which will help in increasing your blog traffic.


Though I've explained how to add the sharing bar when I published how to add Facebook Share & Like buttons, Digg and Tweet Button to the side of blogger/blogspot blogs, I've recoded a better one which I decided to share with you. I have replaced "Facebook Like button" with the new Facebook Share button and removed Digg and SU buttons.


More so, since displaying too many social media counters could affect the speed at which your blog loads, I've added a AddThis share button which provide your visitors with over 300+ social sharing options all in one place.


Below is a screenshot:


share_bar


So, How Do I add the Floating Share bar to my Blogger/blogspot blog?


Adding the Vertical Floating Bar to a Blogger blog is very easy. You just have to copy a snippet of code,and drop it into a HTML/JavaScript gadget.


STEPS


  • Log in to your Blogger account.

  • Go to Layout

  • Click "Add A Gadget"

  • In Add A Gadget window, select HTML/Javascript

  • Copy the code highlighted below and paste it inside the HTML/Javascript box


<!-- floating page sharers Start Share This With Friends-->
<style>
#pageshare {position:fixed; bottom:15%; right:10px; float:left; border-radius:5px;-moz-border-radius:5px;-webkit-border-radius:5px;background-color:#fff;padding:0 0 2px 0;z-index:10;}
#pageshare .sbutton {float:left;clear:both;margin:5px 5px 0 5px;}
.fb_share_count_top {width:48px !important;}
.fb_share_count_top, .fb_share_count_inner {-moz-border-radius:3px;-webkit-border-radius:3px;}
.FBConnectButton_Small, .FBConnectButton_RTL_Small {width:49px !important; -moz-border-radius:3px;-webkit-border-radius:3px;}
.FBConnectButton_Small .FBConnectButton_Text {padding:2px 2px 3px !important;-moz-border-radius:3px;-webkit-border-radius:3px;font-size:8px;}
</style>
<div id='pageshare' title="Share This With Your Friends">
<div class='sbutton' id='rt'>
<a href="http://twitter.com/share" class="twitter-share-button" data-count="vertical" >Tweet</a>
<script src='http://platform.twitter.com/widgets.js' type="text/javascript"></script>
</div>
<div class='sbutton' id='gb'>
<script src="http://connect.facebook.net/en_US/all.js#xfbml=1"></script>
<div class="fb-share-button" data-type="box_count"></div></div>
<div class='sbutton' id='gplusone'>
<g:plusone size="tall"></g:plusone>
</div>
<div class='sbutton' id='at'>
<a class="addthis_counter"></a>
<script type="text/javascript" src="//s7.addthis.com/js/300/addthis_widget.js"></script>
</div>
<div style="clear: both;font-size: 9px;text-align:center;"> <a href="http://www.ogbongeblog.com/2013/04/floating-sharing-bar-for-blogger-blogs.html" rel="nofollow">Get this</a></div>
</div>
<!-- floating page sharers End -->


Save the gadget and click "Save arrangement" button on the upper right corner.


View your blog and I hope it works for you.


Saturday 22 March 2014

5 Easy Ways to Improve the SEO of a blog & Boost Traffic

5 easy ways to improve the SEO of a blog 

A blogger needs to know at least the minimum on SEO. For it, you don't need to be an SEO expert but you need to know the minimum so that your posts are well indexed in the search engines.

The phrase "content is king" is one of the widest spread Internet memes being used by so many bloggers, with the idea that you should focus on having quality content, while the rest don't matter much. This is not true. Quality content is important, but it shouldn't be the only concern of a blogger today. In addition to producing quality content, your text needs to be optimized for the search engines.

improve seo, seo tips, boost traffic
Boost traffic & increase SERP visibility with SEO

5 easy ways to improve the SEO of a blog

Now, let's see what would be the basics that any blogger needs to learn about SEO and other simple SEO knowledge. Below are 5 easy tips to improve the SEO of your blog:

1. Define the keyword

When you write a post, it is recommended to choose the keyword (or term) suitable for your text. What you want is that this keyword - or term - to be searched on Google, and then get your post among the top. For this, you need to use this keyword a few times in the text.

For example, here the keyword could be SEO, but this term is too generic and I could hardly get in the top for this search. Then I'll work with a phrase or a long tail keyword, so that this post will rank for the term "easy ways to improve the SEO of a blog". I will use this phrase a few times, but without overdoing it.

2. Use the keyword in the post title

Now that I have defined the keyword, I will use it in the post title. This step is very important, and certainly will help you to get a better rank in search engines. As you can see, what I have in the title is the easy ways to improve the SEO of a blog keyword, along with other words to form an attractive and optimized title for SEO.

3. Use the keyword in the H2 tags

You must also use heading tags (h2, h3) in your posts. Here, I am using the keyword "easy ways to improve the SEO of a blog" in a H2 heading. Do this always, because it also helps to become well positioned in the search results. If you don't know or don't understand what are the heading tags, I would suggest to do a further research on this subject.

use keyword in h2 tags

4. Use the keyword in the text

Make use of your chosen keywords throughout the text. Especially in the first paragraph (please note that I have repeated the title in italics in the first sentence). But be careful when doing this, there is a maximum and minimum limit for that. A good keyword density is between 1.5% to 4.5% for best results. Less than that will have no effect and more than that can alert the search engines and your text might be considered spam.

5. Publish Posts with 300 words or more

Posts under 300 words have little chance to be among the top results in search engines. Of course, you will be able to rank for multiple keywords that are less popular with less than 300 words, but for the most competitive keywords that have the potential to bring a greater number of visits, it will be nearly impossible.

Thus, it is recommended to write posts with more than 300 words. It's not hard when you really understand the topic you're talking about.

Conclusion

As you can see, with some simple SEO techniques you can improve the traffic coming to your blog from the search engines. I hope you enjoyed these 5 easy ways to improve the SEO of a blog!

What is the difference between padding and margins?

For those who would like to know more about HTML and CSS, today we will see about the difference between margin and padding CSS properties which allow us to add blank space between the HTML elements, preventing the elements from getting 'stuck' together.

Although both possess similar functions, each has its particularity. 
  1. Padding determines the inner margins, being responsible for determining the distance between the content of a given element and its border.
  2. Margin is applied to the outside of an element affecting how far the element is away from other elements.
For more info, please take a look at the picture below:

padding and margin, css proprieties
Difference between margin and padding

Just as you have the option to define the borders for each side of your HTML elements (eg. borders in the sidebar), you can do the same with the margin and padding properties. All you need to to do is to change the top, right, bottom and left values​​.
These values ​​that you can select include: pixels (px), centimeters (cm), millimeters (mm). em units (em), x-height (ex), inches (in), picas (pc) and point sizes (pt).

By using margin and padding, you should add each value set in the four corners, as follows: top, right, bottom, left and each value must refer to each side of the HTML element. The first value is for the top, and they follow a clockwise direction, so the value would be close to the right, then bottom and finally, left.

Example 1: 

padding:5px 15px 5px 15px;
- top padding is 5px 
- right padding is 15px 
- bottom padding is 5px 
- left padding is 15px  

margin: 10px 5px 10px 5px;
- top margin is 10px
- right margin is 5px
- bottom margin is 10px
- left margin is 5px

If you define a single value, the distance applies to all sides, so it will be applied to the 4 sides of the HTML element that you want to modify.

Example 2:
padding: 5px (top and bottom) 15px (left and right);
margin: 10px (top and bottom) 5px (left and right);

If it helps to do it visually, think of an A4 page of type inside a picture frame. The margin is the space between the edge of the sheet of paper and the other elements (the parts of the frame) and the padding would be the space between the edge of the sheet and where the type starts on the page. The border would be the edge of the sheet of paper.

It's probably easier to understand if you have borders, then it also becomes obvious which one to use. Do you want the "space" after the border (outside the element = margin) or before the border (inside the element = padding).

Friday 21 March 2014

2 GMail Apps that Would Make Your Life Better and Improve Your Productivity


e-Mails are good but most times, they are time consuming to manage. If you use GMail, you will find in this post, 2 GMail apps that you can use to make your life better and also improve your productivity. There are many GMail apps you can use, but these two has been so useful for me.


1. Unroll Me


Do you get bombarded with emails and newsletters you are not even sure you subscribed for? I get lots of such emails from people and brands. Maybe because I made my GMail address available publicly. This is not fun at all. Loads of useless email promoting to me what i'm not interested in. And goiung through them and subscribing takes time.


However, Unroll me offers a genius solution to this issue. This free GMail app aggregates all of these subscriptions into one daily digest. With this, you can simply click the unsubscribe links from the daily digest. Unroll me makes unsubscribing from emails and newsletter a breeze.


Unroll me is compatible with Gmail, Google Apps, Yahoo! Mail, AOL, Outlook.com, and iCloud.


Get started at Unroll.me


2. Rapportive


We all have tendencies not to remember all our contacts email address. Before I came incontact with this GMail app. I spend time trying to find people email address by using the search box in GMail. These sometimes takes lots of times.


With Rapportive, you don't need to spend lots of time searching for your contacts email address. This app replaces the ads in GMail with a social profile that lists in the contact information from the person you’re trying to send an email to. 


With Rapportive, it becomes easy to guess your contacts email addresses. Once you hit the right combination, a profile will automatically populate on the side. It is free to use and compatible with GMail and Google Apps.


Get started at Rapportive


I hope this helps?


Feel free to share this post on your social networks and help your connections to improve their productivity.


Wednesday 19 March 2014

Receiving Payment by Amazon Gift Card From Non-Nigerians

Few days back,a non-Nigerian internet marketer contacted me for an advert slot on my blog. He offered to pay me via PayPal but I replied him that I'm currently having some problem with my PayPal account.


He agreed to send the funds to me if I can come up with an alternative to Paypal. While thinking about the easiest way I can receive money from a non-Nigerian, Amazon Gift Cards came to my mind. I mailed him that he can use his money to buy a gift card for me at amazon.com. I also sent him a link on how to buy the gift card.


This morning while checking my mail, I received a notification from amazon.com to redeem a gift card. I followed the link to redeem the gift card and the dollar amount on the gift card was successfully added to my amazon.com account.


gift card balance


I can use the fund when next I want to shop on Amazon.com and ship to Nigeria. The balance will never expire. I can also use it to buy Amazon Gift card too.


So, when next a non-Nigerian wants to pay you, you can tell him or her to buy Amazon gift card for you. It's better than accepting Paypal funds which might get trapped in your PayPal account or that of your friend, if it gets limited.


If you know other ways of receiving payments from non-Nigerians, please share them via comments.


Cheers!

Monday 17 March 2014

Nigerians To Start Receiving Adsense Payments Directly Into Bank Accounts

Earlier this morning, Google notified me of upcoming updates to my Adsense account which will affect my payment options. It was stated clearly in the notification mail that after the upgrade, express delivery secure checks and courier tracking numbers will be discontinued and I will be offered the option to receive my Adsense payments by international wire transfer.


If you don't know what wire transfer means, it is a method of electronic funds transfer that allows you to receive funds directly into your bank account. Wire transfer is a fast, secure, and reliable alternative to receiving payments by check. Unlike the secure check payment option, Google doesn't charge a fee to send wire transfer payments.


If you are a Nigerian Adsense publisher, you will have to add the details of your Nigerian bank account to your Adsense account if you want to receive your Adsense payments via Wire Transfer. 


Google Adsense money


How To Add Bank Account To Google Adsense Account


After the upgrade is complete, you will have to follow the steps below to enter your banking information in your Google Adsense account:


    ==> Sign in to your AdSense account.

    ==> Click the gear icon in the upper right corner of any tab

    ==> From the drop-down list, select  "Payments".

    ==> In the left sidebar menu, click Payment settings.

    ==> In the "Available forms of payment" section, click Add new form of payment.

    ==> Choose the radio button for “Funds transfer to bank account” and click Continue.

    ==> Enter your bank account information and click Confirm and continue.


That's all.


Your account will be updated and your next payment should arrive in your bank account within 4-10 days.


Did you also receive the notification mail?


What's your take on this?


Please, let me hear from you via comments.


PLEASE, share this with friends.


Add Adsense Below Post Title of Mobile Blogger Templates

I've customized the mobile view of OgbongeBlog in such a way that I now have an Adsense 320x50 mobile banner been displayed under post titles as well as an Adsense 250x250 ad unit been displayed at the end of each post on the mobile view.


Besides that, I created an extra section above the header region and right there, I can also add an Adsense mobile banner or a non-adsense 320x50 banner. In this tutorial, I'm sharing with you how to add Adsense ad inside blog posts of Blogger mobile templates, directly below post titles.


Just follow me through the steps.


==> Log in to www.google.com/adsense to generate the Adsense code for the ad unit you want to add to the mobile view. eg 320x50 mobile banner.


Now, we need to parse the ad code.


==> Go to http://www.freehtmlparser.blogspot.com/

==> Copy and paste your ad code inside the box and click the "Encode" button

==> Copy and paste the code somewhere eg in a notepad


==> Ensure you have enabled CUSTOM Blogger mobile template.


If not sure, login to your Blogger dashboard, go to "Template". Under "Mobile", select "Yes. Show mobile template on mobile devices" and choose "Custom" from the "choose mobile template" dropdown box and save your settings.


==> Now, we need to find the code for the Blogger Mobile Template Post title so we can place the Adsense code directly below it.


==> So, back up your template and go to "Template" > "Edit HTML"


==> Click inside the HTML and use CTRL F to find the code below:


<b:includable id='mobile-post' var='post'>


==> Once you find the code, scroll down gently till you see the code below:


<div class='post-body entry-content'
expr:id='&quot;post-body-&quot; + data:post.id'
itemprop='articleBody'>


==> Paste your parsed Adsense code directly below the code above.


Save your template.


View one of your blog posts on mobile view using default browser of your mobile device (NOT Opera Mini) and you should see the ad below the post title on POST pages (Not on the homepage).


NBYou can place any ad code there be it AdDynamo, Infolink, media.net ad etc


You can access the mobile view of your Blogger post on PC by adding ?m=1 at the end of the post URL.


Try it and let me know if it works for you.


PLEASE, Share this with your friends.


Questions? Contributions? Kindly relay them via comments.


Recommended: How to Add Adsense Below Post Titles on Blogger Desktop View

Saturday 15 March 2014

Intagme: The Instagram Widget For Blogger and Wordpress Blogs

If you love to show your Instagram photos on your website, you can do so with easy by adding the Intagme Instagram widget to your site. The widget Works With Wordpress, Blogger, Tumblr And HTML Websites! The widget is so simple to use and doesn't require any authentication. This simply means you can use the widget to show Instagram photos of any Instagram user or hashtag on your blog.


For example, if you own an entertainment blog, you can create an hashtag on Instagram to group celeb photos, then use the hashtag to generate an Instgram widget at intagme.com that will display the celeb photos on your entertainment blog. If you are the type that loves quotes, selfies on Instagram, you can use the same trick to display them on your blog.


Instagram widget
Intagme Instgram Widget Generator


How To Add Instagram Photos To Blogger and Wordpress Blogs


==> Go to Instagme website - http://www.intagme.com/

-->  Enter your Instagram Username or a hashtag in the Instagram Widget Generator

==> Select Grid or Slideshow

==> Select your Thumbnail size (250 or 350 will be OK for the sidebar)

==> Select if you want a Photo Border or not

==> Change background color if you want

==> Click on the "Preview" button to see what it will look like

==> If satisfied, click on the "Get code" button


If you want to add it to a Blogger blog, log in to your dashboard, go to "Layout", click "Add a gadget". Select "HTML/Javascript" and paste the code inside the box. Save and view your blog.


For WordPress blogs, copy and paste the code in a Text gadget.


That's all.


You can follow me on Instagram : @jidetheblogger.


Feel free to drop your Instagram username via comments if you want me to follow you too.


Pls, SHARE this with your friends. 


Have fun!


Recommended: How To Upload Photos To Instagram From PC

How I Update Facebook Status With "Via OgbongeBlog"

If you're my Friend on Facebook, you would have noticed that most of my Facebook updates are now tagged with "Via Ogbongeblog". If anyone clicks on the "Via OgbongeBlog" link in the News Feed, it takes the person directly to Ogbongeblog.com.


Well, Facebook Feed Dialog makes this possible. You can also be posting to Facebook with "Via your blog name". It's so easy.


For you to create such for your site, you will need the Facebook application ID of the site. You will have to include it in the Feed Dialog URL which you will have to create for this purpose.


If you don't know the Facebook App ID of your site, read: How To Get Facebook Application ID and Secret Key.


How To Generate Facebook Feed Dialog URL


==> Edit the code below with your appID.


https://www.facebook.com/dialog/feed?

  app_id=150436614997987

  &display=page

  &redirect_uri=http://www.facebook.com


You can also replace the www.facebook.com with a link to your site. Not compulsory to change the Facebook Feed dialog redirect_uri though.


==> Copy and paste in your browser address bar. Hit the "Enter" or "OK" button.


You should see something like this:


Facebook feed dialog


==> Type whatever you want to post to Facebook and click "Share".


That's all.


In the Facebook News Feed, it will appear like this:


Facebook feed dialog in news feed


On your Facebook Timeline, it will appear like this:


Facebook feed dialog on Timeline


Bookmark the Feed Dialog URL so you won't have to be typing it every time.You can use CTRL D to do this on PC.Your mobile browser will also have an option for such.


If you have an iPad, once the URL opens in your browser, go to the browser options and tap the "Add to Home Screen". This will create a shortcut on your iPad which you can always tap whenever you want to post to Facebook.


Try it and let me know if it works for you.


Please, SHARE this with your friends.


Hopefully soon, I hope to publish the "share to download" trick I'm using on my Free eBooks Page. So, Subscribe to updates if you don't want to miss it.


Have fun!


Thursday 13 March 2014

Facebook Comment Form Not Working? Try This Solution for Blogspot Blogs

If you've been finding it difficult to integrate the Facebook comment box with your Blogger blog, sit back and relax as I guide you on how to add Facebook comments plugin to Blogspot blogs using HTML5.


For you to add the Facebook social plugin to your blog, you will need the Facebook Application ID of the blog. If you know the ID, copy it somewhere and if you don't know it you can check the Facebook apps page.


You can read: How To Get Facebook Application ID to generate one for your blog.


Next is to log in to your Blogger dashboard, back up your template and go to "Template" > "Edit HTML"


==> Click inside the HTML and use CTRL F to find : <body


==> Directly below it, paste <div id='fb-root'/> OR <div id="fb-root"></div>


==> Open a new tab on your browser and go to www.freehtmlparser.blogspot.com

==> Copy and paste the code below inside the box on the page


<script>(function(d, s, id) {

  var js, fjs = d.getElementsByTagName(s)[0];

  if (d.getElementById(id)) return;

  js = d.createElement(s); js.id = id;

  js.src = "//connect.facebook.net/en_US/all.js#xfbml=1&appId=522587054526444";

  fjs.parentNode.insertBefore(js, fjs);

}(document, 'script', 'facebook-jssdk'));</script>


==> Carefully replace the highlighted appID with the ID of your blog

==> Click "Encode"


==> Go back to the browser tab where you have your blog HTML


==> Copy and Paste the encoded script directly below the  <div id='fb-root'/>


==> Now, your html should look similar to the screenshot below:


==> Click "Save Template"


==> Click inside the HTML and use CTRL F to find :


<div class='post-footer-line post-footer-line-3'>


 OR


<div class='post-footer-line post-footer-line-3'/>


 OR


<data:post.body/>


==> Directly below it, paste this code : 


<b:if cond='data:blog.pageType == &quot;item&quot;'>

<p align='center'>

<img alt='' class='icon-action' src='https://blogger.googleusercontent.com/img/b/R29vZ2xl/AVvXsEi_i6bwzBUZd9Uko4OfIk0eV0Ha_mVxz0ilZamN1zUwGZk8zGzmQPKDQdp_eN7V84Fy_JWK3bzTV91J7y4YESw5gL7iz8ESDXRbHrLVuPxrSPfbphKoUtZtJM3Nfc0ZpvOFSilCo_0IGMLT/s1600/cmds.png'/> </p>

<div style='text-align: center;'>

<div class="fb-comments" expr:href='data:post.url' data-width="100%" data-numposts="10" data-colorscheme="light"></div></div>

</b:if>


==> Click "Save Template"


That's all.


Check out the desktop view (not Mobile View) of any post on your blog and you should see the comment form below the post.


Please, let me know if it works for you.


Also use the comment form to let me know if you face some challenges.


Please, SHARE this with friends.


Cheers!


Subscribe to this blog if you don't want to miss my tutorials on how to add Facebook comment form to Blogger mobile templates and how to receive notifications On Facebook when anyone comments on your blog, using the Facebook comment form. 

Wednesday 12 March 2014

SEO Starter Guide by Google : Free pdf eBook Of The Week

Last week, I shared a free Microsoft Excel pdf guide to launch the Free eBook per week freebie on this blog. This week, I've decided to share with you, for free, the Search Engine optimization Starter Guide compiled by Google.


If you are interested in increasing the traffic your site gets from search engines, then you must download, read and implement all you read from the guide. Small modifications to your site or content could have a noticeable impact on your site's user experience and performance in organic search results.


This Google SEO book is world widely distributed by top Pro Bloggers and SEO analysts. It contains a lot of SEO optimization tips for guaranteed SEO . They include:


==> how to create unique, accurate page titles

==> how to improve the structure of your URLs

==> how to make your site easier to navigate

==> how to optimize the use of images

==> how to write better anchor text

==> how to use heading tags appropriately

==> how to make effective use of robots.txt

==> how to notify Google of mobile sites

==> how to guide mobile users accurately

==> how to promote your website in the right ways

==> how to make use of free webmaster tools

 etc..


Google Seo starter guide
Google SEO eBook


How To Download The Google SEO eBOOk


==> Go to the Free eBooks Page here and do the needful. follow the instruction on the page.


That's all.


Apart from the 32-pages Starter guide, you will also download Google's One page SEO ebook for free at the page.


Have fun!

Tuesday 11 March 2014

Embed Soundcloud Free Music Player On Blogger In Easy Steps

If you are a music blogger, you can easily add Soundcloud widget to your blog to enable your blog readers play and listen to latest music on your blog. This Soundcloud music player widget for websites is an alternative to the Hulkshare music player for websites I shared sometimes ago.


SoundCloud is an online audio distribution platform that enables sound creators to upload, record, promote and share their originally-created sounds. If you are a music lover, the site makes it easy to share uploaded songs with your friends on Facebook, Twitter and via your blog.


In this post, I'm sharing with you, how to add the Soundcloud embeddable music player to Blogger/Blogspot blogs using the Soundcloud widget embed code.


Below is the "Drunk in Love remix" by Beyonce ft Kanye West and JayZ ;  to show you a sample of what an embedded mp3 from Soundcloud will look like on your Blogger blog.


How To Add Soundcloud Widget To Blogger


Let's get started.


==> Go to www.soundcloud.com


==>  Search Soundcloud playlists, tracks etc for the song you want to embed


==> Once you see the music track in the search results, click on the "Share" link under the track


==> A new window like the one below will pop up.


Soundcloud widget


==> Click on "Embed".  You will now see the Souncloud code to embed in your blog post.


soundcloud embed code


==> Copy and paste it somewhere eg in a Notepad.


==> Log in to www.blogger.com dashboard and create a New Post.


==> Give the post a title, write the content and paste the code inside the post editor.


==> Click the "Options" icon at the right hand side of the Post Editor.  Select "Interpret typed HTML" and click Done.


==> Click on the "Preview" button


==> If it works fine and can see the Soundcloud music player, click "Publish".


That's all.


Let me know if it works for you.


Kindly SHARE this with friends.


Questions? Contributions? Kindly relay them via comments.


How To Make Adsense Show After Posts On Blogger Mobile View

Earlier, I shared a tutorial on how to add Adsense ad below post titles on Blogger mobile templates. In this tutorial, I am sharing with you, how to add Adsense ads after each blog post on the mobile view of your Blogspot blog.


Readers of your blog posts are more likely to click on ads after reading
your post. Hence, I recommend you add an ad unit right after each post.


Ads added below each post on the desktop view of your Blogger blog won't
show by default on the mobile view. You have to enable "custom" mobile
template and add the ad code to the HTML of the Blogger mobile template.


Below is a 300x250 Adsense ad showing after my blog post on the mobile view of  OgbongeBlog:


Adsense under blog post


Let's get started 


==> Log in to www.google.com/adsense to generate the Adsense code for the ad unit you want to add to the mobile view. eg 300x250 Medium Rectangle ad size.

Now, we need to parse the ad code.

==> Go to http://www.freehtmlparser.blogspot.com/
==> Copy and paste your ad code inside the box and click the "Encode" button
==> Copy and paste the code somewhere eg in a notepad

==> Ensure you have enabled CUSTOM Blogger mobile template. If not sure, login to your Blogger dashboard, go to "Template". Under "Mobile", select "Yes. Show mobile template on mobile devices" and choose "Custom" from the "choose mobile template" dropdown box and save your settings.

==> Now, we need to find the code for the Blogger Mobile Template Post title so we can place the Adsense code directly below it.

==> So, back up your template and go to "Template" > "Edit HTML"

==> Click inside the HTML and use CTRL F to find the code below:


<b:if cond='data:top.showMobileShare'>


==> Directly above it, paste the parsed Adsense code.


Save your template.


View one of your blog
posts on mobile view using default browser of your mobile device (NOT
Opera Mini) and you should see the ad after each blog post on POST pages
(Not on the homepage).


NBYou can place any ad code there be it AdDynamo, Infolink, media.net ad etc If you also want to add share buttons to your Blogger mobile template, you can also paste the codes of the buttons there.


You can access the mobile view of your Blogger post on PC by adding ?m=1 at the end of the post URL.


Try it and let me know if it works for you.


PLEASE, Share this with your friends.


Questions? Contributions? Kindly relay them via comments.


Recommended: How to Add Adsense Below Post Titles on Blogger Desktop View

Sunday 9 March 2014

Add a Custom jQuery Lightbox To Blogger

If you are not satisfied with the default Lightbox set up by Blogger, here's another amazing way to show off your pictures. If you've missed out, I have already shown in one of my posts how to customize the Blogger Lightbox by changing the background color, borders or the text color, but this tutorial will show you how to replace it entirely with a cool jQuery Lightbox plugin that is very popular among bloggers.

What this Lightbox does, is to display larger versions of the images that will pop-up into a larger box once we click on them, and allows us to easily navigate through that set of photos by using the previous and next buttons.

jquery lightbox, blogger plugins

To see it in action, please visit the following demo blog and click on any picture to enlarge it.


Adding jQuery Lightbox to Blogger

Step 1. From your Blogger Dashboard, click on Template > Edit HTML

blogger edit html

Step 2. Click anywhere on the code area and press the CTRL + F keys to open the search box. Paste the following tag inside the search box and hit Enter to find it:
]]></b:skin>
Step 3. Choose one of the Lighbox styles from below and paste the CSS code just above the aforementioned ]]></b:skin> tag:

Custom Blogger Lightbox with White Background


jquery lightbox white
#jquery-overlay{position:absolute;top:0;left:0;z-index:90;width:100%;height:500px;}
#jquery-lightbox{position:absolute;top:10%;left:0;width:100%;z-index:100;text-align:center;line-height:0;}
#jquery-lightbox a,#jquery-lightbox a:hover{border:none;}
#jquery-lightbox a img{border:none;}
#lightbox-container-image-box{position:relative;background-color:#fff;max-width: 960px;max-height: 560px;margin:0 auto;}
#lightbox-container-image{padding:10px;}
img#lightbox-image {max-height: 540px;max-width: 940px;}
#lightbox-loading{position:absolute;top:40%;left:0%;height:25%;width:100%;text-align:center;line-height:0;}
#lightbox-nav{position:absolute;top:0;left:0;height:100%;width: 100%;z-index:10;}
#lightbox-container-image-box > #lightbox-nav{left:0;}
#lightbox-nav a{outline:none;}
#lightbox-nav-btnPrev,#lightbox-nav-btnNext{width:49%;height:100%;zoom:1;display:block;}
#lightbox-nav-btnPrev{left:10%;float:left;}
#lightbox-nav-btnNext{right:10%;float:right;}
#lightbox-container-image-data-box{font:10px Verdana,Helvetica,sans-serif;background-color:#fff;margin:0 auto;line-height:1.4em;overflow:auto;max-width: 940px;;padding:0 10px 0;}
#lightbox-container-image-data{padding:0 10px;color:#555;}
#lightbox-container-image-data #lightbox-image-details{width:70%;float:left;text-align:left;}
#lightbox-image-details-caption{font-weight:bold;}
#lightbox-image-details-currentNumber{display:block;clear:left;padding-bottom:1.0em;}
#lightbox-secNav-btnClose{width:66px;float:right;padding-bottom:0.7em;}

Custom Blogger Lightbox with Dark Background:


jquery lightbox dark
#jquery-overlay{position:absolute;top:0;left:0;z-index:90;width:100%;height:500px;}
#jquery-lightbox{position:absolute;top:10%;left:0;width:100%;z-index:100;text-align:center;line-height:0}
#jquery-lightbox a,#jquery-lightbox a:hover{border:none}
#jquery-lightbox a img{border:none;}
#lightbox-container-image-box{position:relative;background-color:#000;max-width: 960px;max-height: 560px;margin:0 auto}
#lightbox-container-image{padding:10px;}
img#lightbox-image {max-height: 540px;max-width: 940px;}
#lightbox-loading{position:absolute;top:40%;left:0%;height:25%;width:100%;text-align:center;line-height:0}
#lightbox-nav{position:absolute;top:0;left:0;height:100%;width: 100%;z-index:10}
#lightbox-container-image-box > #lightbox-nav{left:0;}
#lightbox-nav a{outline:none}
#lightbox-nav-btnPrev,#lightbox-nav-btnNext{width:49%;height:100%;zoom:1;display:block}
#lightbox-nav-btnPrev{left:10%;float:left}
#lightbox-nav-btnNext{right:10%;float:right}
#lightbox-container-image-data-box{font:10px Verdana,Helvetica,sans-serif;background-color:#000;margin:0 auto;line-height:1.4em;overflow:auto;max-width: 940px;;padding:0 10px 0}
#lightbox-container-image-data{padding:0 10px;color:#fff}
#lightbox-container-image-data #lightbox-image-details{width:70%;float:left;text-align:left}
#lightbox-image-details-caption{font-weight:bold}
#lightbox-image-details-currentNumber{display:block;clear:left;padding-bottom:1.0em}
#lightbox-secNav-btnClose{width:66px;float:right;padding-bottom:0.7em}
Step 4. Now find the following tag and just above it, add the below scripts:
</head>

Script for Lightbox with White Background:

   <script src='http://ajax.googleapis.com/ajax/libs/jquery/1/jquery.min.js' type='text/javascript'/>
    <script src='http://helplogger.googlecode.com/svn/trunk/custom-lightbox-for-blogger.js' type='text/javascript'/>

Script for Lightbox with Dark Background:

<script src='http://ajax.googleapis.com/ajax/libs/jquery/1/jquery.min.js' type='text/javascript'/>
    <script src='http://helplogger.googlecode.com/svn/trunk/custom-lightbox-for-blogger-black.js' type='text/javascript'/>
Step 5. Click on the "Save template" button to save the changes.

Finally, we need to disable the original Blogger Lightbox so that it doesn't interfere with this one that we just added: go to "Settings" > "Posts and comments" and on the right side, you will see the "Showcase images with Lightbox" section > select "No" and click on the "Save settings" button on the upper right side.

disable blogger lightbox

Now, view your blog and click on any image to see this Custom Blogger Lightbox in action. Enjoy!

How to Use Cookies in Javascript

Each time we visit a website, cookies can be stored to 'remember' things that we do while browsing a page. This may happen, for example, when we visit a page where we have to login with an username and a password. In this case, after verifying that the login is correct, usually a cookie is recorded on our computer.

An example would be the popular page of Google. This search engine allows users to choose how many search results they want to see on each page. Thanks to a cookie, this configuration remains unchanged for each computer, even after rebooting several sessions. Despite this, it is good to remove them from time to time because, although, some will expire being erased automatically after a while, some of them will never do so.
cookies with javascript, blogger tricks

Like many other things, cookies may suffer a poor use and hence their bad reputation. For instance, some websites can store and study the browsing habits of a user without their knowledge. This is why most browsers already include a system to filter them and can decide if they will provide some privacy or not.

If you want to see a live example of how a cookie works, please visit this page and refresh it a few times. You should get an alert window telling you about how many times you visited the page.
(script source: javascriptkit.com)

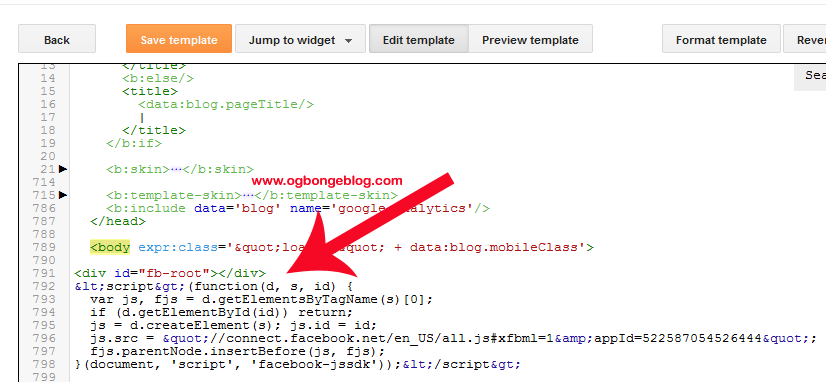
There could be other ways to use cookies but a server could do this with JavaScript. Below we have a simple script that can be used as many times we want, even for different purposes. Basically, what the following script does is to create three functions: the first one is to set a cookie, the second one is to read it, and the last one is to erase it. We can apply it in Blogger by accessing the template HTML and add it just before the </head> tag:
<script type='text/javascript'>
//<![CDATA[

// Set cookie
function setCookie(name, value, expires, path, domain, secure) {
document.cookie = name + "=" + escape(value) +
((expires == null) ? "" : "; expires=" + expires.toGMTString()) +
((path == null) ? "" : "; path=" + path) +
((domain == null) ? "" : "; domain=" + domain) +
((secure == null) ? "" : "; secure");
}

// Read cookie
function getCookie(name){
var cname = name + "=";
var dc = document.cookie;
if (dc.length > 0) {
begin = dc.indexOf(cname);
if (begin != -1) {
begin += cname.length;
end = dc.indexOf(";", begin);
if (end == -1) end = dc.length;
return unescape(dc.substring(begin, end));
}
}
return null;
}

//delete cookie
function eraseCookie (name,path,domain) {
if (getCookie(name)) {
document.cookie = name + "=" +
((path == null) ? "" : "; path=" + path) +
((domain == null) ? "" : "; domain=" + domain) +
"; expires=Thu, 01-Jan-70 00:00:01 GMT";
}
}

//]]>
</script>
Once done, in order to set a cookie, we only need to put the name and the value in quotes when we call the function. Additionally, we will set the expiry date by getting the current Time (in milliseconds) and add the required number of minutes (in milliseconds):
var expiration = new Date();
expiration.setTime(expiration.getTime() + 10000); //Expire after 10 seconds
setCookie("cookiename","hello",expiration);
}
The above code sets a cookie called cookiename, with the hello value and set its expiry date to 10 seconds after it has been set (10000 milliseconds = 10 seconds). If we want to restore the value of this cookie, then we should use the second function with the cookie name:
var checkCookie = getCookie("cookiename");
By adding this code below <body>, we created a cookie with the value 'hello' which can be shown on the screen if we want to. The cookie will disappear after 10 seconds:
<script type='text/javascript'>
var expiration = new Date();
expiration.setTime(expiration.getTime() + 10000);
setCookie("cookiename","hello",expiration);
var checkCookie = getCookie("cookiename");
document.write(checkCookie);
</script>
The erase function is used in the same way as the one for reading just by clicking on the name of the cookie. The setCookie values for 'domain' and 'secure' are not utilized. Use 'domain' on the Javascript cookie if you are using it on a subdomain, where the cookie is set on the widgets subdomain, but you need it to be accessible over the whole yoursite.com domain.

The combination of these three functions will allow us to handle cookies for specific purposes, as we will see in the near future.

Facebook Feed Dialog Tutorial

Feed Dialog is one of the sharing options provided by Facebook for webpages. It prompts a person to share an individual story to a profile's timeline without the need of extended permissions. It's the backbone of the "share on Facebook to download" concept on my Free eBooks page. You can also use it to post to Facebook with a "via my blog name" link.


Unlike the Facebook Share Dialog, the Feed Dialog lets you customize how you want your story or update to appear after sharing it on Facebook. You can specify the Facebook feed dialog picture, title (name), caption, description etc. You can even specify how the dialog should be rendered eg Facebook feed dialog popup.


For you to integrate Facebook Feed Dialog with your website, you will need the Facebook App ID of the site.


If you don't know the Facebook App ID of your site, read: How To Get Facebook Application ID and Secret Key.


Facebook Feed Dialog Example


In this Facebook dialog tutorial, I will show you how to create a dialog like the one below:


facebook feed dialog with link


==> Edit the Facebook Feed dialog URL below with your appID.


https://www.facebook.com/dialog/feed?

  app_id=150436614997987

  &display=page

  &description=Free eBooks are available for download on this page every week. Click this link to get yours!

  &link=http://www.ogbongeblog.com/p/free-ebooks.html

  &redirect_uri=http://www.facebook.com

  &name=Download Free EBooks Every Week

  &picture=https://blogger.googleusercontent.com/img/b/R29vZ2xl/AVvXsEiefIWHpD39NaeVyOW3EEwMmOaspRdYju_vQmsfAZmszwQ1wm0kuse7ZDdi82Dv_CVUatRqlnGpVhEW-CzedN6sNvt7wsydVBr3PX7_YY8MndABDqwTt12HWIeN0THXUrwPb1LCg1W5s_tw/s1600/free_ebook2.jpg


Also carefully change the description, link, name as desired. Also change the Facebook feed dialog picture to a link that links to a picture you want to use.


You can change the Facebook Feed dialog redirect_uri from www.facebook.com to a link that links to a page on your site.


Once you are through with the editing, copy and paste it in your browser address bar and hit "enter" or "OK". You should see a dialog similar to the screenshot above.


If you prefer a caption to replace the link under the title (name), you can use the URL below.


https://www.facebook.com/dialog/feed?

  app_id=150436614997987

  &display=page

  &description=Free eBooks are available for download on this page every week. Click this link to get yours!

  &link=http://www.ogbongeblog.com/p/free-ebooks.html

  &redirect_uri=http://www.facebook.com

  &name=Download Free EBooks Every Week

  &picture=https://blogger.googleusercontent.com/img/b/R29vZ2xl/AVvXsEiefIWHpD39NaeVyOW3EEwMmOaspRdYju_vQmsfAZmszwQ1wm0kuse7ZDdi82Dv_CVUatRqlnGpVhEW-CzedN6sNvt7wsydVBr3PX7_YY8MndABDqwTt12HWIeN0THXUrwPb1LCg1W5s_tw/s1600/free_ebook2.jpg

  &caption=Email, Phone Number NOT required!


Take note of the caption parameter.


This will generate a dialog similar to the one below:


facebook field dialog with caption


You will notice that the link has been replaced by the caption.


That's all.


You can customize it further using the Facebook feed dialog parameters.


To create "share to download" with this, shorten the URL, then link a Facebook Share icon to the shortened URL as seen here.


I hope this helps.


If you've got questions, contributions etc kindly relay them via comments.


Cheers!

Saturday 8 March 2014

How To Get Facebook Application ID and Secret Key

If you look closely at the Facebook Javascript SDK generated whenever you generate the code for Facebook Like box/button and other Facebook social plugins, you will notice there is a line that contains an appID. The Facebook App ID is required if you want to integrate your site with Facebook Open Graph and Facebook Insights. 


If you also want to implement a "share on Facebook to download" trick on your blog, you will also need a Facebook application ID. It's also a must-have if you want something like "Via Ogbongeblog" to be displayed in your Facebook status.


So, in this tutorial, I am showing you how to create a Facebook application to get an app ID for your blog or website.


How To Create Facebook Application


==> Go to : developers.facebook.com/setup/

==> Click on the "Create New App" button


create facebook application


==> Enter your blog/site name in the "Display Name" field

==> Leave "NameSpace" blank

==> From the "Category" drop down menu, select a category for your blog site eg Entertainment

==> Click the "Create App" button


A security check might pop up asking you to enter the displayed captcha. Enter the displayed text and click "submit". If entered correctly, you will be redirected to the dashboard of your new app which will look similar to the screenshot below;


facebook application dashboard


Take note of the AppID. You can write it down or save it somewhere you can easily access.


For the purposes of this tutorial, you won’t need your “App Secret” value.


facebook application settings


==> Click on "Settings" > "+Add Platform"


facebook application platforms


==> Select "Website" from the options. This will open up a new field as seen below:


facebook application site url


==> Enter the URL of your blog/site in the "Site URL" and "Mobile Site URL" fields as seen above.


==> Click the "Save Changes" button


==> Scroll up and enter your domain name in the "App Domains" field


facebook application app domains


==> Enter your email address in the "Contact Email" field.

==> Click the "Save Changes" button.


Now, we need to change the status of the app from development mode to public.


==> Click on "Status & Review"

==> Click on the blank tab besides "NO" to change it to "Yes"


facebook application status


A confirmation window will pop up. Click on the "confirm" button.


That's all.


You can click on "App details" to add description, icons, banners, contact info and demo video.


You can see all your Facebook apps at : https://developers.facebook.com/apps/ You can click on any app on the page to see the app's ID.


I hope this helps.


Recommended: How To Add Facebook Comment Form to Blogspot Blogs


How to Add CSS code To Blogger using Template Designer

If you are having difficulties adding the CSS codes in a Blogger template, here's a short guide that will show you a more practical and fast way to add CSS (Cascading Style Sheets) so that it will be easier for you to customize your blog.

Some readers have complained that when they had to add the CSS codes to install some feature in Blogger, they found it difficult to locate the ]]></b:skin> tag. So, I decided to make this quick tutorial to show you another way of adding the CSS without having to access the Blogger HTML editor.

Adding CSS via the Blogger Template Designer

Step 1. Log in to your Blogger account and select the blog that you want to customize.

Step 2. From the Blogger dashboard, choose "Template" and click on the "Customize" button.


Step 3. Click on the "Advanced" tab.

Step 4. Now just add your CSS code inside the right field, located in the "Add CSS" tab (if you have more options, you may need to scroll down the list). Here you can add any CSS code when you want to apply a new style to your template.


Step 5. Once added, click on the "Apply to blog" button to save the changes.

Following this method, you can't edit the existing CSS styles already added in your template which will require to access the template's HTML and make the modifications there. Here, you can only add new styles and edit the existing styles added through the Template Designer panel.

It's important to mention that when adding the CSS styles, it isn't required to put the <style type="text/css"> ... </style> style tags, which normally would go above the </head> tag of the template html. Adding those tags may result in an error.

If you change the template, the CSS added here will be removed. The same goes for any other additions or CSS customizations made ​​through the Template HTML editor.

Unable To Add App Domains To New Facebook Application? Try This Fix

While trying to get a Facebook App ID for a site yesterday, I noticed that the way I create new Facebook applications has changed. "App Domains" field has been added to the basic app settings page while the "Site URL" field is no longer visible until you add a new platform.


You must add a new platform before you can enter your domain name in the "App "Domains" field, if not, it will not save and it will display the error message below:


This must be derived from Canvas URL, Secure Canvas URL, Site URL, Mobile Site URL, Page Tab URL or Secure Page Tab URL.


To fix the problem, click on the "+Add Platform" tab on the App Settings page. Select "Website" if you want to get App ID for your site or blog. Thereafter, you will see the "Site URL" and "Mobile Site URL" fields where you can enter your site URL as seen below:


After saving the settings, you can then enter your domain name in the "App Domains" field as seen above. If you now save the settings, it will save successfully.


That's all.


Friday 7 March 2014

How To Download Feedburner Email List

Your blog can also act as a free email list generator if you activate Feedburner email subscriptions and add the Feedburner email subscription box to your blog. I've been using the Feedburner newsletter email service for some years now and it has really been helpful in building email lists for free from my blogs.


If you use Feedburner to email newsletters to your blog readers, you can get the list of emails of your subscribers when you sign in to your Feedburner account. Feedburner even offers csv email list download thereby making it possible for you to carry out email marketing using your csv email list.


To download the email list of your Feedburner email subscribers, follow me through the steps below:


    ==> Sign in to FeedBurner.com

    ==> Click on the name of your feed.

    ==> Click the "Analyze" tab.

    ==> Click on "Subscribers" under "Feed Stats"

    ==> Click on "FeedBurner Email Subscriptions"

    ==> Click on "Manage Your Email Subscriber List"

    ==> Click on the "CSV" link beside "Export"


You will be prompted to save the csv file.


That's all.

PLACE YOUR ADS HERE